Introduction
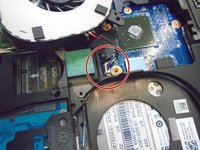
The cooling fan may need to be replaced if the laptop is over heating. Sometimes the fan just may need to be clean, so be sure to clean the cooling fan before buying a new one.
Ce dont vous avez besoin
-
-
Remove the five strews that are holding the back cover down.
-
Firmly grasp the laptop and slide the cover to the front, then lift.
-
-


To reassemble your device, follow these instructions in reverse order.
To reassemble your device, follow these instructions in reverse order.
Annulation : je n'ai pas terminé ce tutoriel.
2 autres ont terminé cette réparation.

Équipe

The Citadel Military College of South Carolina, Team S2-G6, Eggleston Spring 2019 Membre de l'équipe The Citadel Military College of South Carolina, Team S2-G6, Eggleston Spring 2019
CMCSC-EGGLESTON-S19S2G6
3 membres
1 tutoriel rédigé