Aller au contenu principal

Dell XPS 15 9510 Hinges Replacement

Ce dont vous avez besoin

  1. Dell XPS 15 9510 Hinges Replacement, Lower Case: étape 1, image 1 de 1
    • Make sure the laptop is powered off and unplug all cables before beginning any repair.

    • Remove eight 3 mm screws from the underside of the case using a T5 Torx screwdriver.

  2. Dell XPS 15 9510 Hinges Replacement: étape 2, image 1 de 1
    • The metal case of the XPS 15 9510 is extremely sharp, so be careful not to run your fingers along the edge when disassembling the laptop.

    • Wedge the case apart with a nylon spudger.

    • If the plastic one isn't possible to insert, use the metal spudger to carefully create a small gap first.

    • Slide spudger along each side of the laptop

  3. Dell XPS 15 9510 Hinges Replacement: étape 3, image 1 de 1
    • The metal case of the XPS 15 9510 is extremely sharp, so be careful not to run your fingers along the edge when disassembling the laptop.

    • Lift the back panel of the laptop off and set it aside.

  4. Dell XPS 15 9510 Hinges Replacement, Battery: étape 4, image 1 de 2 Dell XPS 15 9510 Hinges Replacement, Battery: étape 4, image 2 de 2
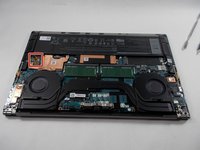
    • Using the small battery pull tab, disconnect the battery connector from the motherboard.

  5. Dell XPS 15 9510 Hinges Replacement: étape 5, image 1 de 1
    • Remove eight 2.5 mm from around the perimeter of the battery using a Phillips #0 screwdriver.

  6. Dell XPS 15 9510 Hinges Replacement: étape 6, image 1 de 2 Dell XPS 15 9510 Hinges Replacement: étape 6, image 2 de 2
    • There are many delicate components in the vicinity of the battery, so be extremely careful removing it

    • Remove the old battery from the laptop.

  7. Dell XPS 15 9510 Hinges Replacement, Display Assembly: étape 7, image 1 de 1
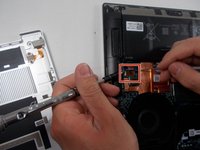
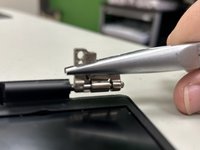
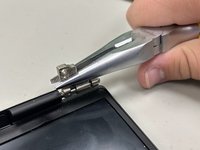
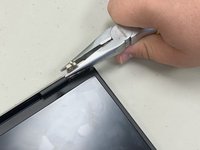
    • Remove the four screws (eight total) from each display hinge using a Phillips #00 screwdriver.

  8. Dell XPS 15 9510 Hinges Replacement: étape 8, image 1 de 1
    • Remove five screws that connect the display using a Phillips #00 screwdriver.

  9. Dell XPS 15 9510 Hinges Replacement: étape 9, image 1 de 1
    • Carefully remove the display from the Dell XPS 15 9510.

  10. Dell XPS 15 9510 Hinges Replacement, Hinges: étape 10, image 1 de 2 Dell XPS 15 9510 Hinges Replacement, Hinges: étape 10, image 2 de 2
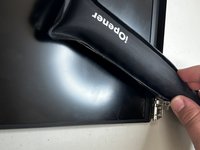
    • Heat the iOpener in the microwave for 30 seconds.

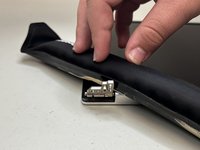
    • Place the iOpener on top of the laptop where the hinge is connected. Leave it there until the glue holding it in place melts.

  11. Dell XPS 15 9510 Hinges Replacement: étape 11, image 1 de 3 Dell XPS 15 9510 Hinges Replacement: étape 11, image 2 de 3 Dell XPS 15 9510 Hinges Replacement: étape 11, image 3 de 3
    • Pull out the hinges using a pair of needle nose pliers.

Conclusion

To reassemble your device, follow these instructions in reverse order.

Haley H.

Membre depuis le 09/23/24

85 Réputation

1 tutoriel rédigé

Équipe

0 commentaires

Ajouter un commentaire

Nombre de vues :

Dernières 24 heures : 0

7 derniers jours : 16

30 derniers jours : 29

Total : 68