Aller au contenu principal

DigiTech RP70 Input/Output ¼” Ports Replacement

Ce dont vous avez besoin

  1. DigiTech RP70 Input/Output ¼” Ports  Replacement, Motherboard: étape 1, image 1 de 2 DigiTech RP70 Input/Output ¼” Ports  Replacement, Motherboard: étape 1, image 2 de 2
    • Unplug the device from its AC power adapter; unplug anything connected to the input/output jacks.

    • Remove the four 8mm Phillips #0 screws located on the back panel.

  2. DigiTech RP70 Input/Output ¼” Ports  Replacement: étape 2, image 1 de 2 DigiTech RP70 Input/Output ¼” Ports  Replacement: étape 2, image 2 de 2
    • Remove the back panel to expose the motherboard.

  3. DigiTech RP70 Input/Output ¼” Ports  Replacement: étape 3, image 1 de 1
    • Remove the two 11mm #0 Phillips screws located at the bottom of the motherboard.

  4. DigiTech RP70 Input/Output ¼” Ports  Replacement: étape 4, image 1 de 1
    • Lift the indented end of the motherboard opposite the input/output jacks. Then, pull away from the input/output jacks to slide the motherboard out of the casing.

  5. DigiTech RP70 Input/Output ¼” Ports  Replacement, Input/Output ¼” Ports: étape 5, image 1 de 2 DigiTech RP70 Input/Output ¼” Ports  Replacement, Input/Output ¼” Ports: étape 5, image 2 de 2
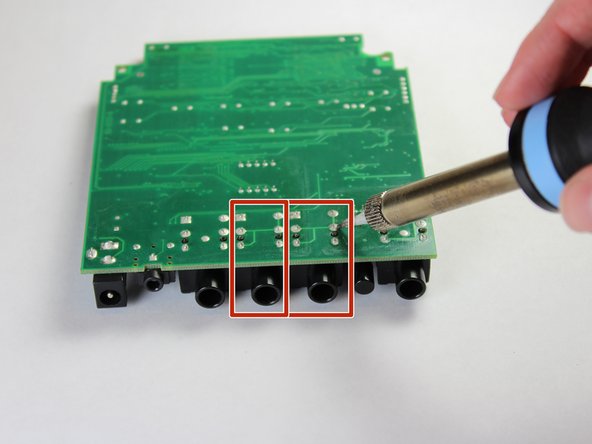
    • Desolder the back of the motherboard where the damaged input/output port is located.

Conclusion

To reassemble your device, follow these instructions in reverse order.

Une autre personne a terminé cette réparation.

Elijah Smith

Membre depuis le 09/10/18

738 Réputation

6 tutoriels rédigés

0 commentaires

Ajouter un commentaire

Nombre de vues :

Dernières 24 heures : 0

7 derniers jours : 6

30 derniers jours : 11

Total : 312