Aller au contenu principal

Disassembling 8BitDo Pro 2 Wired Joystick Board

Ce dont vous avez besoin

  1. Disassembling 8BitDo Pro 2 Wired Joystick Board, Remove R2 and L2 pads: étape 1, image 1 de 2 Disassembling 8BitDo Pro 2 Wired Joystick Board, Remove R2 and L2 pads: étape 1, image 2 de 2
    • Remove both pads by pushing them up.

  2. Disassembling 8BitDo Pro 2 Wired Joystick Board, Remove T6 Screws: étape 2, image 1 de 1
    • Remove both Torx T6 screws from the back.

  3. Disassembling 8BitDo Pro 2 Wired Joystick Board, Open the controller: étape 3, image 1 de 3 Disassembling 8BitDo Pro 2 Wired Joystick Board, Open the controller: étape 3, image 2 de 3 Disassembling 8BitDo Pro 2 Wired Joystick Board, Open the controller: étape 3, image 3 de 3
    • With an opening pick, detach the seven clips holding the faceplate. Start from the sides, towards the bottom.

    • Detach the remaining clips by carefully raising the faceplate away from the clips.

    • A flex cable joins both plates.

    • Move the faceplate to the side.

  4. Disassembling 8BitDo Pro 2 Wired Joystick Board, Remove the flex cable: étape 4, image 1 de 1
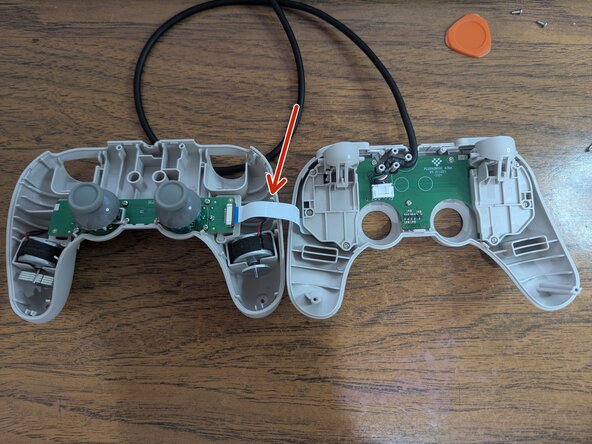
    • Push the sides of the connector away from it to free the cable.

  5. Disassembling 8BitDo Pro 2 Wired Joystick Board, Remove the #0 screws: étape 5, image 1 de 1
    • Remove the 8 screws using a Phillips #0 screwdriver.

    • You can remove the joystick caps by lifting them.

  6. Disassembling 8BitDo Pro 2 Wired Joystick Board, Remove the board: étape 6, image 1 de 2 Disassembling 8BitDo Pro 2 Wired Joystick Board, Remove the board: étape 6, image 2 de 2
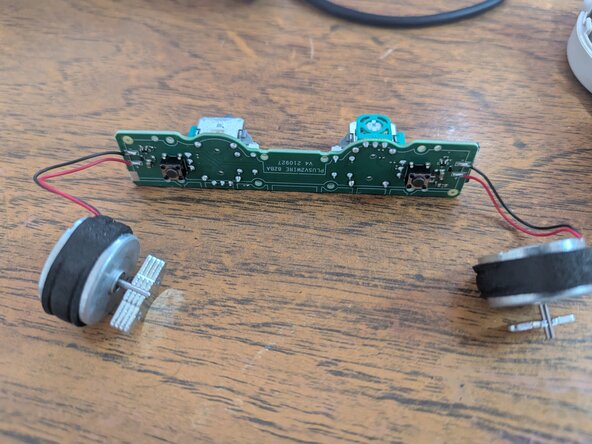
    • Slowly lift the board from the controller. Make sure to lift both rumble motors as well.

Conclusion

To reassemble your device, follow these instructions in reverse order.

Adrián

Membre depuis le 01/22/23

173 Réputation

1 tutoriel rédigé

0 commentaires de tutoriel

Ajouter un commentaire

Nombre de vues :

Dernières 24 heures : 2

7 derniers jours : 21

30 derniers jours : 90

Total : 443