Aller au contenu principal

Ce tutoriel a des changements plus récents. Passer à la dernière version non vérifiée.

Disassembling Cambridge Audio A3i Case

Ce dont vous avez besoin

  1. Disassembling Cambridge Audio A3i Case, Case: étape 1, image 1 de 1
    • Remove 2 screws from each side of the amplifier.

  2. Disassembling Cambridge Audio A3i Case: étape 2, image 1 de 1
    • Remove 2 screws on rear of device. Slide top cover up and back from main case.

  3. Disassembling Cambridge Audio A3i Case: étape 3, image 1 de 2 Disassembling Cambridge Audio A3i Case: étape 3, image 2 de 2
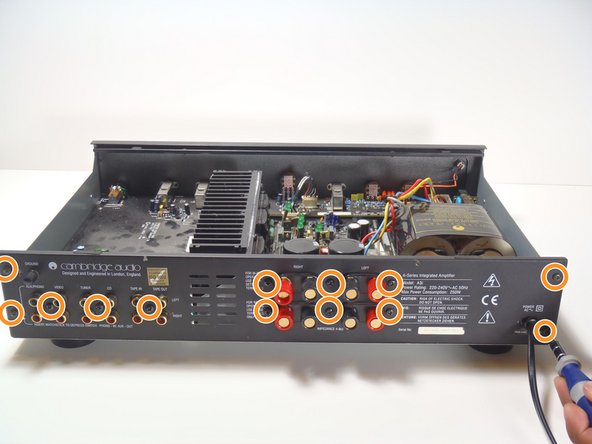
    • Remove 3 screws on bottom of case.

    • Remove 13 screws on rear panel.

    • Do not move the rear panel too far, as the power cord is still connected.

  4. Disassembling Cambridge Audio A3i Case: étape 4, image 1 de 1
    • Using a pair of pliers, squeeze the retainer for the power cord as shown and pull it toward the external side the panel.

    • It may require some wiggling, but it should slip out of the hole and then off of the cord.

Conclusion

To reassemble your device, follow these instructions in reverse order.

3 autres ont terminé cette réparation.

Colby

Membre depuis le 04/15/10

338 Réputation

3 tutoriels rédigés

Équipe

Cal Poly, Team 28-36, Regan Spring 2010 Membre de l'équipe Cal Poly, Team 28-36, Regan Spring 2010

CPSU-REGAN-S10S28G36

4 membres

3 tutoriels rédigés

0 commentaires

Ajouter un commentaire

Nombre de vues :

Dernières 24 heures : 0

7 derniers jours : 3

30 derniers jours : 11

Total : 4,117