Aller au contenu principal

Disassembling Flip Video USB Port

Ce dont vous avez besoin

  1. Disassembling Flip Video USB Port, Outer Shell: étape 1, image 1 de 2 Disassembling Flip Video USB Port, Outer Shell: étape 1, image 2 de 2
    • Turn off the device and take the batteries out.

    • Remove metal sticker under the LCD screen with a spudger.

    • This may require a large force to pry off the glued sticker.

  2. Disassembling Flip Video USB Port: étape 2, image 1 de 1
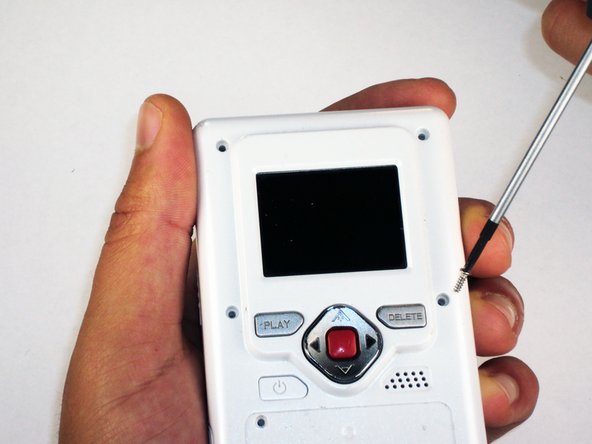
    • Remove the 4 gray screw caps with the spudger. These cover the screw heads and protect from dirt or grime.

  3. Disassembling Flip Video USB Port: étape 3, image 1 de 2 Disassembling Flip Video USB Port: étape 3, image 2 de 2
    • Remove the 5 10mm screws with the #00 Phillips screwdriver. These connect the back of the outer shell to the front of the outer shell.

  4. Disassembling Flip Video USB Port: étape 4, image 1 de 1
    • Open battery door. This can be done by gently depressing and sliding the battery down downward.

  5. Disassembling Flip Video USB Port: étape 5, image 1 de 1
    • Use the spudger to separate outer shells.

    • The spudger must be inserted between the shell halves to pry the edges apart.

    • Slowly work around the outside to separate the halves.

  6. Disassembling Flip Video USB Port, Circuit Board: étape 6, image 1 de 1
    • Remove the 3 5mm screws securing the circuit board to the front shell with the #00 Phillips screwdriver.

  7. Disassembling Flip Video USB Port: étape 7, image 1 de 1
    • Slowly lift the left side of the circuit board.

    • Do not attempt to remove the circuit board completely yet. It is still connected to the device.

  8. Disassembling Flip Video USB Port: étape 8, image 1 de 1
    • Disconnect the USB port cable from the back side of the circuit board.

  9. Disassembling Flip Video USB Port: étape 9, image 1 de 1
    • Slide out the battery contacts.

    • Battery contacts

    • Slot where battery contacts were located

  10. Disassembling Flip Video USB Port, USB Port: étape 10, image 1 de 1
    • Remove black 3mm screw that secures wire to outer shell with #00 Phillips screwdriver.

  11. Disassembling Flip Video USB Port: étape 11, image 1 de 1
    • Lift wire out of the outer shell slot.

    • The wire mount should stay attached to the wire.

  12. Disassembling Flip Video USB Port: étape 12, image 1 de 1
    • Use tweezers to remove the spring that holds the port door shut.

    • Make sure the spring is firmly grasped by the tweezers so that it does not shoot off of the case.

  13. Disassembling Flip Video USB Port: étape 13, image 1 de 1
    • Remove the 3 screws securing USB port cover to the outer case with the #00 Phillips screwdriver.

  14. Disassembling Flip Video USB Port: étape 14, image 1 de 1
    • Remove the USB port cover.

  15. Disassembling Flip Video USB Port: étape 15, image 1 de 1
    • Remove the USB slider.

  16. Disassembling Flip Video USB Port: étape 16, image 1 de 1
    • Lift out the USB port slowly.

    • Since the hinge is spring loaded, be careful that no pieces fall out when the port is lifted.

Conclusion

To reassemble your device, follow these instructions in reverse order.

Une autre personne a terminé cette réparation.

Elizabeth

Membre depuis le 04/15/10

100 Réputation

6 tutoriels rédigés

Équipe

Cal Poly, Team 26-21, Regan Spring 2010 Membre de l'équipe Cal Poly, Team 26-21, Regan Spring 2010

CPSU-REGAN-S10S26G21

4 membres

12 tutoriels rédigés

0 commentaires

Ajouter un commentaire

Nombre de vues :

Dernières 24 heures : 0

7 derniers jours : 0

30 derniers jours : 0

Total : 4,124