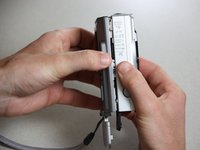
Aller au contenu principal

Disassembling the Canon PowerShot A200 Case

Ce dont vous avez besoin

  1. Disassembling the Canon PowerShot A200 Case, Disassembling the Canon PowerShot A200 Case: étape 1, image 1 de 1
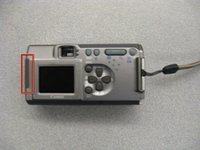
    • Use a Phillips #00 screwdriver to remove the two screws at the bottom of the camera.

  2. Disassembling the Canon PowerShot A200 Case: étape 2, image 1 de 2 Disassembling the Canon PowerShot A200 Case: étape 2, image 2 de 2
    • Locate a screw and a rubber covering on the left side of the camera. Slide the rubber covering to expose a second screw.

    • Remove both screws with the Phillips #00 screwdriver.

  3. Disassembling the Canon PowerShot A200 Case: étape 3, image 1 de 2 Disassembling the Canon PowerShot A200 Case: étape 3, image 2 de 2
    • Open the battery compartment on the right side of the camera by pushing slightly in the direction of the arrow.

    • Be sure to remove the memory card.

    • Remove the two screws by the memory card slot using the Phillips #00 screwdriver.

  4. Disassembling the Canon PowerShot A200 Case: étape 4, image 1 de 2 Disassembling the Canon PowerShot A200 Case: étape 4, image 2 de 2
    • Pull the grey tab towards the back of the camera. Lift the black cover to expose the battery slots.

    • Remove the two visible screws with the Phillips #00 screwdriver.

    • During reassembly, the holes for these screws must align properly with the interior of the camera body. Then the black battery cover must lie flat and be held in place by the grey tab.

  5. Disassembling the Canon PowerShot A200 Case: étape 5, image 1 de 2 Disassembling the Canon PowerShot A200 Case: étape 5, image 2 de 2
    • Remove the screen battery located to the left of the screen.

  6. Disassembling the Canon PowerShot A200 Case: étape 6, image 1 de 2 Disassembling the Canon PowerShot A200 Case: étape 6, image 2 de 2
    • Gently pull the camera apart from the top.

    • Be careful. The two halves are still attached by two short ribbons at the bottom of the camera.

  7. Disassembling the Canon PowerShot A200 Case: étape 7, image 1 de 2 Disassembling the Canon PowerShot A200 Case: étape 7, image 2 de 2
    • Locate the black tabs on either side of the white ribbon.

    • Use the metal tweezers to gently move these tabs to the outside edges of the ribbon.

    • Gently pull the white ribbon out from its connection.

  8. Disassembling the Canon PowerShot A200 Case: étape 8, image 1 de 3 Disassembling the Canon PowerShot A200 Case: étape 8, image 2 de 3 Disassembling the Canon PowerShot A200 Case: étape 8, image 3 de 3
    • Locate the black tabs on either side of the orange ribbon.

    • Use the metal tweezers to gently move these tabs to the outside edges of the ribbon.

    • Gently pull the orange ribbon out of its connection.

    • Your camera will now be in two separate pieces.

Conclusion

To reassemble your device, follow these instructions in reverse order.

Daniel Stone

Membre depuis le 01/28/11

101 Réputation

1 tutoriel rédigé

Équipe

Cal Poly, Team 7-37, Regan Winter 2011 Membre de l'équipe Cal Poly, Team 7-37, Regan Winter 2011

CPSU-REGAN-W11S7G37

4 membres

10 tutoriels rédigés

0 commentaires

Ajouter un commentaire

Nombre de vues :

Dernières 24 heures : 0

7 derniers jours : 1

30 derniers jours : 11

Total : 653