Introduction
Today we will be replacing the screen on a Doogee Valencia2 Y100 Pro.
Ce dont vous avez besoin
-
-
Start by flipping the phone over and removing the back plate by applying a small amount of of prying, between the glass screen and the plastic back, indicated in red in the picture. If having trouble I recommend a plastic prying tool.
-
-
-
After the plastic back of the phone has been removed, we now get first glance of the battery.
-
To remove the battery, use your finger nail or a plastic prying tool in the small slot at the bottom of the battery, indicated in the red marked area in the picture.
-
The battery is a 3.8V Li-Ion battery, with a 2200mAh rate.
-
-
-
Under the battery you can see the identification sticker, which shows the phone model, bands the phone can connect too and 2x IMEI.
-
This phone has dual sims, which explains the 2x IMEI numbers. Please note I have censored the IMEI numbers in the picture for privacy reasons.
-
-
-
Remove all 12 phillips head screws using a 1.8 x 40mm phillips head screw driver.
-
The green indicated screw has a void sticker covering it. If you remove this sticker you will void your warranty, but here at Ifixit we laugh at warranties.
-
-
-
-
Using a plastic prying tool to carefully separate the back plastic cover (first mid frame) from the second mid frame. I recommend starting at the bottom and slowly work your prying tool around from there.
-
-
-
Once the first mid frame has been removed you will notice the speaker on the back of it, indicated in green in the picture.
-
Next we will need to remove the antenna cable marked in red in the picture. Using a pair of tweezers carefully lift the cable of the connector. There might be tape holding it there. Remove this as well.
-
Do the same for the other end of the antenna cable.
-
-
-
We now turn our attention to the main board. We need disconnect 2 cables marked in red on the picture.
-
Most likely there will be tape covering the connectors. Remove this with a pair of tweezers.
-
We now can see the connector. Using a pair of tweezers to lift the little arm that holds the cable into the connector. I have marked the arm in red in the close up photo. Please be careful with your tweezers as the arm of the connector is very fragile.
-
Using your tweezers again (very useful tool) carefully pull the cable out of the connector.
-
Now repeat this step for the other connector which is the same.
-
-
-
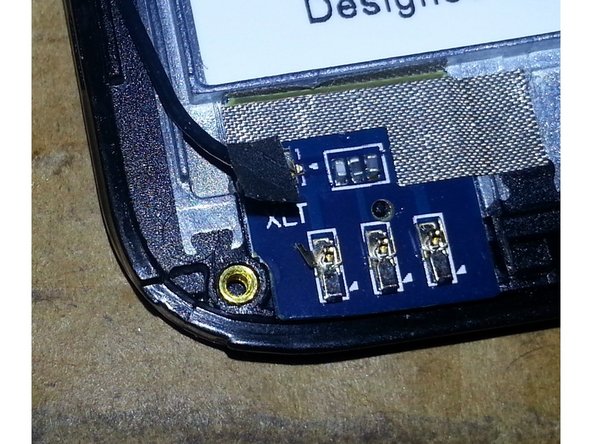
We will now need to remove the power and volume PCB.
-
Using the tab marked in red in the picture, pull the volume and power PCB with tweezers away from the plastic mid frame. Please be very careful as the PCB is very fragile.
-
-
-
The main board is held in by one pillips head 1.8 x 40mm screw. I have marked this screw in red on the picture.
-
-
-
Do not try to remove the main board just yet, because there is still another cable attached underneath.
-
Slowly lift the main board from the top of the phone and pivot it up. You should now see the connector. This connector is the same as the other two on top of the main board. Disconnect the connector the same way as you did before.
-
-
-
If you need to replace neither the rear or front facing camera you can do this now.
-
To remove the front facing camera disconnect the camera from the board (marked in green). The connector is the same as the other connects on the mainboard.
-
To remove the rear facing camera disconnect the camera from the board (marked in red). The connector is the same as the other connects on the mainboard.
-
You will find the ear receiver on the second mid frame. I have marked it in red.
-
-
-
We are now finally at the stage of removing the screen.
-
Flip the mid frame back over so that you are now looking at the front of the phone again. We will now need to use a hair dryer or heat gun to heat up the edges of the phone to loosen the glue that is holding in the screen and front buttons, to the mid frame
-
Once the glue has heated up enough you should be able to get a plastic prying tool between the glass screen and the plastic mid frame.
-
Slowly and carefully move your prying tool around the phone until the screen has been released from the mid frame. I found that the glue that holds the screen to the mid frame is not to strong, which is good.
-
-
-
You should now be about to replace the screen with another one. The glass + Screen + Digitiser are all fussed together. This means all three part will need to be replaced if one of them fails. This is becoming the norm with most mobile today.
Hi. You see very difficult to change only separating it from the LCD touch screen? . With this replacement :
I have the same problem. I bought that replacement but I'm not sure about if is possible change only the touch.
Could you change it?
Hi! anyone could change ONLY the glass screen without buying the complete kit?? Mine is broken, but the touchscreen is still working ok
I took my phone apart and just read the last part i only have the glass screen replacement not all three. About to cry
-


To reassemble your device, follow these instructions in reverse order.
To reassemble your device, follow these instructions in reverse order.
Annulation : je n'ai pas terminé ce tutoriel.
19 autres ont terminé cette réparation.

9 commentaires
I have the same problem. I bought that replacement but I'm not sure about if is possible change only the touch.
Could you change it?
can anyone link somewhere i can buy the y100 plus screen replacement?
for y100 pro with old version on the OS, when you change the screen,it need to flash a new ROM to install screen driver because Doogee use different screen.Read blog http://blog.cellphonemic.com/?p=871
What's the problem with old roms?. I have replaced the screen, but I have a problem.
The screen work, but there is vertical random lines. They appear and disappear, are constantly moving and does not look good the screen.
Best regards.
I'll see if I still have the broken screen laying around. If I do and have time I'll see if I can separate them with a heat gun.
hi i have a doogee t3 i stupidly droped it in the loo took it quickly and dried it over a few days it worked at first then screen stoped lighting up still works but just cant see it and letters look all smuged like wet ink on paper ive read try cleaning the terminals but on this phone cant seem to see how to gain access to all the srews to undo them and seem to be no repairers over here that will touch them any advise would help
thank you Davina