Aller au contenu principal
Pour réparer ensemble - Je crée un compte

ESGE Magic Wand - Bamix blocked motor repair

Ce dont vous avez besoin

    1. ESGE Magic Wand - Bamix blocked motor repair, Remove top cover: étape 1, image 1 de 3 ESGE Magic Wand - Bamix blocked motor repair, Remove top cover: étape 1, image 2 de 3 ESGE Magic Wand - Bamix blocked motor repair, Remove top cover: étape 1, image 3 de 3
      Outil utilisé dans cette étape :
      iFixit Precision 4 mm Screwdriver Bit
      $2.99
      • Unplug the power cord and remove the cutter blade.

      • The top cover is fastened with two Torx TR10 security screws. These screws are different from normal Torx screws: they are equipped with a center pin. Use the right bit or screwdriver with center hole.

      • Remove two Torx TR10 screws.

      • Carefully lift off the cover. It is latched at the front.

      Demander à FixBot

      Ajouter un commentaire

    2. ESGE Magic Wand - Bamix blocked motor repair: étape 2, image 1 de 3 ESGE Magic Wand - Bamix blocked motor repair: étape 2, image 2 de 3 ESGE Magic Wand - Bamix blocked motor repair: étape 2, image 3 de 3
      • This is what it looks like under the cover.

      • Slide out the two buttons and the small circuit board. The buttons are only snapped in.

      Demander à FixBot

      Ajouter un commentaire

    3. ESGE Magic Wand - Bamix blocked motor repair: étape 3, image 1 de 2 ESGE Magic Wand - Bamix blocked motor repair: étape 3, image 2 de 2
      • The handle is fastened with a Torx T8 machine screw and a Torx T8 plastic screw. You will need a long screwdriver.

      • Remove two Torx T8 screws.

      Demander à FixBot

      Ajouter un commentaire

    4. ESGE Magic Wand - Bamix blocked motor repair: étape 4, image 1 de 3 ESGE Magic Wand - Bamix blocked motor repair: étape 4, image 2 de 3 ESGE Magic Wand - Bamix blocked motor repair: étape 4, image 3 de 3
      • On newer models, the handle looks slightly different, see picture 1.

      • Carefully press the two catches on the switch module down a little. Then pull the module inwards a little.

      • Carefully pull the switch module out of the device.

      • Unscrew the Torx T8 screw and the Torx T10 screw inside.

      Demander à FixBot

      Ajouter un commentaire

    5. ESGE Magic Wand - Bamix blocked motor repair: étape 5, image 1 de 2 ESGE Magic Wand - Bamix blocked motor repair: étape 5, image 2 de 2
      • Unclip the handle from one side.

      • Unthread the cable, the buttons and the board.

      • The motor ist exposed. However, it is not yet completely accessible, since the lower plastic housing part cannot yet be slid over the bell. The bell must first be removed.

      Demander à FixBot

      Ajouter un commentaire

    6. ESGE Magic Wand - Bamix blocked motor repair: étape 6, image 1 de 3 ESGE Magic Wand - Bamix blocked motor repair: étape 6, image 2 de 3 ESGE Magic Wand - Bamix blocked motor repair: étape 6, image 3 de 3
      • First try If the bell can be unscrewed. It is fastened with a left-hand thread, so turn it in the "wrong direction", clockwise, to loosen it.

      • Pull on the knife to remove it

      • The bell sits probably quite tight, as it should not come loose during normal operation. When reassembling, glue it in place with a few drops of fluid threadlocker, if needed.

      • If it does not come off easily, then slide the lower plastic part towards the bell and clamp the motor in a vice. Do not tighten the vice very much, the motor is sensitive.

      • Use a long screwdriver as a lever between the bell and the shaft. Then carefully unscrew the bell. Reminder: the wrong way round, i.e. clockwise.

      • Pay attention to the washer between the shaft and the bell, do not lose it.

      Demander à FixBot

      Ajouter un commentaire

    7. ESGE Magic Wand - Bamix blocked motor repair: étape 7, image 1 de 1
      • Pull off the lower case over the shaft.

      Demander à FixBot

      Ajouter un commentaire

    1. ESGE Magic Wand - Bamix blocked motor repair, Motor replace: étape 8, image 1 de 2 ESGE Magic Wand - Bamix blocked motor repair, Motor replace: étape 8, image 2 de 2
      • Using a Torx T15 screwdriver unscrew the two screws securing the flange of the shaft to the motor.

      • Seperate the flange including the shaft from the motor.

      Demander à FixBot

      Ajouter un commentaire

    2. ESGE Magic Wand - Bamix blocked motor repair: étape 9, image 1 de 3 ESGE Magic Wand - Bamix blocked motor repair: étape 9, image 2 de 3 ESGE Magic Wand - Bamix blocked motor repair: étape 9, image 3 de 3
      • Desolder the red and the white wire. These wires are thin and delicate, don't break them.

      • The motor remains.

      Demander à FixBot

      Ajouter un commentaire

    1. ESGE Magic Wand - Bamix blocked motor repair, ESGE Magic Wand - Bamix blocked motor repair: étape 10, image 1 de 3 ESGE Magic Wand - Bamix blocked motor repair, ESGE Magic Wand - Bamix blocked motor repair: étape 10, image 2 de 3 ESGE Magic Wand - Bamix blocked motor repair, ESGE Magic Wand - Bamix blocked motor repair: étape 10, image 3 de 3
      • The rotor is easier to remove and reinstall later when the carbons are pushed back.

      • You can also simplify the work by pushing the carbon brushes back and securing them with a wire, as shown in image 3. Then you can skip this step.

      • Desolder the connections to both carbons.

      • The contact strips are delicate and cannot be bent open and closed often, work very gently.

      • Very carefully bend both contact strips open so that the coil springs are free and the carbons can be pushed back.

      Demander à FixBot

      Ajouter un commentaire

    2. ESGE Magic Wand - Bamix blocked motor repair: étape 11, image 1 de 2 ESGE Magic Wand - Bamix blocked motor repair: étape 11, image 2 de 2
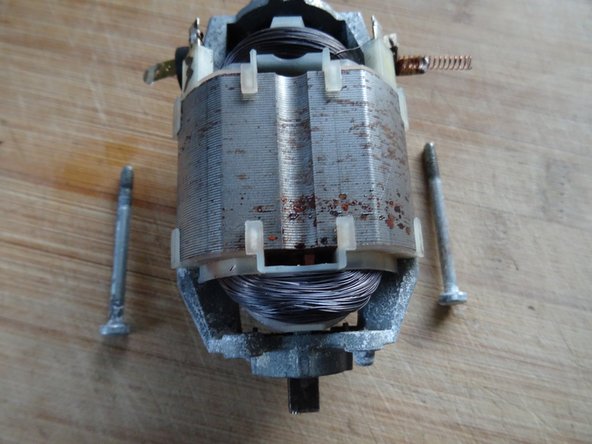
      • Using a Torx T15 screwdriver remove the two long screws keeping the motor together.

      Demander à FixBot

      Ajouter un commentaire

    3. ESGE Magic Wand - Bamix blocked motor repair: étape 12, image 1 de 1
      • Carefully pull out the upper motor shield including the carbons.

      Demander à FixBot

      Ajouter un commentaire

    4. ESGE Magic Wand - Bamix blocked motor repair: étape 13, image 1 de 1
      • Carefully pull out the bottom motor shield.

      • Remove the rotor. If it is stuck tap it carefully out using a hammer.

      • Take care of the two washers located on the top and the bottom of the motor shaft.

      • This motor was heavily rusted and dirty inside. All sliding surfaces, the contact surfaces on the commutator (where the carbons rest), the rotor and the armatur insides were cleaned with fine sandpaper. The bearings were lubricated with silicone oil. After reassembly, the motor ran as it did on the first day.

      Demander à FixBot

      Ajouter un commentaire

Conclusion

To reassemble your device, follow these instructions in reverse order.

Annulation : je n'ai pas terminé ce tutoriel.

2 autres ont terminé cette réparation.

Merci à ces traducteurs :

de en

100%

Ces traducteurs nous aident réparer le monde ! Vous voulez contribuer ?
Commencez à traduire ›

VauWeh

Membre depuis le 10/19/15

339 386 Réputation

311 tutoriels rédigés

0 commentaires de tutoriel

Ajouter un commentaire

Nombre de vues :

Dernières 24 heures : 6

7 derniers jours : 18

30 derniers jours : 78

Total : 5,439