Aller au contenu principal

Echo Power Pruner 254 cc PPT2620 2019 Fan Clutch Drum Replacement

Ce dont vous avez besoin

  1. Echo Power Pruner 254 cc PPT2620 2019 Fan Clutch Drum Replacement, Disconnect the spark plug: étape 1, image 1 de 2 Echo Power Pruner 254 cc PPT2620 2019 Fan Clutch Drum Replacement, Disconnect the spark plug: étape 1, image 2 de 2
    • Move the stop switch into the "stop" position to turn the pruner off before attempting any repairs.

    • Pull the spark plug cap straight off of the spark plug.

  2. Echo Power Pruner 254 cc PPT2620 2019 Fan Clutch Drum Replacement, Remove the control handle assembly: étape 2, image 1 de 1
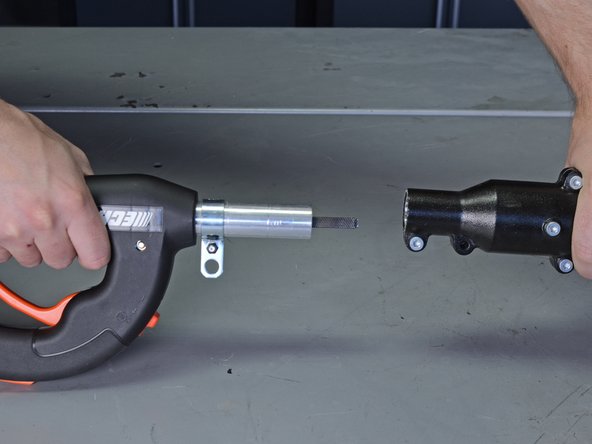
    • Use a T25 Torx screwdriver to loosen (but not remove) the two screws clamping the main pipe assembly to the control handle.

  3. Echo Power Pruner 254 cc PPT2620 2019 Fan Clutch Drum Replacement: étape 3, image 1 de 2 Echo Power Pruner 254 cc PPT2620 2019 Fan Clutch Drum Replacement: étape 3, image 2 de 2
    • Remove the control handle from the main pipe assembly.

  4. Echo Power Pruner 254 cc PPT2620 2019 Fan Clutch Drum Replacement, Remove the throttle trigger: étape 4, image 1 de 1
    • Remove seven T25 screws holding together the control handle.

  5. Echo Power Pruner 254 cc PPT2620 2019 Fan Clutch Drum Replacement: étape 5, image 1 de 1
    • Lift the top half of the control handle straight up to remove it.

  6. Echo Power Pruner 254 cc PPT2620 2019 Fan Clutch Drum Replacement: étape 6, image 1 de 2 Echo Power Pruner 254 cc PPT2620 2019 Fan Clutch Drum Replacement: étape 6, image 2 de 2
    • Lift the throttle lockout out of the control handle.

    • During reassembly, make sure the throttle lockout and the throttle trigger are oriented correctly, and that the small wire spring is inserted in the hole on the throttle lockout, as shown in the second photo.

  7. Echo Power Pruner 254 cc PPT2620 2019 Fan Clutch Drum Replacement: étape 7, image 1 de 3 Echo Power Pruner 254 cc PPT2620 2019 Fan Clutch Drum Replacement: étape 7, image 2 de 3 Echo Power Pruner 254 cc PPT2620 2019 Fan Clutch Drum Replacement: étape 7, image 3 de 3
    • Lift the throttle trigger out of the control handle.

    • During reassembly, make sure that the spring inside the trigger is positioned so that it loops around the trigger's hinge post and rests against the screw post to the left of the trigger.

  8. Echo Power Pruner 254 cc PPT2620 2019 Fan Clutch Drum Replacement: étape 8, image 1 de 2 Echo Power Pruner 254 cc PPT2620 2019 Fan Clutch Drum Replacement: étape 8, image 2 de 2
    • Pull the throttle cable sideways through the slot in the throttle trigger to remove it from the trigger.

  9. Echo Power Pruner 254 cc PPT2620 2019 Fan Clutch Drum Replacement, Remove the control handle: étape 9, image 1 de 1
    • Use a T25 Torx screwdriver to loosen (but don't remove) the screw clamping the strap hook to the handle pipe.

    • You may need an 8 mm socket and socket wrench to hold the nut on the back of the strap hook while you loosen the bolt.

    • Remove the two T25 screws securing the handle to the handle pipe.

  10. Echo Power Pruner 254 cc PPT2620 2019 Fan Clutch Drum Replacement: étape 10, image 1 de 3 Echo Power Pruner 254 cc PPT2620 2019 Fan Clutch Drum Replacement: étape 10, image 2 de 3 Echo Power Pruner 254 cc PPT2620 2019 Fan Clutch Drum Replacement: étape 10, image 3 de 3
    • Slide the strap hook off the pipe and remove it.

    • Slide both clamps that held the handle off of the pipe and remove them.

  11. Echo Power Pruner 254 cc PPT2620 2019 Fan Clutch Drum Replacement, Remove the flexible tube: étape 11, image 1 de 1
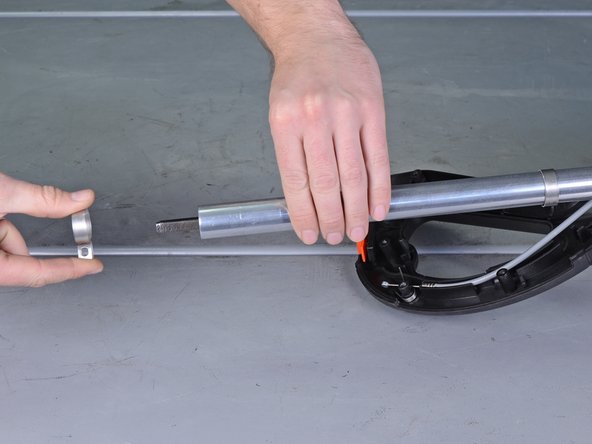
    • Slide the flexible tube off of the handle pipe and remove it.

  12. Echo Power Pruner 254 cc PPT2620 2019 Fan Clutch Drum Replacement, De-route the control cable assembly: étape 12, image 1 de 3 Echo Power Pruner 254 cc PPT2620 2019 Fan Clutch Drum Replacement, De-route the control cable assembly: étape 12, image 2 de 3 Echo Power Pruner 254 cc PPT2620 2019 Fan Clutch Drum Replacement, De-route the control cable assembly: étape 12, image 3 de 3
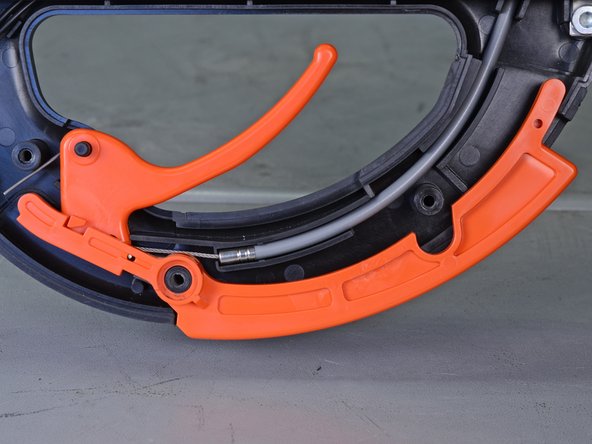
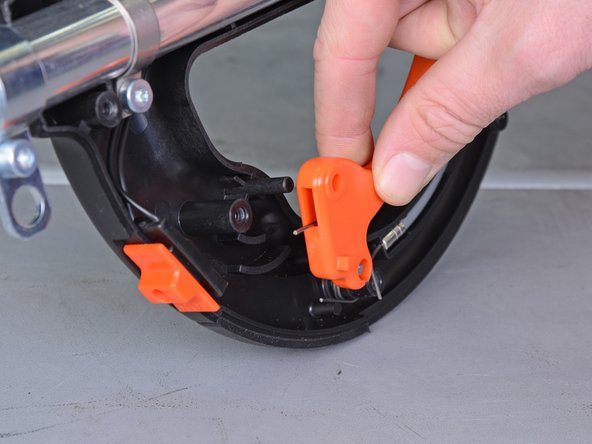
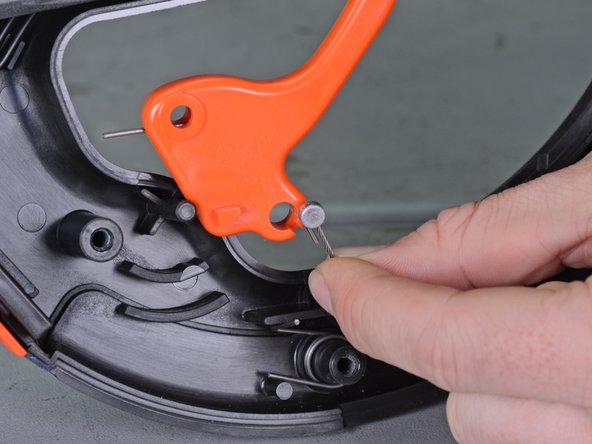
    • Lift the control wires out of their slots in the handle.

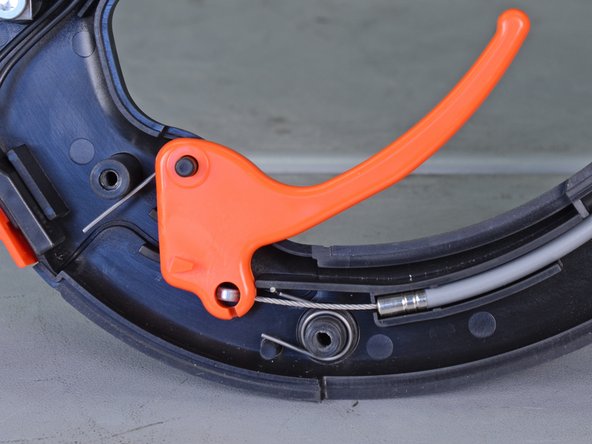
    • Lift the throttle cable out of its slots in the handle.

  13. Echo Power Pruner 254 cc PPT2620 2019 Fan Clutch Drum Replacement: étape 13, image 1 de 2 Echo Power Pruner 254 cc PPT2620 2019 Fan Clutch Drum Replacement: étape 13, image 2 de 2
    • Slide the plastic tube holding the control wires and the throttle cable together up and off of the throttle cable. The tube will stay on the control wires.

  14. Echo Power Pruner 254 cc PPT2620 2019 Fan Clutch Drum Replacement, Remove the driveshaft: étape 14, image 1 de 2 Echo Power Pruner 254 cc PPT2620 2019 Fan Clutch Drum Replacement, Remove the driveshaft: étape 14, image 2 de 2
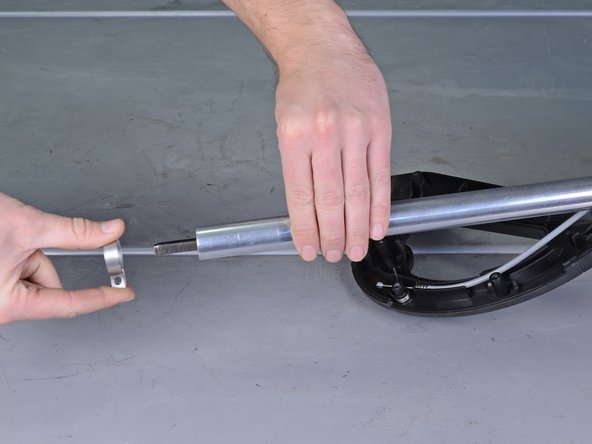
    • Lift the driveshaft straight out of the handle pipe and remove it.

  15. Echo Power Pruner 254 cc PPT2620 2019 Fan Clutch Drum Replacement: étape 15, image 1 de 1
    • Use a T25 Torx screwdriver to loosen (but don't remove) the screw securing the clamp around the handle pipe.

  16. Echo Power Pruner 254 cc PPT2620 2019 Fan Clutch Drum Replacement: étape 16, image 1 de 2 Echo Power Pruner 254 cc PPT2620 2019 Fan Clutch Drum Replacement: étape 16, image 2 de 2
    • Remove the handle pipe.

  17. Echo Power Pruner 254 cc PPT2620 2019 Fan Clutch Drum Replacement: étape 17, image 1 de 2 Echo Power Pruner 254 cc PPT2620 2019 Fan Clutch Drum Replacement: étape 17, image 2 de 2
    • Remove two T25 screws securing the exhaust cover: one between the cover and the fuel tank, and the other near the fan cover.

  18. Echo Power Pruner 254 cc PPT2620 2019 Fan Clutch Drum Replacement: étape 18, image 1 de 3 Echo Power Pruner 254 cc PPT2620 2019 Fan Clutch Drum Replacement: étape 18, image 2 de 3 Echo Power Pruner 254 cc PPT2620 2019 Fan Clutch Drum Replacement: étape 18, image 3 de 3
    • Lift the exhaust cover starting at the side nearest the fuel tank and rotate it away from the exhaust muffler assembly.

    • Lift the exhaust cover to remove it.

  19. Echo Power Pruner 254 cc PPT2620 2019 Fan Clutch Drum Replacement: étape 19, image 1 de 2 Echo Power Pruner 254 cc PPT2620 2019 Fan Clutch Drum Replacement: étape 19, image 2 de 2
    • Remove two T25 screws securing the engine cover: one near the starter handle, and another near the base of the throttle cable.

  20. Echo Power Pruner 254 cc PPT2620 2019 Fan Clutch Drum Replacement: étape 20, image 1 de 2 Echo Power Pruner 254 cc PPT2620 2019 Fan Clutch Drum Replacement: étape 20, image 2 de 2
    • Lift the engine cover straight up to remove it.

  21. Echo Power Pruner 254 cc PPT2620 2019 Fan Clutch Drum Replacement: étape 21, image 1 de 1
    • Remove the two T25 screws securing the fan cover protector.

  22. Echo Power Pruner 254 cc PPT2620 2019 Fan Clutch Drum Replacement: étape 22, image 1 de 2 Echo Power Pruner 254 cc PPT2620 2019 Fan Clutch Drum Replacement: étape 22, image 2 de 2
    • Pull the fan cover protector straight out and remove it.

    • Make sure that it does not get caught on the control wires running through it. It is not necessary to pull the wires all the way out of the fan cover.

  23. Echo Power Pruner 254 cc PPT2620 2019 Fan Clutch Drum Replacement: étape 23, image 1 de 1
    • Remove the two T25 screws securing the fan cover.

  24. Echo Power Pruner 254 cc PPT2620 2019 Fan Clutch Drum Replacement: étape 24, image 1 de 2 Echo Power Pruner 254 cc PPT2620 2019 Fan Clutch Drum Replacement: étape 24, image 2 de 2
    • Remove the fan cover.

  25. Echo Power Pruner 254 cc PPT2620 2019 Fan Clutch Drum Replacement: étape 25, image 1 de 2 Echo Power Pruner 254 cc PPT2620 2019 Fan Clutch Drum Replacement: étape 25, image 2 de 2
    • Use snap ring pliers to remove the snap ring inside of the narrow end of the fan cover.

  26. Echo Power Pruner 254 cc PPT2620 2019 Fan Clutch Drum Replacement: étape 26, image 1 de 2 Echo Power Pruner 254 cc PPT2620 2019 Fan Clutch Drum Replacement: étape 26, image 2 de 2
    • Grasp the main pipe holder with a pair of pliers and pull it straight out of the fan cover. This will take a lot of force.

    • Be careful not to mar or deform the pipe holder while you pull on it. Do not grab the inside of the holder with the pliers.

  27. Echo Power Pruner 254 cc PPT2620 2019 Fan Clutch Drum Replacement: étape 27, image 1 de 3 Echo Power Pruner 254 cc PPT2620 2019 Fan Clutch Drum Replacement: étape 27, image 2 de 3 Echo Power Pruner 254 cc PPT2620 2019 Fan Clutch Drum Replacement: étape 27, image 3 de 3
    • Use a pair of snap ring pliers to remove the snap ring around the clutch drum.

  28. Echo Power Pruner 254 cc PPT2620 2019 Fan Clutch Drum Replacement: étape 28, image 1 de 3 Echo Power Pruner 254 cc PPT2620 2019 Fan Clutch Drum Replacement: étape 28, image 2 de 3 Echo Power Pruner 254 cc PPT2620 2019 Fan Clutch Drum Replacement: étape 28, image 3 de 3
    • Use a punch or a bolt to gently tap out the fan clutch drum.

    • Remove the fan clutch drum.

Conclusion

To reassemble your device, follow these instructions in reverse order.

5 autres ont terminé cette réparation.

Adam O'Camb

Membre depuis le 04/11/15

196 194 Réputation

416 tutoriels rédigés

Un commentaire

does the case come with the bearings in it already? if not how do you remove the bearings?

DAVID - Réponse

Ajouter un commentaire

Nombre de vues :

Dernières 24 heures : 0

7 derniers jours : 1

30 derniers jours : 17

Total : 882