Aller au contenu principal

Electric Eel Drain Cleaner Auto-Feeder Replacement

Ce dont vous avez besoin

  1. Electric Eel Drain Cleaner Auto-Feeder Replacement, Remove the Guide Spring: étape 1, image 1 de 3 Electric Eel Drain Cleaner Auto-Feeder Replacement, Remove the Guide Spring: étape 1, image 2 de 3 Electric Eel Drain Cleaner Auto-Feeder Replacement, Remove the Guide Spring: étape 1, image 3 de 3
    • Unplug your drain cleaner before starting this guide. Because this device may have been used in a septic setting, it should be cleaned and disinfected as much as possible before disassembly.

    • Wear gloves to protect your hands from injury when handling the cable.

    • Ensure the cable is completely retracted into the auto-feeder.

    • Twist the guide spring counter-clockwise to unscrew it from the auto-feeder.

    • Remove the guide spring.

  2. Electric Eel Drain Cleaner Auto-Feeder Replacement, Release the Tension Spring: étape 2, image 1 de 3 Electric Eel Drain Cleaner Auto-Feeder Replacement, Release the Tension Spring: étape 2, image 2 de 3 Electric Eel Drain Cleaner Auto-Feeder Replacement, Release the Tension Spring: étape 2, image 3 de 3
    • Unscrew the tension knob to loosen the tension spring in the top feeder assembly.

  3. Electric Eel Drain Cleaner Auto-Feeder Replacement, Set the Feeder in Neutral Position: étape 3, image 1 de 3 Electric Eel Drain Cleaner Auto-Feeder Replacement, Set the Feeder in Neutral Position: étape 3, image 2 de 3 Electric Eel Drain Cleaner Auto-Feeder Replacement, Set the Feeder in Neutral Position: étape 3, image 3 de 3
    • Set the feeder adjustment knob in the neutral position, in between the "FWD" and "REV" positions.

  4. Electric Eel Drain Cleaner Auto-Feeder Replacement, Disengage the Top Bearing: étape 4, image 1 de 2 Electric Eel Drain Cleaner Auto-Feeder Replacement, Disengage the Top Bearing: étape 4, image 2 de 2
    • Push the top control finger up as far as possible.

    • This disengages the top feeder assembly and allows the cable to freely move through the feeder. The finger may fall back down on its own and restrict cable movement. If this occurs, simply push the finger back up.

  5. Electric Eel Drain Cleaner Auto-Feeder Replacement, Remove the Auto-Feeder: étape 5, image 1 de 1
    • Use a 1/2" open-ended wrench to remove the two bolts from the bottom of the feeder body mounting arm.

  6. Electric Eel Drain Cleaner Auto-Feeder Replacement: étape 6, image 1 de 2 Electric Eel Drain Cleaner Auto-Feeder Replacement: étape 6, image 2 de 2
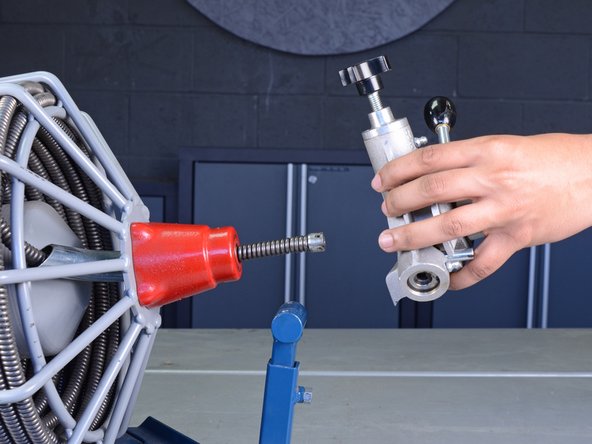
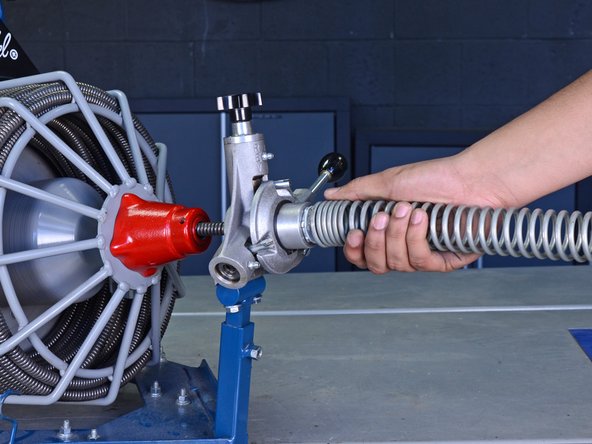
    • Remove the auto-feeder from the cable.

    • If the end of the cable won't pass through the feeder, ensure that the top bearing is completely disengaged as described in step 4 of this guide.

Conclusion

To reassemble your device, follow these instructions in reverse order.

Une autre personne a terminé cette réparation.
Tarun Thiruma

Membre depuis le 11/20/19

35 373 Réputation

134 tutoriels rédigés

3 commentaires

Removal of what part number? Replace with part number xxx.. Needed to do the job of replacing a part IS the part and it's part number.

KEVIN - Réponse

Bearing part number

DE-10SET

Mark W -

So how do you take the rest apart to change out the bearings.

TIMOTHY - Réponse

Ajouter un commentaire

Nombre de vues :

Dernières 24 heures : 0

7 derniers jours : 15

30 derniers jours : 48

Total : 1,596