Aller au contenu principal

Elegoo Mars 3 Motherboard Replacement

Ce dont vous avez besoin

  1. Elegoo Mars 3 Motherboard Replacement, Remove the back screws: étape 1, image 1 de 1
    • Remove 6 screws.

    • 12.5mm self tapping screws with 2.0mm hex socket head

  2. Elegoo Mars 3 Motherboard Replacement, Remove the back lid: étape 2, image 1 de 2 Elegoo Mars 3 Motherboard Replacement, Remove the back lid: étape 2, image 2 de 2
    • Use a small flat-headed screwdriver, spudger, or similar to pry open the lid enough to be able to get a grip of it and pull straight back and then fold down.

    • The back of the lid has a PCB with cables connecting it to the motherboard inside the unit. While not particularly fragile, do take care so you do not damage the connectors.

  3. Elegoo Mars 3 Motherboard Replacement, Remove the LED and power connectors: étape 3, image 1 de 2 Elegoo Mars 3 Motherboard Replacement, Remove the LED and power connectors: étape 3, image 2 de 2
    • Remove the connectors by pulling them straight out.

    • Make sure you connect the connectors in the correct sockets during reassembly!

  4. Elegoo Mars 3 Motherboard Replacement, Remove the resin panel connector: étape 4, image 1 de 3 Elegoo Mars 3 Motherboard Replacement, Remove the resin panel connector: étape 4, image 2 de 3 Elegoo Mars 3 Motherboard Replacement, Remove the resin panel connector: étape 4, image 3 de 3
    • Use a spudger or similar tool (your finger nail works if you can get it there) to loosen the resin panel connector by flipping the dark gray part 90° down.

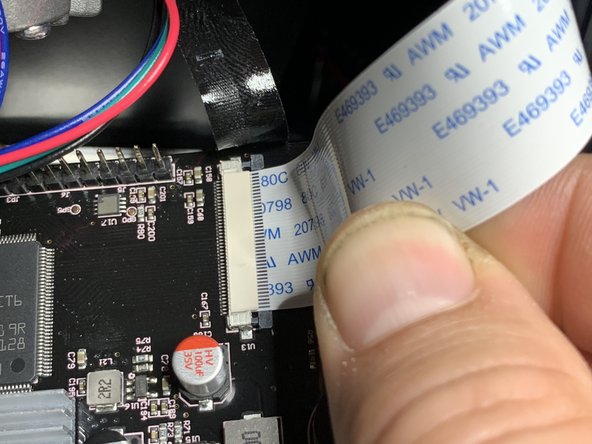
    • Pull the cable straight up.

    • Be careful not to bend the cable!

  5. Elegoo Mars 3 Motherboard Replacement, Remove the bottom right connectors: étape 5, image 1 de 1
    • Remove the three cable connectors in the bottom right corner by pulling them straight out.

    • Be sure to pull the connectors, and not the cables!

    • If you are also replacing the limit switch, now is a good time to do so.

  6. Elegoo Mars 3 Motherboard Replacement, Unfasten the motherboard: étape 6, image 1 de 1
    • Remove the two screws fastening the motherboard to the unit.

    • 7.5mm self tapping screws with 2.0mm hex socket head

    • The touch screen cable on the right and the USB cable on the left are still connected to the motherboard.

  7. Elegoo Mars 3 Motherboard Replacement, Remove the tape covering the touch screen connector: étape 7, image 1 de 2 Elegoo Mars 3 Motherboard Replacement, Remove the tape covering the touch screen connector: étape 7, image 2 de 2
    • Use a pair of tweezers to get a grip on and remove the tape covering the touch screen connector.

    • You can transfer this tape and reuse it on the new motherboard.

  8. Elegoo Mars 3 Motherboard Replacement, Remove the touch screen cable: étape 8, image 1 de 3 Elegoo Mars 3 Motherboard Replacement, Remove the touch screen cable: étape 8, image 2 de 3 Elegoo Mars 3 Motherboard Replacement, Remove the touch screen cable: étape 8, image 3 de 3
    • Use a spudger or similar to unlock the connector by pushing the dark gray part to the right, away from the connector, both on the top and bottom.

    • Note how far into the connector the cable is seated. When reinserting the cable in the new motherboard it can be hard to feel if the cable is fully inserted.

    • Remove the cable by pulling it out of the connector to the right.

  9. Elegoo Mars 3 Motherboard Replacement, Remove the USB cable: étape 9, image 1 de 1
    • Unplug the USB cable.

    • In my case the glue did not stick to the USB cable, just the USB socket on the motherboard, so I was able to just pull it out without doing anything with the glue. If necessary you should be able to pry off the glue blob with a spudger or similar.

    • During reassembly it is not necessary to glue these together.

Conclusion

To reassemble your device, follow these instructions in reverse order.

Une autre personne a terminé cette réparation.

Konrad Skeri Ekblad

Membre depuis le 12/10/17

520 Réputation

3 tutoriels rédigés

0 commentaires

Ajouter un commentaire

Nombre de vues :

Dernières 24 heures : 0

7 derniers jours : 4

30 derniers jours : 26

Total : 1,110