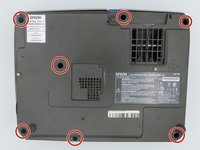
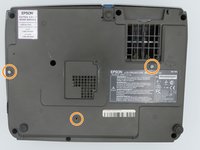
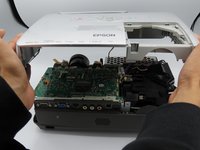
Aller au contenu principal

Epson Powerlite S4 Motherboard Replacement

Ce dont vous avez besoin

  1. Epson Powerlite S4 Motherboard Replacement, Motherboard: étape 1, image 1 de 1
    • Press the power button located on top of the projector.

    • Remember to let the projector cool off completely after turning off the power before beginning the repair.

  2. Epson Powerlite S4 Motherboard Replacement: étape 2, image 1 de 2 Epson Powerlite S4 Motherboard Replacement: étape 2, image 2 de 2
    • Using the Phillips #1 screwdriver, loosen the single captive screw on the right side of the projector.

    • The captive screw will loosen, but it cannot be fully removed.

    • Slide the panel off and remove it from the device.

  3. Epson Powerlite S4 Motherboard Replacement: étape 3, image 1 de 2 Epson Powerlite S4 Motherboard Replacement: étape 3, image 2 de 2
    • Remove seven black 10 mm screws from the bottom of the device using a Phillips #1 screwdriver.

    • You may need to use a screwdriver extender to reach the seven screws.

    • Remove three smaller silver screws using a Phillips #1 screwdriver.

  4. Epson Powerlite S4 Motherboard Replacement: étape 4, image 1 de 3 Epson Powerlite S4 Motherboard Replacement: étape 4, image 2 de 3 Epson Powerlite S4 Motherboard Replacement: étape 4, image 3 de 3
    • Turn the projector so the power button is on top.

    • Gently pull up the cover until it pops off.

    • Do not pull too far; a ribbon cable still connects the top cover to the motherboard.

    • Disconnect the ribbon cable that attaches the cover to the motherboard.

    • Remove the cover and place to the side.

  5. Epson Powerlite S4 Motherboard Replacement: étape 5, image 1 de 1
    • Remove the three screws holding down the motherboard using a Phillips #1 screwdriver.

  6. Epson Powerlite S4 Motherboard Replacement: étape 6, image 1 de 1
    • Ensure that the two large cable cords located in the center are disconnected.

  7. Epson Powerlite S4 Motherboard Replacement: étape 7, image 1 de 1
    • Remove the nine cables that are running to the motherboard by pulling them up out of their sockets.

    • You may need a spudger or a plastic opening tool to disconnect all of the wires connected to the motherboard.

  8. Epson Powerlite S4 Motherboard Replacement: étape 8, image 1 de 1
    • Carefully lift the motherboard from the edges.

    • Remove from base and set aside.

Conclusion

To reassemble your device, follow these instructions in reverse order.

Claire Garland

Membre depuis le 02/21/23

229 Réputation

2 tutoriels rédigés

Équipe

0 commentaires

Ajouter un commentaire

Nombre de vues :

Dernières 24 heures : 0

7 derniers jours : 0

30 derniers jours : 2

Total : 69