Aller au contenu principal

Fast Fix Screen Replacement

Ce dont vous avez besoin

  1. Fast Fix Screen Replacement, Screen: étape 1, image 1 de 3 Fast Fix Screen Replacement, Screen: étape 1, image 2 de 3 Fast Fix Screen Replacement, Screen: étape 1, image 3 de 3
    • Slide both battery latches to release cover.

    • Remove battery.

  2. Fast Fix Screen Replacement: étape 2, image 1 de 2 Fast Fix Screen Replacement: étape 2, image 2 de 2
    • Remove the M2.5 X 5mm phillips screw for the CD drive.

    • Remove the CD drive.

  3. Fast Fix Screen Replacement: étape 3, image 1 de 2 Fast Fix Screen Replacement: étape 3, image 2 de 2
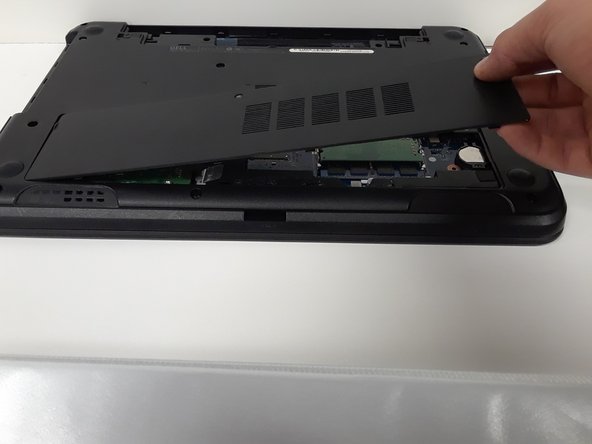
    • Loosen 2 screws on access door.

    • They cannot be removed

    • Remove the access door.

  4. Fast Fix Screen Replacement: étape 4, image 1 de 1
    • Remove 12 M2.5 X 5MM Phillips bottom palm rest screws.

  5. Fast Fix Screen Replacement: étape 5, image 1 de 3 Fast Fix Screen Replacement: étape 5, image 2 de 3 Fast Fix Screen Replacement: étape 5, image 3 de 3
    • Use a small screwdriver to press in the keyboard latches.

    • Remove the keyboard.

    • Unplug the keyboard cable at the ZIF connection.

  6. Fast Fix Screen Replacement: étape 6, image 1 de 3 Fast Fix Screen Replacement: étape 6, image 2 de 3 Fast Fix Screen Replacement: étape 6, image 3 de 3
    • Remove the palm-rest cable by releasing the ZIF latch and pulling the wire out.

    • Remove 5 M2.5 X 5mm Phillips and 2 M2 X 3mm Phillips palm-rest screws.

  7. Fast Fix Screen Replacement: étape 7, image 1 de 1
    • Use a small flat screwdriver to pry the palm-rest off of the computer.

  8. Fast Fix Screen Replacement: étape 8, image 1 de 3 Fast Fix Screen Replacement: étape 8, image 2 de 3 Fast Fix Screen Replacement: étape 8, image 3 de 3
    • Remove the wireless antenna

    • Remove the LCD cable

  9. Fast Fix Screen Replacement: étape 9, image 1 de 1
    • Remove the 1 M2.5 x 5mm Phillips left hinge screw and 2 M2.5 x 5mm Phillips right hinge screw.

  10. Fast Fix Screen Replacement: étape 10, image 1 de 1
    • Pry off the LCD bevel using a small flat screwdriver.

  11. Fast Fix Screen Replacement: étape 11, image 1 de 1
    • Remove the 4 M2 X 3mm Philips LCD screws.

  12. Fast Fix Screen Replacement: étape 12, image 1 de 2 Fast Fix Screen Replacement: étape 12, image 2 de 2
    • Unplug the screen cable and remove the screen.

Conclusion

To reassemble your device, follow these instructions in reverse order.

3 autres ont terminé cette réparation.

Carl Kangas

Membre depuis le 10/01/17

182 Réputation

1 tutoriel rédigé

Équipe

Michigan Tech, Team S3-G8, Galliah Fall 2017 Membre de l'équipe Michigan Tech, Team S3-G8, Galliah Fall 2017

MTU-GALLIAH-F17S3G8

1 membre

1 tutoriel rédigé

Un commentaire

Hello good day, I have a question, I have managed to replace the screen and the computer started the first time without problems, but after I started it again the computer did not turn on the screen again, will you have any possible solution?

vikingo1ero - Réponse

Ajouter un commentaire

Nombre de vues :

Dernières 24 heures : 0

7 derniers jours : 2

30 derniers jours : 19

Total : 2,909