Aller au contenu principal

Fugoo Tough XL Case Replacement

Ce dont vous avez besoin

  1. Fugoo Tough XL Case Replacement, Case: étape 1, image 1 de 1
    • Remove the four 3 mm screws located in each corner using a 3 mm Hex screwdriver.

  2. Fugoo Tough XL Case Replacement: étape 2, image 1 de 2 Fugoo Tough XL Case Replacement: étape 2, image 2 de 2
    • Gently pull up and off the outer casing.

    • Do not feel afraid to use a bit of force if necessary.

  3. Fugoo Tough XL Case Replacement: étape 3, image 1 de 2 Fugoo Tough XL Case Replacement: étape 3, image 2 de 2
    • Remove the internal device from the outer casing.

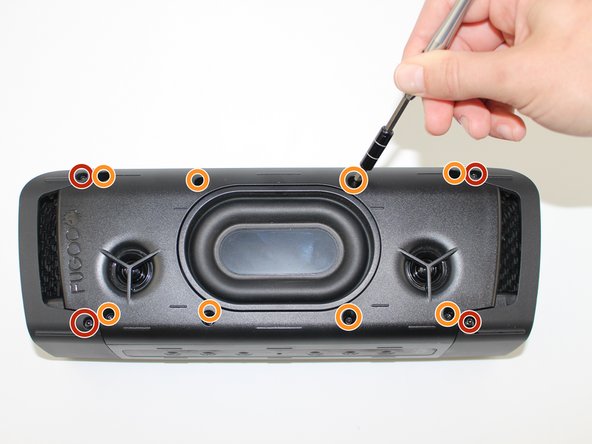
    • Remove the four 12 mm screws on each corner using a T10 Torx screwdriver.

    • Remove the eight 6 mm screws on the top and bottom using a T10 Torx screwdriver.

  4. Fugoo Tough XL Case Replacement: étape 4, image 1 de 3 Fugoo Tough XL Case Replacement: étape 4, image 2 de 3 Fugoo Tough XL Case Replacement: étape 4, image 3 de 3
    • Use your hands to gently remove the side plates.

    • Use an opening tool to pry off the back plate with the Fugoo trademark.

  5. Fugoo Tough XL Case Replacement: étape 5, image 1 de 1
    • Slowly pull the front casing from the back casing. Avoid putting any tension on the connected cables.

    • Separate the two slowly and consistently to avoid damaging the speaker cables.

Conclusion

To reassemble your device, follow these instructions in reverse order.

Une autre personne a terminé cette réparation.

Abdul

Membre depuis le 02/17/17

527 Réputation

4 tutoriels rédigés

Équipe

USF Tampa, Team S19-G1, Hoffman Spring 2017 Membre de l'équipe USF Tampa, Team S19-G1, Hoffman Spring 2017

USFT-HOFFMAN-S17S19G1

4 membres

5 tutoriels rédigés

0 commentaires

Ajouter un commentaire

Nombre de vues :

Dernières 24 heures : 0

7 derniers jours : 0

30 derniers jours : 8

Total : 940