Aller au contenu principal

Fugoo Tough XL Speaker Replacement

Ce dont vous avez besoin

  1. Fugoo Tough XL Speaker Replacement, Case: étape 1, image 1 de 1
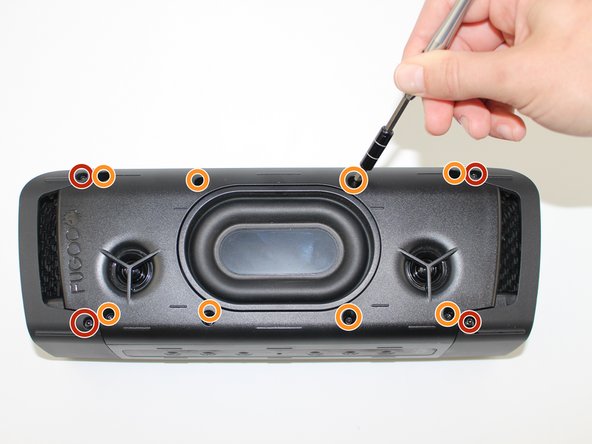
    • Remove the four 3 mm screws located in each corner using a 3 mm Hex screwdriver.

  2. Fugoo Tough XL Speaker Replacement: étape 2, image 1 de 2 Fugoo Tough XL Speaker Replacement: étape 2, image 2 de 2
    • Gently pull up and off the outer casing.

    • Do not feel afraid to use a bit of force if necessary.

  3. Fugoo Tough XL Speaker Replacement: étape 3, image 1 de 2 Fugoo Tough XL Speaker Replacement: étape 3, image 2 de 2
    • Remove the internal device from the outer casing.

    • Remove the four 12 mm screws on each corner using a T10 Torx screwdriver.

    • Remove the eight 6 mm screws on the top and bottom using a T10 Torx screwdriver.

  4. Fugoo Tough XL Speaker Replacement: étape 4, image 1 de 3 Fugoo Tough XL Speaker Replacement: étape 4, image 2 de 3 Fugoo Tough XL Speaker Replacement: étape 4, image 3 de 3
    • Use your hands to gently remove the side plates.

    • Use an opening tool to pry off the back plate with the Fugoo trademark.

  5. Fugoo Tough XL Speaker Replacement: étape 5, image 1 de 1
    • Slowly pull the front casing from the back casing. Avoid putting any tension on the connected cables.

    • Separate the two slowly and consistently to avoid damaging the speaker cables.

  6. Fugoo Tough XL Speaker Replacement, Speaker: étape 6, image 1 de 2 Fugoo Tough XL Speaker Replacement, Speaker: étape 6, image 2 de 2
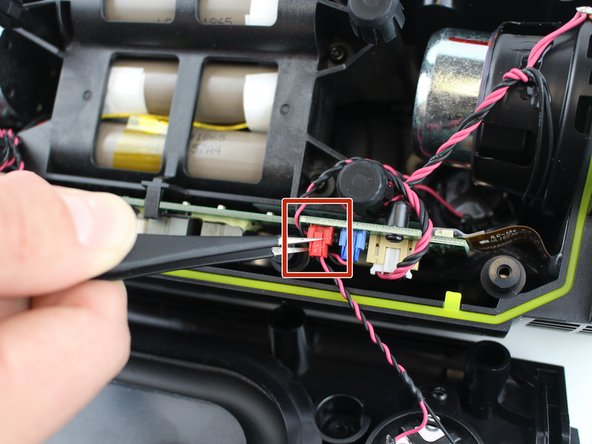
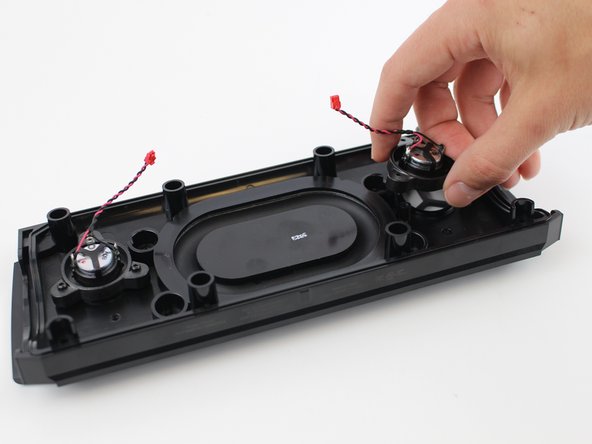
    • Carefully untangle the wires that are connected from the speaker to the motherboard.

    • Using a tweezer, pull downwards on the base of each red speaker connector to remove them from the motherboard.

  7. Fugoo Tough XL Speaker Replacement: étape 7, image 1 de 3 Fugoo Tough XL Speaker Replacement: étape 7, image 2 de 3 Fugoo Tough XL Speaker Replacement: étape 7, image 3 de 3
    • Use a #3 Hex screwdriver to unscrew all six 3mm screws."

    • While holding the case with one hand, pull up on the speaker you wish to replace.

Conclusion

To reassemble your device, follow these instructions in reverse order.

Abdul

Membre depuis le 02/17/17

527 Réputation

4 tutoriels rédigés

Équipe

USF Tampa, Team S19-G1, Hoffman Spring 2017 Membre de l'équipe USF Tampa, Team S19-G1, Hoffman Spring 2017

USFT-HOFFMAN-S17S19G1

4 membres

5 tutoriels rédigés

0 commentaires

Ajouter un commentaire

Nombre de vues :

Dernières 24 heures : 0

7 derniers jours : 0

30 derniers jours : 5

Total : 987