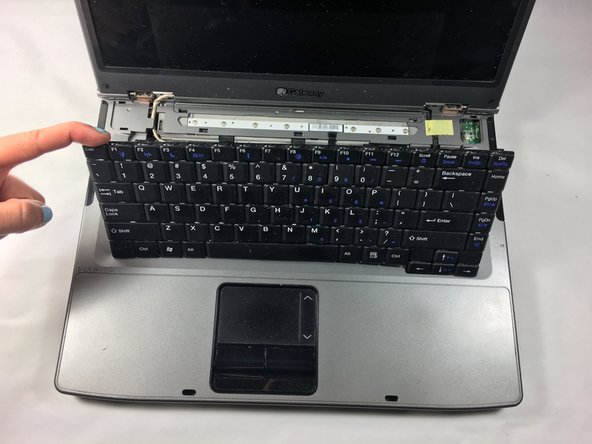
Aller au contenu principal

GATEWAY ML6720 Keyboard Replacement

Ce dont vous avez besoin

    • Flip the laptop on to the backside.

  1. GATEWAY ML6720 Keyboard Replacement: étape 2, image 1 de 1
    • Locate the battery at the very top on the backside of the laptop.

  2. GATEWAY ML6720 Keyboard Replacement: étape 3, image 1 de 2 GATEWAY ML6720 Keyboard Replacement: étape 3, image 2 de 2
    • Slide the latch in the top right corner to the right, to set it to unlocked.

  3. GATEWAY ML6720 Keyboard Replacement: étape 4, image 1 de 2 GATEWAY ML6720 Keyboard Replacement: étape 4, image 2 de 2
    • Hold the other latch in the top left corner to the left.

    • Hold it in that place with your thumb until the completion of the next step. (This step unlocks the second latch.)

  4. GATEWAY ML6720 Keyboard Replacement: étape 5, image 1 de 2 GATEWAY ML6720 Keyboard Replacement: étape 5, image 2 de 2
    • With both latches unlocked you can now slide out the battery, by pushing it off the top.

  5. GATEWAY ML6720 Keyboard Replacement, Keyboard: étape 6, image 1 de 1
    • Turn the laptop on its backside with the stickers and barcode facing you.

  6. GATEWAY ML6720 Keyboard Replacement: étape 7, image 1 de 3 GATEWAY ML6720 Keyboard Replacement: étape 7, image 2 de 3 GATEWAY ML6720 Keyboard Replacement: étape 7, image 3 de 3
    • Be careful of losing the screws because of how small they are

    • Remove the six 2.0mm Phillips screws and panels from the back of the RAM, motherboard, and laptop fan.

  7. GATEWAY ML6720 Keyboard Replacement: étape 8, image 1 de 1
    • Have your laptop remained on the backside

    • Remove the twelve identical 2.0mm Phillips Screws located around the back of the laptop using the Phillips #0 Screwdriver.

    • Remove the entire back panel of the laptop

  8. GATEWAY ML6720 Keyboard Replacement: étape 9, image 1 de 2 GATEWAY ML6720 Keyboard Replacement: étape 9, image 2 de 2
    Outil utilisé dans cette étape :
    Tweezers
    $4.99
    J'achète
    • Using a pair of tweezers or the tip of your screw driver, dig into the laptop cover and apply force to pop it out.

    • Do this on the left and right side of the cover

  9. GATEWAY ML6720 Keyboard Replacement: étape 10, image 1 de 2 GATEWAY ML6720 Keyboard Replacement: étape 10, image 2 de 2
    • Pull up the keyboard with your finger

Conclusion

To reassemble your device, follow these instructions in reverse order.

Nathan Da Silva

Membre depuis le 10/19/16

401 Réputation

4 tutoriels rédigés

Équipe

UMass Dartmouth, Team 2-3, Isaacson Fall 2016 Membre de l'équipe UMass Dartmouth, Team 2-3, Isaacson Fall 2016

UMASSD-ISAACSON-F16S2G3

2 membres

10 tutoriels rédigés

0 commentaires

Ajouter un commentaire

Nombre de vues :

Dernières 24 heures : 0

7 derniers jours : 0

30 derniers jours : 7

Total : 537