Cette version peut contenir des modifications incorrectes. Passez au dernier aperçu vérifié.
Ce dont vous avez besoin
-
Cette étape n’est pas traduite. Aidez à la traduire
-
Place the Game Boy Pocket face-down on a clean, flat surface.
-
Remove batteries from battery compartment.
-
Use a Y1 tri-wing screwdriver and turn counterclockwise to remove the four external screws.
-
Use a Y1 tri-wing screwdriver and turn counterclockwise to remove the two screws inside the battery compartment.
-
-
Cette étape n’est pas traduite. Aidez à la traduire
-
Place your hands on the front and back covers of the Game Boy Pocket, and carefully separate the device.
-
-
Cette étape n’est pas traduite. Aidez à la traduire
-
Use a Phillips #1 screwdriver and turn counterclockwise to remove the three screws on the motherboard.
-
-
-
Cette étape n’est pas traduite. Aidez à la traduire
-
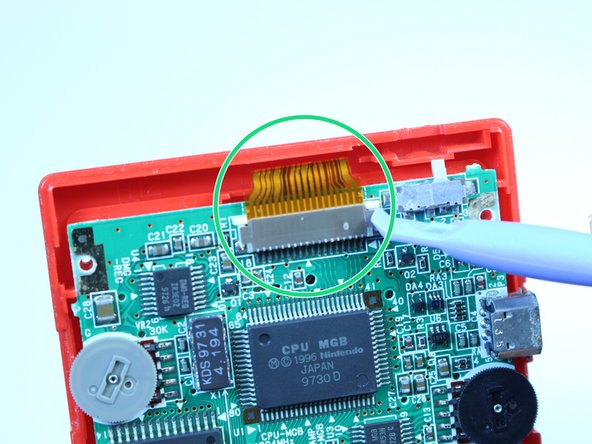
Use a plastic opening tool to dislodge and remove the clip securing the ribbon cable.
-
-
Cette étape n’est pas traduite. Aidez à la traduire
-
Use a plastic opening tool to dislodge the ribbon cable.
-
-
Cette étape n’est pas traduite. Aidez à la traduire
-
Grab the black piece protruding from the motherboard, and lift up to remove the motherboard.
-
-
Cette étape n’est pas traduite. Aidez à la traduire
-
Use a plastic opening tool to lift the LCD screen away from the front cover.
-
Use your fingers to remove the LCD screen.
-
Annulation : je n'ai pas terminé ce tutoriel.
15 autres ont terminé cette réparation.
3 commentaires
please can anyone give me a website that sells replacemtn screens for the Gameboy pocket?
There's no website that sells replacement screens the only way to get one is to order another Gameboy off of eBay and take out the screen
I get mine from Handheld Legend. They have all the Gameboy parts you could ever want.


