Aller au contenu principal

Garmin Dash Cam 20 Motherboard Replacement

Ce dont vous avez besoin

  1. Garmin Dash Cam 20 Motherboard Replacement, Internal Assembly: étape 1, image 1 de 2 Garmin Dash Cam 20 Motherboard Replacement, Internal Assembly: étape 1, image 2 de 2
    • Be sure to turn off the Dash Cam by pressing the power button.

  2. Garmin Dash Cam 20 Motherboard Replacement: étape 2, image 1 de 2 Garmin Dash Cam 20 Motherboard Replacement: étape 2, image 2 de 2
    • Rotate the Dash Cam to where the socket faces you.

    • Remove the 9 mm screw using the Torx T6 screwdriver.

  3. Garmin Dash Cam 20 Motherboard Replacement: étape 3, image 1 de 2 Garmin Dash Cam 20 Motherboard Replacement: étape 3, image 2 de 2
    • Remove the Dash Cam socket piece.

  4. Garmin Dash Cam 20 Motherboard Replacement: étape 4, image 1 de 2 Garmin Dash Cam 20 Motherboard Replacement: étape 4, image 2 de 2
    • Rotate the Dash Cam to where the product information faces you.

    • Remove the two 5 mm screws using the Torx T5 screwdriver.

  5. Garmin Dash Cam 20 Motherboard Replacement: étape 5, image 1 de 3 Garmin Dash Cam 20 Motherboard Replacement: étape 5, image 2 de 3 Garmin Dash Cam 20 Motherboard Replacement: étape 5, image 3 de 3
    • Remove top case from the bottom case.

    • The compact nature of the casing requires use of the metal spudger for needed leverage.

  6. Garmin Dash Cam 20 Motherboard Replacement: étape 6, image 1 de 3 Garmin Dash Cam 20 Motherboard Replacement: étape 6, image 2 de 3 Garmin Dash Cam 20 Motherboard Replacement: étape 6, image 3 de 3
    • Remove the two 5mm screws using the Torx T5 screwdriver

    • By removing the screws, the metal battery frame will now become free from the rest of the device.

  7. Garmin Dash Cam 20 Motherboard Replacement, Motherboard Components: étape 7, image 1 de 2 Garmin Dash Cam 20 Motherboard Replacement, Motherboard Components: étape 7, image 2 de 2
    • This step shows the use of an incorrect tool. Always use an ESD safe tool, like a nylon spudger, when working with delicate internal components.

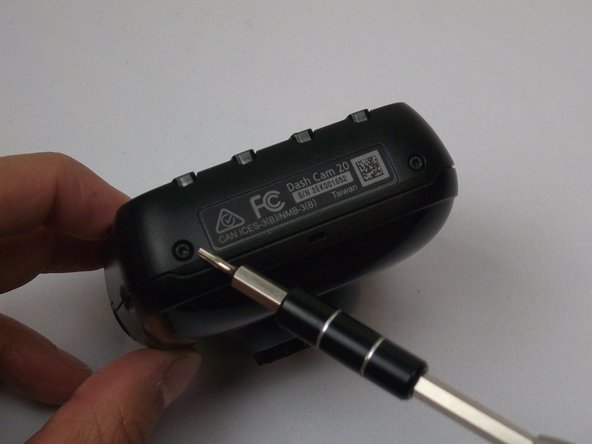
    • Use the nylon spudger to pry the corner of the case off of the motherboard.

  8. Garmin Dash Cam 20 Motherboard Replacement: étape 8, image 1 de 3 Garmin Dash Cam 20 Motherboard Replacement: étape 8, image 2 de 3 Garmin Dash Cam 20 Motherboard Replacement: étape 8, image 3 de 3
    • Remove the metal case off of the motherboard.

  9. Garmin Dash Cam 20 Motherboard Replacement: étape 9, image 1 de 3 Garmin Dash Cam 20 Motherboard Replacement: étape 9, image 2 de 3 Garmin Dash Cam 20 Motherboard Replacement: étape 9, image 3 de 3
    • Remove the battery connection.

  10. Garmin Dash Cam 20 Motherboard Replacement: étape 10, image 1 de 3 Garmin Dash Cam 20 Motherboard Replacement: étape 10, image 2 de 3 Garmin Dash Cam 20 Motherboard Replacement: étape 10, image 3 de 3
    • Remove the three 5 mm screws using the Torx T5 screwdriver.

  11. Garmin Dash Cam 20 Motherboard Replacement: étape 11, image 1 de 3 Garmin Dash Cam 20 Motherboard Replacement: étape 11, image 2 de 3 Garmin Dash Cam 20 Motherboard Replacement: étape 11, image 3 de 3
    Outil utilisé dans cette étape :
    Tweezers
    $4.99
    J'achète
    • Use tweezers to remove the connector on the top right of the motherboard.

  12. Garmin Dash Cam 20 Motherboard Replacement: étape 12, image 1 de 3 Garmin Dash Cam 20 Motherboard Replacement: étape 12, image 2 de 3 Garmin Dash Cam 20 Motherboard Replacement: étape 12, image 3 de 3
    • Remove the motherboard from the case and flip to reveal SD connection.

    • Use tweezers to remove the connector next to the SD card slot.

  13. Garmin Dash Cam 20 Motherboard Replacement: étape 13, image 1 de 1
    • The motherboard is now removed aside from the copper strip and its connector.

    • Disconnect from the front case and the copper strip.

Conclusion

To reassemble your device, follow these instructions in reverse order.

Jesse Hillman

Membre depuis le 10/04/16

757 Réputation

5 tutoriels rédigés

Équipe

USF Tampa, Team 2-1, Cagle Fall 2016 Membre de l'équipe USF Tampa, Team 2-1, Cagle Fall 2016

USFT-CAGLE-F16S2G1

4 membres

5 tutoriels rédigés

0 commentaires

Ajouter un commentaire

Nombre de vues :

Dernières 24 heures : 2

7 derniers jours : 4

30 derniers jours : 11

Total : 815