Aller au contenu principal

Garmin Nuvi 2455LMT Back Panel Assembly Replacement

Ce dont vous avez besoin

  1. Garmin Nuvi 2455LMT Back Panel Assembly Replacement, Back Panel Assembly: étape 1, image 1 de 1
    • Remove the four 2.5mm screws from the back assembly with a Torx #04 Screwdriver.

    • Holding the GPS with a free hand while unscrewing the small screws will help stabilize the device.

  2. Garmin Nuvi 2455LMT Back Panel Assembly Replacement: étape 2, image 1 de 2 Garmin Nuvi 2455LMT Back Panel Assembly Replacement: étape 2, image 2 de 2
    • Use the plastic opening tool on all four sides of the device to open the Garmin Nuvi LMT2455 Back Panel.

    • To properly remove the back cover assembly pry open both the back and sides of the assembly.

  3. Garmin Nuvi 2455LMT Back Panel Assembly Replacement: étape 3, image 1 de 3 Garmin Nuvi 2455LMT Back Panel Assembly Replacement: étape 3, image 2 de 3 Garmin Nuvi 2455LMT Back Panel Assembly Replacement: étape 3, image 3 de 3
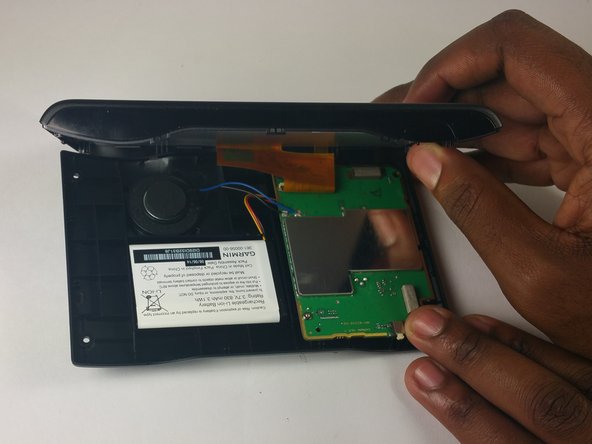
    • Open the device carefully being wary of the orange band that is going from the screen to the motherboard.

    • Remove the orange band by carefully lifting the lip that connects it to the motherboard.

Conclusion

To reassemble your device, follow these instructions in reverse order.

2 autres ont terminé cette réparation.

Nathaniel Williams

Membre depuis le 09/19/16

264 Réputation

2 tutoriels rédigés

Équipe

USF Tampa, Team 2-3, Blackwell Fall 2016 Membre de l'équipe USF Tampa, Team 2-3, Blackwell Fall 2016

USFT-BLACKWELL-F16S2G3

4 membres

5 tutoriels rédigés

0 commentaires

Ajouter un commentaire

Nombre de vues :

Dernières 24 heures : 0

7 derniers jours : 1

30 derniers jours : 4

Total : 944