Aller au contenu principal

Garmin STRIKER 4 Silicon Buttons Replacement

Ce dont vous avez besoin

  1. Garmin STRIKER 4 Silicon Buttons Replacement, Backing: étape 1, image 1 de 3 Garmin STRIKER 4 Silicon Buttons Replacement, Backing: étape 1, image 2 de 3 Garmin STRIKER 4 Silicon Buttons Replacement, Backing: étape 1, image 3 de 3
    • Flip the device so the back is facing up.

  2. Garmin STRIKER 4 Silicon Buttons Replacement: étape 2, image 1 de 3 Garmin STRIKER 4 Silicon Buttons Replacement: étape 2, image 2 de 3 Garmin STRIKER 4 Silicon Buttons Replacement: étape 2, image 3 de 3
    • Remove all six 6 mm screws using a Phillips #0 screwdriver.

    • Detach and flip the backside to open the device.

  3. Garmin STRIKER 4 Silicon Buttons Replacement, Motherboard: étape 3, image 1 de 2 Garmin STRIKER 4 Silicon Buttons Replacement, Motherboard: étape 3, image 2 de 2
    • Slide out the screen cable from the motherboard using the iFixit opening tool or your fingernail.

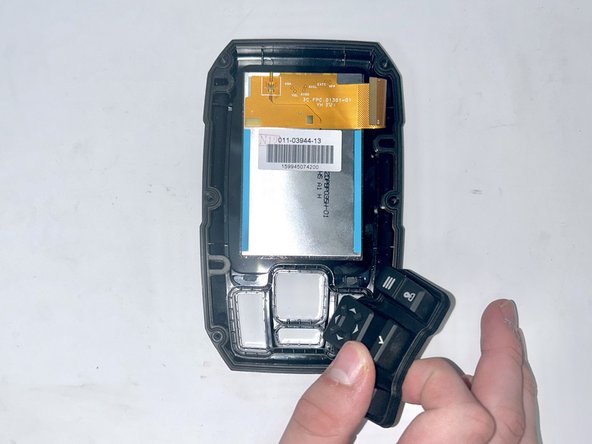
    • Remove the motherboard from the device.

  4. Garmin STRIKER 4 Silicon Buttons Replacement, Silicon Buttons: étape 4, image 1 de 2 Garmin STRIKER 4 Silicon Buttons Replacement, Silicon Buttons: étape 4, image 2 de 2
    • Use the iFixit opening tool to lift the silicon buttons from their original casing.

Conclusion

To reassemble your device, follow these instructions in reverse order.

2 autres ont terminé cette réparation.

Eliza Goodwin

Membre depuis le 09/20/23

196 Réputation

2 tutoriels rédigés

Équipe

Utah Tech University, Team 1-5, McMurrin Fall 2023 Membre de l'équipe Utah Tech University, Team 1-5, McMurrin Fall 2023

UTAHTECH-MCMURRIN-F23S1G5

3 membres

4 tutoriels rédigés

0 commentaires

Ajouter un commentaire

Nombre de vues :

Dernières 24 heures : 0

7 derniers jours : 1

30 derniers jours : 4

Total : 86