Aller au contenu principal

Gateway KAV60 LT2016U Webcam Replacement

Ce dont vous avez besoin

  1. Gateway KAV60 LT2016U Webcam Replacement, Battery: étape 1, image 1 de 3 Gateway KAV60 LT2016U Webcam Replacement, Battery: étape 1, image 2 de 3 Gateway KAV60 LT2016U Webcam Replacement, Battery: étape 1, image 3 de 3
    • Unlock the tab located in the top left corner of the netbook.

    • The red tab indicated that the battery has been properly unlocked.

    • Remove the battery.

    • When working with electronics, it is always wise to remove the power source before taking the device apart.

  2. Gateway KAV60 LT2016U Webcam Replacement, Upper Cover: étape 2, image 1 de 1
    • Make sure the RAM, hard drive, and WiFi card have been removed from the computer before trying to take off the cover so they are not damaged in the process.

  3. Gateway KAV60 LT2016U Webcam Replacement: étape 3, image 1 de 2 Gateway KAV60 LT2016U Webcam Replacement: étape 3, image 2 de 2
    • Remove six (6) 5mm screws, two (2) 17.5mm screws, and three (3) 2.5mm screws from the back, using the Phillips #0 screwdriver, as marked here.

  4. Gateway KAV60 LT2016U Webcam Replacement: étape 4, image 1 de 3 Gateway KAV60 LT2016U Webcam Replacement: étape 4, image 2 de 3 Gateway KAV60 LT2016U Webcam Replacement: étape 4, image 3 de 3
    • Pry up the keyboard using a spudger or plastic opening tool in the exact location shown in the photograph.

    • Don't use a screwdriver as a pry tool as shown in this example.

    • Carefully disconnect the keyboard ribbon cable from the motherboard, and remove the keyboard.

  5. Gateway KAV60 LT2016U Webcam Replacement: étape 5, image 1 de 1
    • Remove the five (5) 5mm screws shown here using the Phillips #0 screwdriver.

  6. Gateway KAV60 LT2016U Webcam Replacement: étape 6, image 1 de 2 Gateway KAV60 LT2016U Webcam Replacement: étape 6, image 2 de 2
    • Separate the upper cover from the back cover. It is possible to do this without a tool, but you may also use a plastic opening tool for added leverage.

    • Be careful to keep even pressure all the way around the cover so that it is not bent beyond repair.

    • Carefully disconnect two ribbon cables to complete the separation of the upper cover.

  7. Gateway KAV60 LT2016U Webcam Replacement, LCD: étape 7, image 1 de 3 Gateway KAV60 LT2016U Webcam Replacement, LCD: étape 7, image 2 de 3 Gateway KAV60 LT2016U Webcam Replacement, LCD: étape 7, image 3 de 3
    • Pry the border around the monitor off of the top cover using a plastic opening tool, as shown.

    • Be careful not to damage the computer screen in the process

  8. Gateway KAV60 LT2016U Webcam Replacement: étape 8, image 1 de 2 Gateway KAV60 LT2016U Webcam Replacement: étape 8, image 2 de 2
    • Separate the monitor from the border cover once all snap connections have been pried apart.

  9. Gateway KAV60 LT2016U Webcam Replacement: étape 9, image 1 de 1
    • Remove the six (6) 5mm screws shown here using the Phillips #0 screwdriver.

  10. Gateway KAV60 LT2016U Webcam Replacement: étape 10, image 1 de 2 Gateway KAV60 LT2016U Webcam Replacement: étape 10, image 2 de 2
    • Take the screen out of the top cover.

  11. Gateway KAV60 LT2016U Webcam Replacement, Webcam: étape 11, image 1 de 2 Gateway KAV60 LT2016U Webcam Replacement, Webcam: étape 11, image 2 de 2
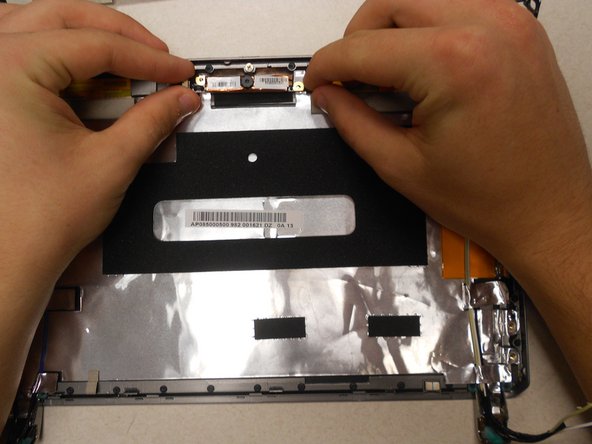
    • The webcam is located here, as shown.

    • Disconnect the webcam from the wires attaching it to the computer.

    • Lift the webcam away from the top cover.

Conclusion

To reassemble your device, follow these instructions in reverse order.

Lydia Benjock

Membre depuis le 10/18/13

1 216 Réputation

10 tutoriels rédigés

Équipe

Clemson, Team 14-3, Benson Fall 2013 Membre de l'équipe Clemson, Team 14-3, Benson Fall 2013

CLEM-BENSON-F13S14G3

3 membres

22 tutoriels rédigés

0 commentaires

Ajouter un commentaire

Nombre de vues :

Dernières 24 heures : 0

7 derniers jours : 2

30 derniers jours : 2

Total : 516