Aller au contenu principal

Geardup RC Ford Mustang GT Motor/Circuit Board Enclosure

Conditions préalables uniquement
Ce tutoriel est uniquement destiné à être utilisé comme prérequis d'autres tutoriels. Il ne se suffit pas à lui-même.

Ce dont vous avez besoin

  1. Geardup RC Ford Mustang GT Motor/Circuit Board Enclosure, Battery Cover: étape 1, image 1 de 3 Geardup RC Ford Mustang GT Motor/Circuit Board Enclosure, Battery Cover: étape 1, image 2 de 3 Geardup RC Ford Mustang GT Motor/Circuit Board Enclosure, Battery Cover: étape 1, image 3 de 3
    • Remove the 5mm Phillips #0 screw from the bottom of the car, located between the rear wheels.

    • Gently lift the battery cover from the car to expose the batteries.

  2. Geardup RC Ford Mustang GT Motor/Circuit Board Enclosure, Lower RC Car: étape 2, image 1 de 2 Geardup RC Ford Mustang GT Motor/Circuit Board Enclosure, Lower RC Car: étape 2, image 2 de 2
    • Flip the car over and remove the four 5mm Phillips #0 screws that hold the shell to the car chassis.

  3. Geardup RC Ford Mustang GT Motor/Circuit Board Enclosure, Shell: étape 3, image 1 de 1
    • Flip the car over again to its upright position and vertically lift the shell from the car.

    • During re-assembly, make sure the shell is correctly aligned. If it is not aligned correctly, it may rub on the wheels, possibly preventing them from turning.

  4. Geardup RC Ford Mustang GT Motor/Circuit Board Enclosure, Rear Wheels: étape 4, image 1 de 2 Geardup RC Ford Mustang GT Motor/Circuit Board Enclosure, Rear Wheels: étape 4, image 2 de 2
    • Unscrew and remove the 5mm Phillips #0 screw located at the center of the wheel while holding the wheel still.

    • Slide the wheel off of the axle.

    • Repeat the previous steps for the other rear wheel.

  5. Geardup RC Ford Mustang GT Motor/Circuit Board Enclosure, Motor/Circuit Board Enclosure: étape 5, image 1 de 2 Geardup RC Ford Mustang GT Motor/Circuit Board Enclosure, Motor/Circuit Board Enclosure: étape 5, image 2 de 2
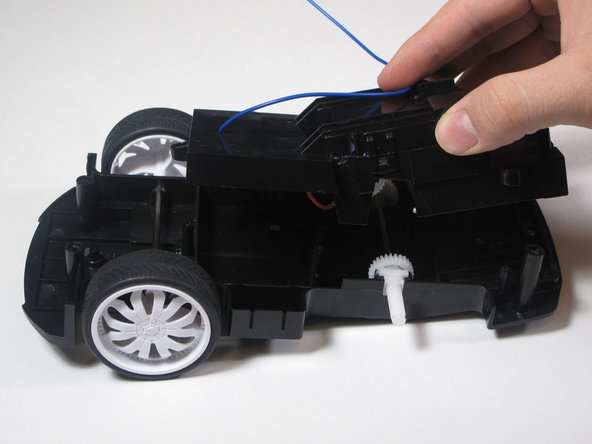
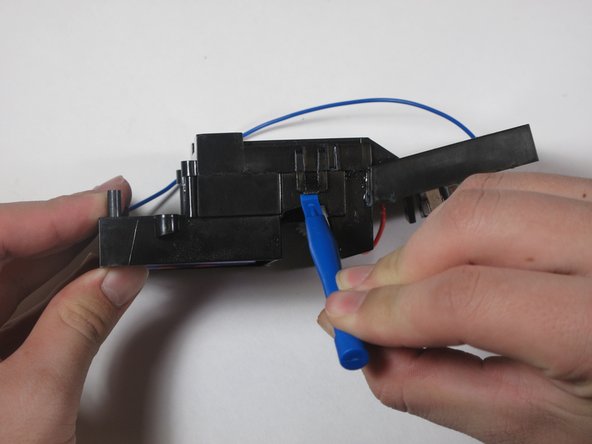
    • Remove the eight 5mm Phillips #0 screws located on the top of the motor/circuit board enclosure.

    • Vertically lift the motor/circuit board enclosure from the car chassis.

  6. Geardup RC Ford Mustang GT Motor/Circuit Board Enclosure: étape 6, image 1 de 2 Geardup RC Ford Mustang GT Motor/Circuit Board Enclosure: étape 6, image 2 de 2
    • Using a small plastic opening tool, gently pry the clips to release the tabs on the circuit board casing. The clips can be located above where the rear wheels used to be.

    • Lift the clips just enough to release them from the tabs. If they are pried too far, they may snap off.

    • There is a clear gear grease inside the enclosure.

  7. Geardup RC Ford Mustang GT Motor/Circuit Board Enclosure: étape 7, image 1 de 2 Geardup RC Ford Mustang GT Motor/Circuit Board Enclosure: étape 7, image 2 de 2
    • Lift the circuit board casing from the enclosure to reveal the motors, gears, and circuit board.

    • During re-assembly, make sure the wires are not pinched between plastic dividers in the enclosure as this may damage them.

Conclusion

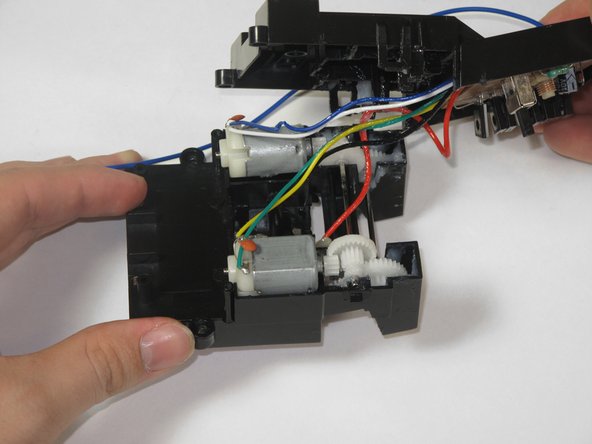
To reassemble your device, follow these instructions in reverse order.

Jake Stone

Membre depuis le 02/01/15

611 Réputation

4 tutoriels rédigés

Équipe

Cal Poly, Team 8-38, Amido Winter 2015 Membre de l'équipe Cal Poly, Team 8-38, Amido Winter 2015

CPSU-AMIDO-W15S8G38

4 membres

8 tutoriels rédigés

0 commentaires

Ajouter un commentaire

Nombre de vues :

Dernières 24 heures : 0

7 derniers jours : 0

30 derniers jours : 0

Total : 149