Aller au contenu principal
Pour réparer ensemble - Je crée un compte

Glass Shelving Replacement

Ce dont vous avez besoin

    1. Glass Shelving Replacement, Bathroom glass shelving: étape 1, image 1 de 1
      • Prepare your work area.

      • You will need a relatively wide platform to place the glass and cutting tools.

      Demander à FixBot

      Ajouter un commentaire

    2. Glass Shelving Replacement: étape 2, image 1 de 1
      • Wipe the glass surface clean.

      Demander à FixBot

      Ajouter un commentaire

    3. Glass Shelving Replacement: étape 3, image 1 de 3 Glass Shelving Replacement: étape 3, image 2 de 3 Glass Shelving Replacement: étape 3, image 3 de 3
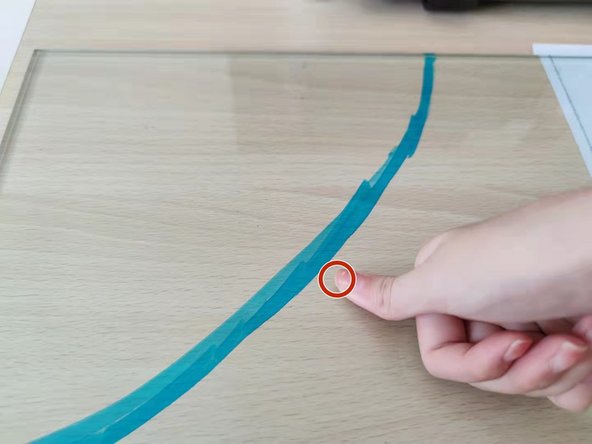
      • Mark and measure the area to be cut.

      • Decide the size of the cut according to the size of the old glass panel.

      • It is recommended to use colored pens or markers to mark the glass directly for the next step of cutting.

      Demander à FixBot

      Ajouter un commentaire

    4. Glass Shelving Replacement: étape 4, image 1 de 1
      • Use a glass cutter to cut the glass panel.

      • Here the angle between the glass cutter and the glass should be kept at 45 degrees. Try to keep the force consistent and draw a neat and smooth cutting line.

      • Pay attention to the sound. The less sound you make, the better the scribing effect will be. Too much force will easily lead to broken glass.

      Demander à FixBot

      Ajouter un commentaire

    5. Glass Shelving Replacement: étape 5, image 1 de 3 Glass Shelving Replacement: étape 5, image 2 de 3 Glass Shelving Replacement: étape 5, image 3 de 3
      • Split the glass plate.

      • Grasp the ends of the glass near the dividing line with your hands. Using your wrist, apply gentle pressure along the scratch line to split the glass in half. With just your wrist pressing on the glass, the elbow joint does not need to move.

      • If the glass panel is curved in shape, you need to lightly bounce the glass and then apply gentle pressure from the back of the glass against the middle point of the scratch line.

      Demander à FixBot

      Ajouter un commentaire

    6. Glass Shelving Replacement: étape 6, image 1 de 3 Glass Shelving Replacement: étape 6, image 2 de 3 Glass Shelving Replacement: étape 6, image 3 de 3
      • Sand the edges of the glass plate. Use sandpaper to clear off the sharp edges of the glass plate until the edges appear matte.

      • You can use various grains of sandpaper to reach the ideal state. If you have access to a glass polishing machine, the effect is even better.

      Demander à FixBot

      Ajouter un commentaire

    7. Glass Shelving Replacement: étape 7, image 1 de 3 Glass Shelving Replacement: étape 7, image 2 de 3 Glass Shelving Replacement: étape 7, image 3 de 3
      • Insert the glass plate into the slot on the wall. Finish the repair.

      • If the glass panel has small railings and other accessories, you can use a glue gun or strong glue to secure it.

      Demander à FixBot

      Ajouter un commentaire

Conclusion

To reassemble your device, follow these instructions in reverse order.

Annulation : je n'ai pas terminé ce tutoriel.

2 autres ont terminé cette réparation.

T TERESA

Membre depuis le 09/12/21

169 Réputation

1 tutoriel rédigé

Équipe

York University, Team E-25, Melo-Thaiss Fall 2021 Membre de l'équipe York University, Team E-25, Melo-Thaiss Fall 2021

YORK-MELO-THAISS-F21SEG25

1 membre

12 tutoriels rédigés

0 commentaires de tutoriel

Ajouter un commentaire

Nombre de vues :

Dernières 24 heures : 6

7 derniers jours : 32

30 derniers jours : 148

Total : 1,941