Aller au contenu principal

GoPro HD Hero2 LCD Replacement

Ce dont vous avez besoin

  1. GoPro HD Hero2 LCD Replacement, Back Cover: étape 1, image 1 de 2 GoPro HD Hero2 LCD Replacement, Back Cover: étape 1, image 2 de 2
    • Place your thumb on the indentation in the back case on the side of the GoPro.

    • Gently press down with your thumb and lift the back cover away from the case to remove it.

  2. GoPro HD Hero2 LCD Replacement, Battery: étape 2, image 1 de 2 GoPro HD Hero2 LCD Replacement, Battery: étape 2, image 2 de 2
    • Slide a plastic opening tool between the battery and the rear case.

    • Gently pry the battery up and out of the rear case.

  3. GoPro HD Hero2 LCD Replacement: étape 3, image 1 de 1
    • Remove the battery from the case.

  4. GoPro HD Hero2 LCD Replacement, Rear Case: étape 4, image 1 de 1
    • Remove the four Phillips #00 screws securing the rear case to the rest of the device:

    • Two 5.5 mm coarse thread screws.

    • Two 4.4 mm fine thread screws.

  5. GoPro HD Hero2 LCD Replacement: étape 5, image 1 de 2 GoPro HD Hero2 LCD Replacement: étape 5, image 2 de 2
    • Slide the edge of a plastic opening tool underneath the sticker on the rear cover and gently peel the sticker up.

    • Once you have enough of the sticker peeled up with the plastic opening tool, grab an edge of it with your fingers and pull it off completely.

  6. GoPro HD Hero2 LCD Replacement: étape 6, image 1 de 2 GoPro HD Hero2 LCD Replacement: étape 6, image 2 de 2
    • Grasp the rear case and lift it off of the front case.

    • Do not try to completely remove the rear case yet, as it is still attached by the display port ribbon cable.

  7. GoPro HD Hero2 LCD Replacement: étape 7, image 1 de 2 GoPro HD Hero2 LCD Replacement: étape 7, image 2 de 2
    • Using a plastic opening tool or your fingernail, flip up the locking tab on the SD board ribbon cable ZIF connector on the motherboard assembly.

    • Be careful that you are prying on the locking tab, and not the connector itself.

    • Use a pair of tweezers to remove the SD board ribbon cable from its connector on the motherboard.

    Hallo, ich fürchte bei mir ist das obere Flexkabel defekt.(oben mittig, welches nach hinten weg geht) Gibt es da ersatz oder reperaturen?

    moejoe DO - Réponse

  8. GoPro HD Hero2 LCD Replacement: étape 8, image 1 de 3 GoPro HD Hero2 LCD Replacement: étape 8, image 2 de 3 GoPro HD Hero2 LCD Replacement: étape 8, image 3 de 3
    • Lift the speaker out of the rear case with the tip of a spudger.

    • Remove the rear case.

    It's not a speaker it the microphone and the wire is very fragile.

    Matt c - Réponse

    Hello. GoPro HERO2 there. overheating after doing update. 10-15 minutes after closing. overheating.

    coskunadnan - Réponse

    You can try put some new heat sink compound under that silver big element (radiator) that you see in step 9 (simply remove 2 screws holding it).

    hellfire -

  9. GoPro HD Hero2 LCD Replacement, Motherboard Assembly: étape 9, image 1 de 1
    • Remove the three screws securing the motherboard assembly to the front case:

    • Two 10.8 mm Phillips #00 screws.

    • One 4.8 mm Phillips #00 screw.

  10. GoPro HD Hero2 LCD Replacement: étape 10, image 1 de 2 GoPro HD Hero2 LCD Replacement: étape 10, image 2 de 2
    • Gently grab the edges of the motherboard assembly and lift it out of the front case.

  11. GoPro HD Hero2 LCD Replacement, LCD: étape 11, image 1 de 2 GoPro HD Hero2 LCD Replacement, LCD: étape 11, image 2 de 2
    • Turn the motherboard assembly over to the side with the LCD and the camera lens.

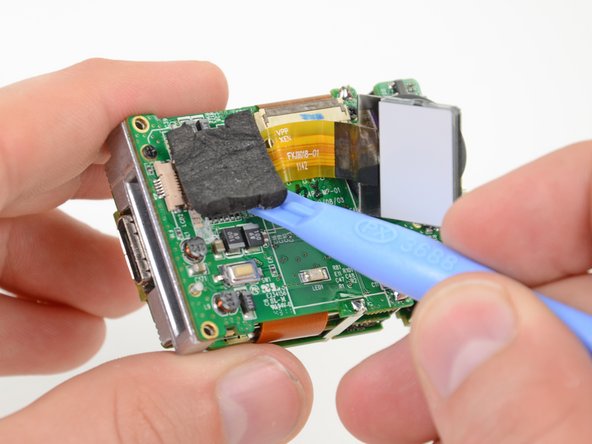
    • Gently wedge a plastic opening tool underneath the foam padding on top of the LCD ribbon cable.

    • Pry the foam padding up until the LCD ribbon cable can be lifted off the surface of the motherboard.

    • Do not try to remove the LCD yet, as its ribbon cable is still connected to the motherboard via a ZIF connector.

  12. GoPro HD Hero2 LCD Replacement: étape 12, image 1 de 2 GoPro HD Hero2 LCD Replacement: étape 12, image 2 de 2
    • Use the tip of a spudger to release the two outer tabs of the LCD ribbon cable ZIF connector.

    • Alternate pressing on both tabs until the connector is completely unfastened.

  13. GoPro HD Hero2 LCD Replacement: étape 13, image 1 de 1
    • Once its ribbon cable is free, remove the LCD from the motherboard assembly.

    Hi, where can i get to purchase this front led for my go pro 2?

    Smokie Cut - Réponse

Conclusion

To reassemble your device, follow these instructions in reverse order.

5 autres ont terminé cette réparation.

David Hodson

Membre depuis le 04/13/10

150 458 Réputation

127 tutoriels rédigés

13 commentaires

Where do you purchase the replacement lcd?

Max Kauker - Réponse

hero2 lcd led replacement part available here

http://ragecams.com/shop/gopro-hero2-lcd...

dennis -

I'm also looking for an LCD replacekit. Unfortionally I broken the front LCD of a GoPro Here 3 cam.

Where can I get one?

arno - Réponse

Im also in need of a LCD for my GoPro Here 3+

is there anyone who can help me and the other 2 guys ?!!

aria - Réponse

I ve just a reference (VPP XEN FKJ06018-01 1142) of the LCD but i m not abble to find the item... Someone can help us?

nicohangouet -

RageCams has all the gopro replacement parts:

http://ragecams.com/shop/advanced_search...

dennis -

Any find where to get the replacement LCDs from? (Required for gopro 2)?

Manjeet Ghataora - Réponse

Found Gopro parts in aliexpress

I bought a lcd front display (mine was broken) and replace, now it works perfect!! (it took me 1 year+ to find it)

natxogm - Réponse

RageCams also has all the parts available

http://ragecams.com/shop/gopro-hero2-lcd...

dennis -

Hello. GoPro HERO2 there. overheating after doing update. 10-15 minutes after closing. overheating.

coskunadnan - Réponse

hero2 lcd led replacement part available here:

http://ragecams.com/shop/gopro-hero2-lcd...

dennis - Réponse

Ajouter un commentaire

Nombre de vues :

Dernières 24 heures : 2

7 derniers jours : 5

30 derniers jours : 18

Total : 14,897