Cette version peut contenir des modifications incorrectes. Passez au dernier aperçu vérifié.
Ce dont vous avez besoin
-
Cette étape n’est pas traduite. Aidez à la traduire
-
Place your thumb on the indentation in the back case on the side of the GoPro.
-
Gently press down with your thumb and lift the back cover away from the case to remove it.
-
-
-
Faites glisser un outil pour ouvrir en plastique entre la batterie et le boîtier arrière.
-
Soulevez doucement la batterie pour la sortir du boîtier arrière.
-
-
Cette étape n’est pas traduite. Aidez à la traduire
-
Remove the four Phillips #00 screws securing the rear case to the rest of the device:
-
Two 5.5 mm coarse thread screws.
-
Two 4.4 mm fine thread screws.
-
-
Cette étape n’est pas traduite. Aidez à la traduire
-
Slide the edge of a plastic opening tool underneath the sticker on the rear cover and gently peel the sticker up.
-
Once you have enough of the sticker peeled up with the plastic opening tool, grab an edge of it with your fingers and pull it off completely.
-
-
-
Cette étape n’est pas traduite. Aidez à la traduire
-
Grasp the rear case and lift it off of the front case.
-
-
Cette étape n’est pas traduite. Aidez à la traduire
-
Using a plastic opening tool or your fingernail, flip up the locking tab on the SD board ribbon cable ZIF connector on the motherboard assembly.
-
Use a pair of tweezers to remove the SD board ribbon cable from its connector on the motherboard.
-
-
Cette étape n’est pas traduite. Aidez à la traduire
-
Lift the speaker out of the rear case with the tip of a spudger.
-
Remove the rear case.
-
-
Cette étape n’est pas traduite. Aidez à la traduire
-
Remove the three screws securing the motherboard assembly to the front case:
-
Two 10.8 mm Phillips #00 screws.
-
One 4.8 mm Phillips #00 screw.
-
-
Cette étape n’est pas traduite. Aidez à la traduire
-
Gently grab the edges of the motherboard assembly and lift it out of the front case.
-
-
Cette étape n’est pas traduite. Aidez à la traduire
-
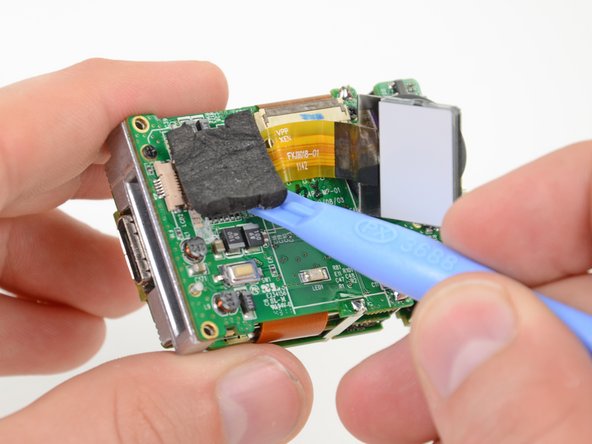
Gently wedge a plastic opening tool underneath the foam padding on top of the LCD ribbon cable.
-
Pry the foam padding up until the LCD ribbon cable can be lifted off the surface of the motherboard.
-
-
Cette étape n’est pas traduite. Aidez à la traduire
-
Use the tip of a spudger to release the two outer tabs of the LCD ribbon cable ZIF connector.
-
Alternate pressing on both tabs until the connector is completely unfastened.
-
-
Cette étape n’est pas traduite. Aidez à la traduire
-
Once its ribbon cable is free, remove the LCD from the motherboard assembly.
-


Annulation : je n'ai pas terminé ce tutoriel.
5 autres ont terminé cette réparation.
