Aller au contenu principal

GoPro Hero4 Black Midframe Housing Replacement

Conditions préalables uniquement
Ce tutoriel est uniquement destiné à être utilisé comme prérequis d'autres tutoriels. Il ne se suffit pas à lui-même.

Ce dont vous avez besoin

  1. GoPro Hero4 Black Midframe Housing Replacement, Midframe Housing: étape 1, image 1 de 3 GoPro Hero4 Black Midframe Housing Replacement, Midframe Housing: étape 1, image 2 de 3 GoPro Hero4 Black Midframe Housing Replacement, Midframe Housing: étape 1, image 3 de 3
    • Remove the faceplate by carefully prying around the edge using a plastic opening tool. Loosen the clips on the edge, then pull the faceplate off.

    • Use the tweezers to lift the faceplate from the rest of the device.

    • The power button on the front of the GoPro may pop off. Ensure to align it properly during reassembly.

  2. GoPro Hero4 Black Midframe Housing Replacement: étape 2, image 1 de 2 GoPro Hero4 Black Midframe Housing Replacement: étape 2, image 2 de 2
    • Using a #00 Phillips head screwdriver, remove the following screws:

    • One 4.6 mm screw

    • Three 8.2 mm screws

    • Two 6.1 mm screws

  3. GoPro Hero4 Black Midframe Housing Replacement: étape 3, image 1 de 2 GoPro Hero4 Black Midframe Housing Replacement: étape 3, image 2 de 2
    • Insert a metal spudger between the back plastic housing and the camera board assembly. Working around the edge to be careful of the inner components, carefully remove the camera.

  4. GoPro Hero4 Black Midframe Housing Replacement: étape 4, image 1 de 3 GoPro Hero4 Black Midframe Housing Replacement: étape 4, image 2 de 3 GoPro Hero4 Black Midframe Housing Replacement: étape 4, image 3 de 3
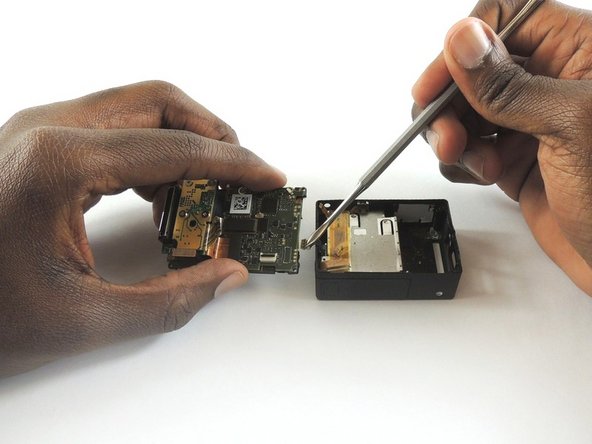
    • Using tweezers, remove the ribbon strip by pulling on it. This will remove the connection.

    • Push down on the three wires with the metal spudger and the clip will disconnect from the motherboard.

    • The clip must be pulled up and away from the motherboard. Attempting to slide it out will damage the clip.

    • During reassembly, remove the black tape on the ribbon cable, turn the camera upside down so you can see the port, and reinsert the cable with tweezers. It's a lot easier!

Conclusion

To reassemble your device, follow these instructions in reverse order.

Thomas Sullivan

Membre depuis le 02/20/17

589 Réputation

3 tutoriels rédigés

Équipe

USF Tampa, Team S2-G1, Sullivan Spring 2017 Membre de l'équipe USF Tampa, Team S2-G1, Sullivan Spring 2017

USFT-SULLIVAN-S17S2G1

4 membres

12 tutoriels rédigés

0 commentaires

Ajouter un commentaire

Nombre de vues :

Dernières 24 heures : 0

7 derniers jours : 0

30 derniers jours : 0

Total : 55