Aller au contenu principal

GoPro Hero5 Black Motherboard Replacement

Ce dont vous avez besoin

  1. GoPro Hero5 Black Motherboard Replacement, Battery: étape 1, image 1 de 3 GoPro Hero5 Black Motherboard Replacement, Battery: étape 1, image 2 de 3 GoPro Hero5 Black Motherboard Replacement, Battery: étape 1, image 3 de 3
    • While pressing the button on the bottom of the GoPro, slide the battery door to the side to pop it open.

  2. GoPro Hero5 Black Motherboard Replacement: étape 2, image 1 de 3 GoPro Hero5 Black Motherboard Replacement: étape 2, image 2 de 3 GoPro Hero5 Black Motherboard Replacement: étape 2, image 3 de 3
    • Grab the plastic flap on the battery and pull the battery out.

  3. GoPro Hero5 Black Motherboard Replacement, Back Housing: étape 3, image 1 de 2 GoPro Hero5 Black Motherboard Replacement, Back Housing: étape 3, image 2 de 2
    • Pull and twist the lens cover right or left until it pops off.

    • The lens cover is secured tightly and might be difficult to twist off.

    レンズを回すには爪などをレンズカバーと本体との隙間に入れて、手前に引き出してから回転させます。

    Taizo Yamamoto - Réponse

    Go around the gap between the lens cover and camera body with a thin spludger to open a small gap and the cover will twist off easily.

    Paul - Réponse

  4. GoPro Hero5 Black Motherboard Replacement: étape 4, image 1 de 1
    • This step is not necessary but will make the process of removing the faceplate much easier.

    • Refer to the iOpener instructions for how to heat up and use the iOpener.

    • Apply the heated iOpener to the front of the GoPro for a few minutes to melt the adhesive under the faceplate.

    • The heated iOpener is very hot and can burn your hands. Avoid burns by using towels or gloves to hold the iOpener.

  5. GoPro Hero5 Black Motherboard Replacement: étape 5, image 1 de 3 GoPro Hero5 Black Motherboard Replacement: étape 5, image 2 de 3 GoPro Hero5 Black Motherboard Replacement: étape 5, image 3 de 3
    • Starting with the edges, use the spudger to pry off the faceplate.

    • The faceplate is held down with adhesive and may take a while to get off.

  6. GoPro Hero5 Black Motherboard Replacement: étape 6, image 1 de 2 GoPro Hero5 Black Motherboard Replacement: étape 6, image 2 de 2
    • Remove the six T3 Torx screws.

    Where can I get the screw driver

    subashzeeq - Réponse

    Mine are actually T4 screws.

    John Hahn - Réponse

  7. GoPro Hero5 Black Motherboard Replacement: étape 7, image 1 de 3 GoPro Hero5 Black Motherboard Replacement: étape 7, image 2 de 3 GoPro Hero5 Black Motherboard Replacement: étape 7, image 3 de 3
    • Be careful when pulling open the motherboard assembly as it is still connected to the back housing by four cables. The cables may break if stretched.

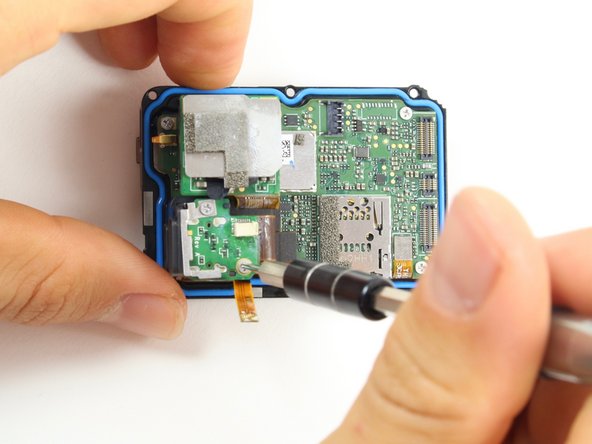
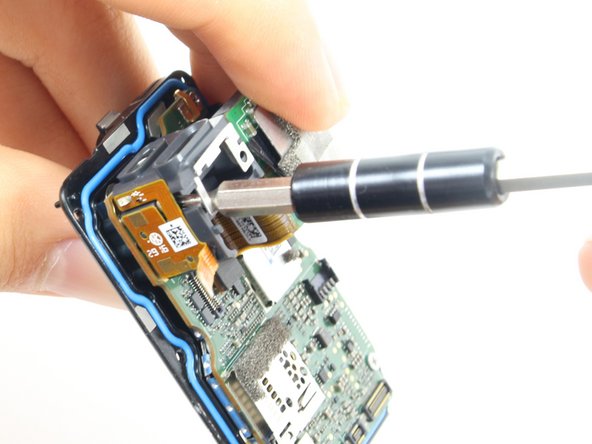
    • Using the spudger, slowly pry open the motherboard assembly from the LCD side of the GoPro.

    Little FYI ; pry slightly on the side with the LCD. Once it pops, work the other slightly. Then pull the board up and out but remember the cables. THE PICTURE ABOVE WHERE THE METAL SHIELD IS IS THE CAMERA LENS! CABLES ARE ON THE SIDE WHERE YOU BEGIN PRYING.

    stevan othon - Réponse

  8. GoPro Hero5 Black Motherboard Replacement: étape 8, image 1 de 3 GoPro Hero5 Black Motherboard Replacement: étape 8, image 2 de 3 GoPro Hero5 Black Motherboard Replacement: étape 8, image 3 de 3
    • Use the flat end of a spudger to pry the three ribbon cables connected to the side of the motherboard.

  9. GoPro Hero5 Black Motherboard Replacement: étape 9, image 1 de 2 GoPro Hero5 Black Motherboard Replacement: étape 9, image 2 de 2
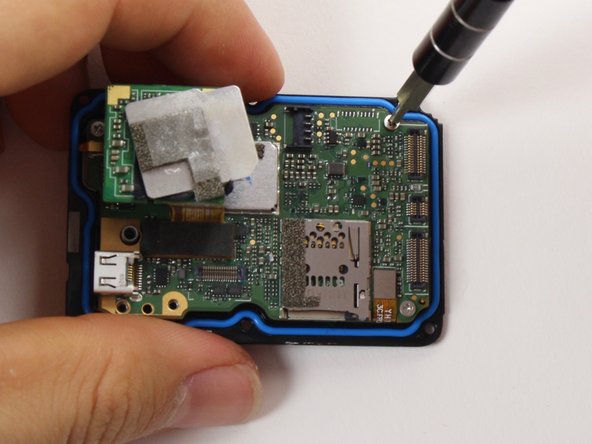
    • Use the flat end of the spudger to pry the battery housing power cable straight up from its socket on the motherboard.

    Does anyone know which are the specs of the connector/socket? Thanks

    Pietro De Caro - Réponse

  10. GoPro Hero5 Black Motherboard Replacement, Motherboard: étape 10, image 1 de 1
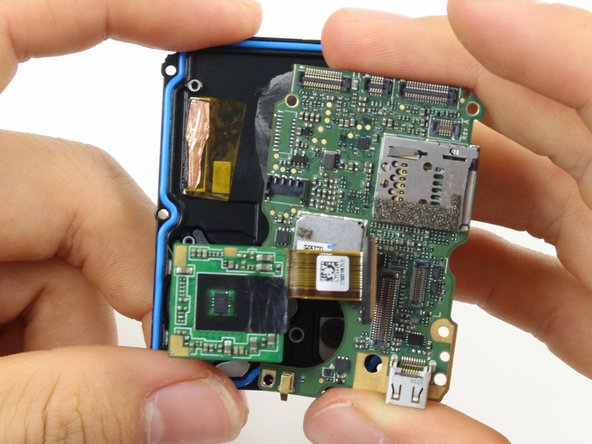
    • Use the flat end of the spudger to pry the black cover plate straight up from its socket on the motherboard.

  11. GoPro Hero5 Black Motherboard Replacement: étape 11, image 1 de 1
    • Use the tweezers to pull the ribbon cable connector out of its white socket on the charging assembly board.

  12. GoPro Hero5 Black Motherboard Replacement: étape 12, image 1 de 2 GoPro Hero5 Black Motherboard Replacement: étape 12, image 2 de 2
    • Remove the two #000 Phillips screw.

  13. GoPro Hero5 Black Motherboard Replacement: étape 13, image 1 de 2 GoPro Hero5 Black Motherboard Replacement: étape 13, image 2 de 2
    • Use the flat end of the spudger to pry the charging port ribbon cable connector straight up from its socket on the motherboard.

    • Once the ribbon cable is disconnected from the motherboard. The charging port assembly should come right off.

  14. GoPro Hero5 Black Motherboard Replacement: étape 14, image 1 de 2 GoPro Hero5 Black Motherboard Replacement: étape 14, image 2 de 2
    • Remove the 10mm #000 Phillips screw.

  15. GoPro Hero5 Black Motherboard Replacement: étape 15, image 1 de 1
    • Remove the charging assembly housing by pulling it straight up off the motherboard.

  16. GoPro Hero5 Black Motherboard Replacement: étape 16, image 1 de 2 GoPro Hero5 Black Motherboard Replacement: étape 16, image 2 de 2
    • Remove the two 6mm #000 Phillips screws.

    • Remove the two 2mm #000 Phillips screws.

  17. GoPro Hero5 Black Motherboard Replacement: étape 17, image 1 de 1
    • Use the flat end of the spudger to pry the lens assembly ribbon cable connector straight up from its socket on the motherboard.

  18. GoPro Hero5 Black Motherboard Replacement: étape 18, image 1 de 1
    • Use the flat end of the spudger to pry the LCD screen ribbon cable connector straight up from its socket on the motherboard.

  19. GoPro Hero5 Black Motherboard Replacement: étape 19, image 1 de 3 GoPro Hero5 Black Motherboard Replacement: étape 19, image 2 de 3 GoPro Hero5 Black Motherboard Replacement: étape 19, image 3 de 3
    • Use the flat end of the spudger to pry the motherboard off the midframe.

    • The motherboard is held onto the midframe with light adhesive and should come right off with a little force.

Conclusion

To reassemble your device, follow these instructions in reverse order.

20 autres ont terminé cette réparation.

Christopher Adams

Membre depuis le 10/03/16

2 112 Réputation

5 tutoriels rédigés

Équipe

Cal Poly, Team 18-6, Forte Fall 2016 Membre de l'équipe Cal Poly, Team 18-6, Forte Fall 2016

CPSU-FORTE-F16S18G6

4 membres

22 tutoriels rédigés

11 commentaires

Hi

I took off only faceplate. Do you guys have an idea how to make it waterproof again? What can be used as an adhesive? Thanks

ramone4 - Réponse

you can try silicone glue, although obviously there is no guarantee to what extent it would be waterproof.

mattatron4 -

I think you better use an extra waterproof case to put your GP5 in it

Loic - Réponse

I used this guide to replace the USB port in my GP5. Does anyone know of a good way to hold the face plate down once it’s been removed? Not looking to make it waterproof again, just trying to hold the faceplate down a little better.

Mario Wong - Réponse

I would try either a silicone- or cyanoacrylate- (super glue) based adhesive. You can try to peel off the blue gasket and/or sand where the two pieces meet for better adhesion.

mattatron4 -

Be careful with CA glue. The vapors as it dries can haze over some plastics. I’m going to try silicone-based.

Winston Moy -

Can you tell me where the WIFI card or antennae is and can it be permanently removed?  Thanks.

Jim Cork - Réponse

any chance to geht schematics on the hero5 or hero5 session? I need to replace some components

Jan - Réponse

Anyone know what type the clock battery is?

purnadika - Réponse

Thanks everyone that put together this tutorial. You saved me $130 bill from a repair shop or making my 5 an expensive paperweight!

David Lee - Réponse

Hello, Do somebody know what size the six screws showed on step 6?

Manuel Rivera - Réponse

Ajouter un commentaire

Nombre de vues :

Dernières 24 heures : 3

7 derniers jours : 26

30 derniers jours : 146

Total : 25,997