Aller au contenu principal

HKC P776A Wifi Antenna Replacement

Ce dont vous avez besoin

  1. HKC P776A Wifi Antenna Replacement, Separating Digitizer and Case: étape 1, image 1 de 1
    • Insert the plastic opening tool between the digitizer and the case.

    • Place the spudger in the gap created by the plastic opening tool to assist in separation.

  2. HKC P776A Wifi Antenna Replacement: étape 2, image 1 de 2 HKC P776A Wifi Antenna Replacement: étape 2, image 2 de 2
    • Slide the spudger along the perimeter of the device to fully separate the two pieces.

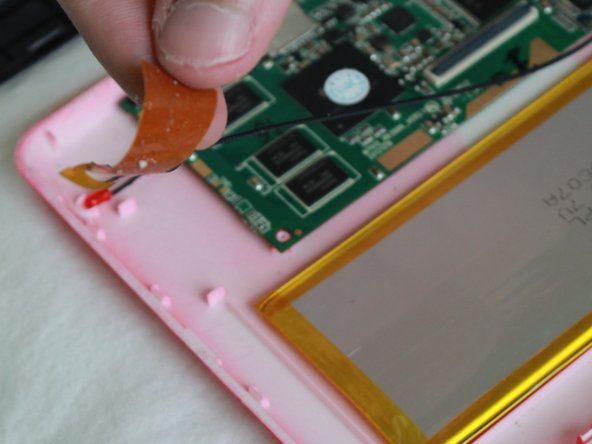
  3. HKC P776A Wifi Antenna Replacement, Wifi Antenna: étape 3, image 1 de 2 HKC P776A Wifi Antenna Replacement, Wifi Antenna: étape 3, image 2 de 2
    • Peel off the tape that is attaching the wifi antenna to the case.

  4. HKC P776A Wifi Antenna Replacement: étape 4, image 1 de 1
    • Using the soldering iron, heat up the solder that is attaching the antenna to the motheboard.

    • The heat from the soldering iron may cause personal injury or damage the internal components of the tablet.

  5. HKC P776A Wifi Antenna Replacement: étape 5, image 1 de 1
    Outil utilisé dans cette étape :
    Desoldering Pump
    $3.99
    J'achète
    • Suck up the leftover solder using the desoldering pump.

    • Remove the wifi antenna from the motherboard.

Conclusion

To reassemble your device, follow these instructions in reverse order.

Ryan Gornati

Membre depuis le 01/22/15

409 Réputation

4 tutoriels rédigés

Équipe

USF Tampa, Team 7-6, Remmell Winter 2015 Membre de l'équipe USF Tampa, Team 7-6, Remmell Winter 2015

USFT-REMMELL-W15S7G6

3 membres

14 tutoriels rédigés

0 commentaires

Ajouter un commentaire

Nombre de vues :

Dernières 24 heures : 1

7 derniers jours : 2

30 derniers jours : 10

Total : 129