Aller au contenu principal

HP 15-ay014dx Heat sink Replacement

Ce dont vous avez besoin

  1. HP 15-ay014dx Heat sink Replacement, Battery: étape 1, image 1 de 1
    • Disconnect device from power source and power down.

  2. HP 15-ay014dx Heat sink Replacement: étape 2, image 1 de 1
    • With the device turned upside down, use your index fingers to push the battery latches in towards each other.

  3. HP 15-ay014dx Heat sink Replacement: étape 3, image 1 de 1
    • The latch on your left will stay at the inward position, while the latch on the right will slide back out.

    • Gently grasp the battery and pull it back away from the device and yourself.

  4. HP 15-ay014dx Heat sink Replacement, Optical Drive: étape 4, image 1 de 1
    • Close the laptop and lay it down with the bottom facing up.

    • Using a size #00 Phillips screw drive remove the screw holding in the optical drive.

  5. HP 15-ay014dx Heat sink Replacement: étape 5, image 1 de 1
    • Grip the optical drive and gently pull it out.

  6. HP 15-ay014dx Heat sink Replacement, Wireless Card: étape 6, image 1 de 1
    • Remove the 11 screws holding the body of the laptop together with a size #00 Phillips screwdriver.

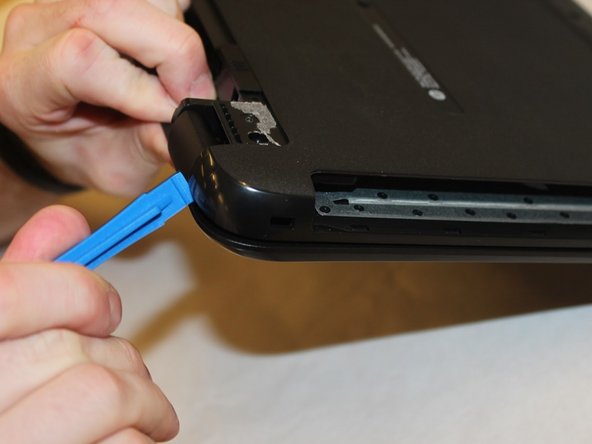
  7. HP 15-ay014dx Heat sink Replacement: étape 7, image 1 de 2 HP 15-ay014dx Heat sink Replacement: étape 7, image 2 de 2
    • Using the spudger, push in the tabs in the back that hold the body together. Carefully pry the body apart by working the spudger around the body.

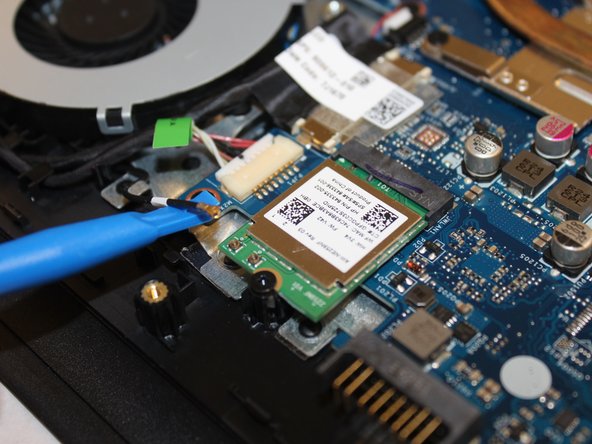
  8. HP 15-ay014dx Heat sink Replacement: étape 8, image 1 de 2 HP 15-ay014dx Heat sink Replacement: étape 8, image 2 de 2
    • Using the spudger, carefully pry the wire connecting the wireless card to the motherboard off of it.

  9. HP 15-ay014dx Heat sink Replacement: étape 9, image 1 de 1
    • Using the size #00 Phillips screwdriver remove the single screw holding it in place.

  10. HP 15-ay014dx Heat sink Replacement: étape 10, image 1 de 1
    • carefully pull the card of its slot.

  11. HP 15-ay014dx Heat sink Replacement, Heat sink: étape 11, image 1 de 1
    • Remove the four screws holding the heatsink on.

  12. HP 15-ay014dx Heat sink Replacement: étape 12, image 1 de 1
    • Carefully pry the heat sink up and out of position to un-stick it from the thermal paste.

    • When reassembling, follow these steps on Comment appliquer de la pâte thermique underneath the heatsink.

Conclusion

To reassemble your device, follow these instructions in reverse order.

Drake Scoville

Membre depuis le 09/21/17

533 Réputation

4 tutoriels rédigés

Équipe

Washington State, Team S1-G4, Phelps-Hillen Fall 2017 Membre de l'équipe Washington State, Team S1-G4, Phelps-Hillen Fall 2017

WSU-PHELPS-HILLEN-F17S1G4

6 membres

7 tutoriels rédigés

0 commentaires

Ajouter un commentaire

Nombre de vues :

Dernières 24 heures : 0

7 derniers jours : 0

30 derniers jours : 0

Total : 402