Aller au contenu principal

HP Chromebook 11 G4 Battery Replacement

Ce dont vous avez besoin

  1. HP Chromebook 11 G4 Battery Replacement, Keyboard: étape 1, image 1 de 1
    • Position the closed Chromebook with the rubber pads are facing up.

  2. HP Chromebook 11 G4 Battery Replacement: étape 2, image 1 de 2 HP Chromebook 11 G4 Battery Replacement: étape 2, image 2 de 2
    • Slide the flat end of the spudger under the rubber pads at the upper right-hand and the upper left-hand corners.

    • Pry off the rubber pads to reveal a screw under each pad.

    • The rubber pads are attached with a strong adhesive. The force applied may damage the pads.

  3. HP Chromebook 11 G4 Battery Replacement: étape 3, image 1 de 2 HP Chromebook 11 G4 Battery Replacement: étape 3, image 2 de 2
    • Remove the eleven 6mm Phillips #1 screws.

    really good instructions by the way you should probably sponsor mr smedbergs kalsonger

    Halleluja Yacob - Réponse

  4. HP Chromebook 11 G4 Battery Replacement: étape 4, image 1 de 1
    • Flip over the Chromebook and open it.

  5. HP Chromebook 11 G4 Battery Replacement: étape 5, image 1 de 2 HP Chromebook 11 G4 Battery Replacement: étape 5, image 2 de 2
    • Insert the flat end of the spudger between the bottom body of the Chromebook and keyboard body.

    • Slide the spudger along the gap, applying downward pressure to separate the two components.

    • You should hear popping sounds as you slide the spudger along the edge.

    • If the spudger gets stuck while sliding, simply slide the spudger back for a bit, and continue sliding forward.

  6. HP Chromebook 11 G4 Battery Replacement: étape 6, image 1 de 1
    • Lift the bottom of the keyboard assembly to reveal the internal components of the device.

    thanks — instyrtuctions clear enough for me to adapt to my Chromebook HP 11” wityh different batytery shape -0- battery was dead but uit worked when plugged in - so I have a battery on order - thanks to all!

    alan - Réponse

  7. HP Chromebook 11 G4 Battery Replacement: étape 7, image 1 de 3 HP Chromebook 11 G4 Battery Replacement: étape 7, image 2 de 3 HP Chromebook 11 G4 Battery Replacement: étape 7, image 3 de 3
    • Use the pointed end of the spudger to flip up the black tabs on the two ZIF connectors located on the motherboard.

    • Disconnect the ribbon cables from the motherboard by gently sliding them out of their sockets.

  8. HP Chromebook 11 G4 Battery Replacement: étape 8, image 1 de 1
    • Remove the keyboard assembly by lifting it off the laptop base.

  9. HP Chromebook 11 G4 Battery Replacement, Battery: étape 9, image 1 de 2 HP Chromebook 11 G4 Battery Replacement, Battery: étape 9, image 2 de 2
    • Remove the six 4mm Phillips #1 screws.

  10. HP Chromebook 11 G4 Battery Replacement: étape 10, image 1 de 2 HP Chromebook 11 G4 Battery Replacement: étape 10, image 2 de 2
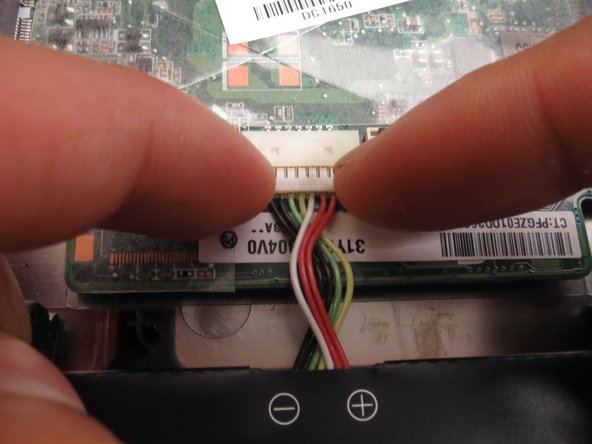
    • Disconnect the bundled power cable by grasping both edges with your fingers and pulling.

  11. HP Chromebook 11 G4 Battery Replacement: étape 11, image 1 de 1
    • Lift the battery out of the laptop.

    Thank you soooo much for this!!! As soon as the battery was out, the machine turned right on from the direct AC cord. So Grateful!!

    Mischa Jensen - Réponse

Conclusion

To reassemble your device, follow these instructions in reverse order.

27 autres ont terminé cette réparation.

Christopher Flood

Membre depuis le 04/26/17

593 Réputation

1 tutoriel rédigé

Équipe

Cal Poly, Team S23-G5, Livingston Spring 2017 Membre de l'équipe Cal Poly, Team S23-G5, Livingston Spring 2017

CPSU-LIVINGSTON-S17S23G5

3 membres

6 tutoriels rédigés

7 commentaires

wow so this is what computer technicians do.

88 88 - Réponse

Christopher, your step by step is superb! I am one grateful chicky. Thanks to your guide, I didn't have to replace my laptop! It worked like a charm, despite not owning a spudger. I had to improvise and used a butter knife for tha unclipping of keyboard and my fingernails to unclip tha component clips and didn't even damage my rubber pads! Thank you so very much!!!

Jammie Brasher - Réponse

Video was great. Disassembly and assembly took about 1 hour

Jorge De Joya - Réponse

Measured power supply voltage as 6V. Not sure if this is enough to bring down the computer. Spec says is should be 7.7Vdc.

Jorge De Joya - Réponse

Excellent! So easy to follow! Thank you for the well written guide and tips.

Martha Webb - Réponse

as stated earlier, my HP 11” is a bit different inside, but instructions were clear enough that I could easily make the connection and remove my battery (which was no good) and I have another on order, will use this Chromebook plugged in until battery arrives - Thanks to everyone involved in putting this helpful site together!

alan - Réponse

Thank you so much my you saved my computer

Aedan mitchell - Réponse

Ajouter un commentaire

Nombre de vues :

Dernières 24 heures : 1

7 derniers jours : 20

30 derniers jours : 86

Total : 62,085