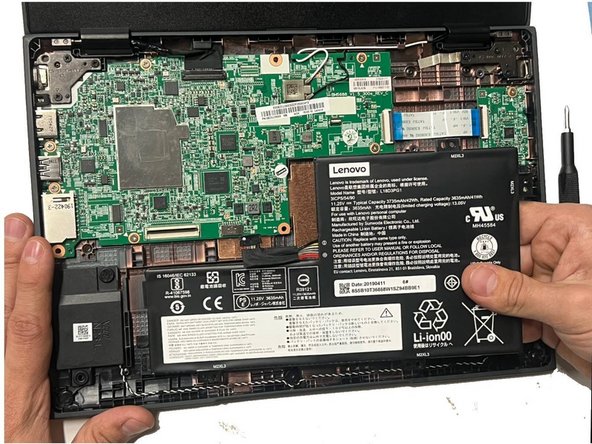
Aller au contenu principal

HP Chromebook 14 G3 Battery Replacement

Ce dont vous avez besoin

  1. HP Chromebook 14 G3 Battery Replacement, Battery: étape 1, image 1 de 1
    • Make sure the battery is completely drained before performing this repair. Failure can result in an electrical shock which may cause bodily harm.

    • Close the computer and flip it to its backside.

  2. HP Chromebook 14 G3 Battery Replacement: étape 2, image 1 de 1
    • Remove the three screws from the middle row using a Phillips screwdriver.

  3. HP Chromebook 14 G3 Battery Replacement: étape 3, image 1 de 1
    • Flip the computer once again and open the lid.

  4. HP Chromebook 14 G3 Battery Replacement: étape 4, image 1 de 1
    • Insert a Jimmy into the space between the frame and the plastic cover and lift gently so that the cover begins to pop up.

    • Do this all around the frame until the entire frame is loose.

  5. HP Chromebook 14 G3 Battery Replacement: étape 5, image 1 de 1
    • Lift the cover up gently.

    • This cover has wires and plugs attached to it so pull the cover up slowly.

  6. HP Chromebook 14 G3 Battery Replacement: étape 6, image 1 de 1
    • With one hand, hold the cover in a way that you can see inside, and with the other, use tweezers and disconnect the large ribbon wire by loosening the black lock and pulling on it until it is loose.

    • Do not perform these steps in a rush because these are very delicate wires. You may break or damage a wire or break a lock if you aren’t careful.

  7. HP Chromebook 14 G3 Battery Replacement: étape 7, image 1 de 1
    • Use tweezers to disconnect the small ribbon wire by loosening the black lock and pulling on it until it is loose.

    • A light source is recommended to ensure that you remove it correctly.

    • Remove the frame from the laptop.

  8. HP Chromebook 14 G3 Battery Replacement: étape 8, image 1 de 2 HP Chromebook 14 G3 Battery Replacement: étape 8, image 2 de 2
    • Use tweezers to carefully detach the battery's cable connector from the motherboard.

    • Remove the screws holding the battery in place using a Phillips screwdriver.

    • Remove the battery.

Conclusion

To reassemble your device, follow these instructions in reverse order.

JesusMOjeda

Membre depuis le 10/24/23

157 Réputation

1 tutoriel rédigé

Équipe

CSU Los Angeles, Team 13-8, Ribeiro Fall 2023 Membre de l'équipe CSU Los Angeles, Team 13-8, Ribeiro Fall 2023

CSULA-RIBEIRO-F23S13G8

3 membres

1 tutoriel rédigé

0 commentaires

Ajouter un commentaire

Nombre de vues :

Dernières 24 heures : 0

7 derniers jours : 5

30 derniers jours : 12

Total : 68