Aller au contenu principal

HP Chromebook 14-Q070NR Solid State Drive Replacement

Ce dont vous avez besoin

  1. HP Chromebook 14-Q070NR Solid State Drive Replacement, Keyboard: étape 1, image 1 de 1
    • At this point, the white caps that hide the top-most screws marked with red circles have been removed.

    • Using the Phillips #1 screwdriver, remove the (10) ten screws from the bottom of the device.

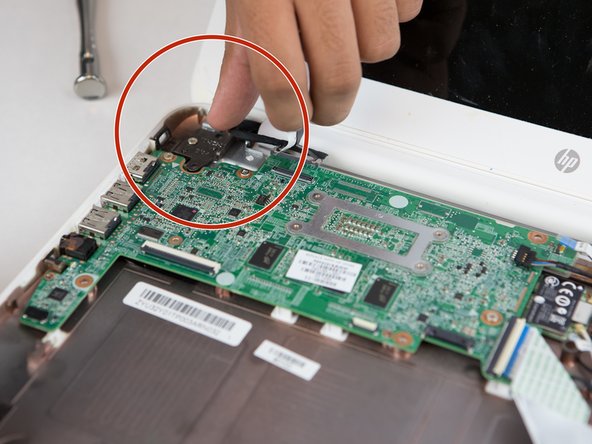
    • After removing the white caps covering the screws, use the Phillips #1 screwdriver to remove the (3) three screws indicated with red circles.

    There are threaded nuts underneath the two screw holes located in the center of the computer (white caps cover them). When I removed the screws, the two nuts became loose and I found them in the pan after I took the battery out. I could not reattach these screws upon reassembly because there were no threads they could screw into, so I ended up with two screws and two nuts left over after completion. Are you sure it is really necessary to remove these two center screws?

    Thomas Badura - Réponse

  2. HP Chromebook 14-Q070NR Solid State Drive Replacement: étape 2, image 1 de 3 HP Chromebook 14-Q070NR Solid State Drive Replacement: étape 2, image 2 de 3 HP Chromebook 14-Q070NR Solid State Drive Replacement: étape 2, image 3 de 3
    • Open the laptop and place it upright. Remove the keyboard from the device using a plastic spudger or opening tool.

    • Carefully remove as there are ribbons attached to the keyboard that is connected to the components inside.

    • Gently lift the keyboard just enough to expose the ribbons.

  3. HP Chromebook 14-Q070NR Solid State Drive Replacement: étape 3, image 1 de 3 HP Chromebook 14-Q070NR Solid State Drive Replacement: étape 3, image 2 de 3 HP Chromebook 14-Q070NR Solid State Drive Replacement: étape 3, image 3 de 3
    • Hold the keyboard up to remove the ribbons from the circuit board.

    • To remove each individual ribbon, grab the blue portion of each ribbon and pull it towards your direction until it is fully detached.

  4. HP Chromebook 14-Q070NR Solid State Drive Replacement: étape 4, image 1 de 3 HP Chromebook 14-Q070NR Solid State Drive Replacement: étape 4, image 2 de 3 HP Chromebook 14-Q070NR Solid State Drive Replacement: étape 4, image 3 de 3
    • Once the ribbons are detached, remove the keyboard from the device.

  5. HP Chromebook 14-Q070NR Solid State Drive Replacement, Battery: étape 5, image 1 de 1
    • Using the Phillips #0 screwdriver, remove the (2) two screws at the bottom of the device.

    • Once removed, separate the screws from previous ones. They are different!

    My battery had a third screw located on the inner side of the battery just to the left of the large ribbon cable (right side in picture in Step 5.

    fergie272 - Réponse

  6. HP Chromebook 14-Q070NR Solid State Drive Replacement: étape 6, image 1 de 2 HP Chromebook 14-Q070NR Solid State Drive Replacement: étape 6, image 2 de 2
    • Remove the taped flat wire from the top of the battery.

    • Carefully pull away the connector from the top of the battery to the motherboard.

  7. HP Chromebook 14-Q070NR Solid State Drive Replacement: étape 7, image 1 de 1
    • Carefully lift the battery and remove it from the device.

  8. HP Chromebook 14-Q070NR Solid State Drive Replacement, Motherboard: étape 8, image 1 de 3 HP Chromebook 14-Q070NR Solid State Drive Replacement, Motherboard: étape 8, image 2 de 3 HP Chromebook 14-Q070NR Solid State Drive Replacement, Motherboard: étape 8, image 3 de 3
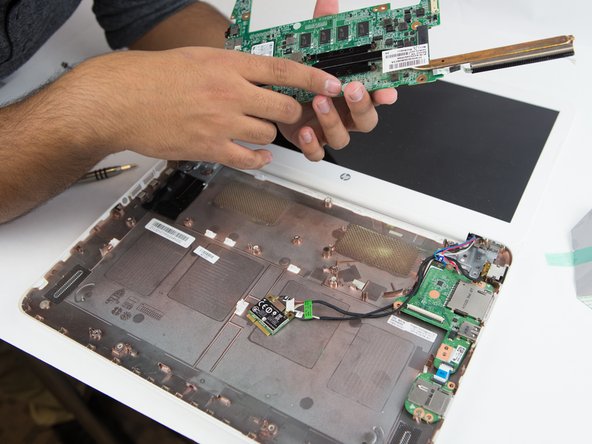
    • Carefully remove the (3) three plastic strips attached to the motherboard.

  9. HP Chromebook 14-Q070NR Solid State Drive Replacement: étape 9, image 1 de 2 HP Chromebook 14-Q070NR Solid State Drive Replacement: étape 9, image 2 de 2
    • Use the Phillips #1 screwdriver to remove the (5) five screws.

  10. HP Chromebook 14-Q070NR Solid State Drive Replacement: étape 10, image 1 de 2 HP Chromebook 14-Q070NR Solid State Drive Replacement: étape 10, image 2 de 2
    • Use the blue plastic opening tool to disconnect the connectors. Remove the fan from the motherboard.

  11. HP Chromebook 14-Q070NR Solid State Drive Replacement: étape 11, image 1 de 2 HP Chromebook 14-Q070NR Solid State Drive Replacement: étape 11, image 2 de 2
    • Gently lift while using the plastic opening tool to unhinge the motherboard from the computer in an upward pattern.

    • Be very careful not to detach the motherboard to quickly or forcefully since you could damage or break it.

  12. HP Chromebook 14-Q070NR Solid State Drive Replacement, Solid State Drive: étape 12, image 1 de 1
    • Locate the retaining screw for the SSD.

  13. HP Chromebook 14-Q070NR Solid State Drive Replacement: étape 13, image 1 de 1
    • Remove screw using a phillips head screw driver.

    I am stuck here. I’ve tried everything I know to get that screw off and it won’t budge. I am beginning to wonder if it is soldered, or glued, or corroded in place. Any suggestions?

    Blue Terra Investments - Réponse

  14. HP Chromebook 14-Q070NR Solid State Drive Replacement: étape 14, image 1 de 1
    • Gently pull outwards to remove the solid state drive.

    • Do not apply any upward force to avoid breaking any other components.

Conclusion

To reassemble your device, follow these instructions in reverse order.

3 autres ont terminé cette réparation.

Kevin Wong

Membre depuis le 10/02/17

158 Réputation

1 tutoriel rédigé

Équipe

USF Tampa, Team S9-G5, Remmell Fall 2017 Membre de l'équipe USF Tampa, Team S9-G5, Remmell Fall 2017

USFT-REMMELL-F17S9G5

5 membres

5 tutoriels rédigés

0 commentaires

Ajouter un commentaire

Nombre de vues :

Dernières 24 heures : 0

7 derniers jours : 2

30 derniers jours : 18

Total : 635