Aller au contenu principal

HP Deskjet 1000 J110a Plug Ports Replacement

Ce dont vous avez besoin

  1. HP Deskjet 1000 J110a Plug Ports Replacement, Cover Removal: étape 1, image 1 de 3 HP Deskjet 1000 J110a Plug Ports Replacement, Cover Removal: étape 1, image 2 de 3 HP Deskjet 1000 J110a Plug Ports Replacement, Cover Removal: étape 1, image 3 de 3
    • Remove the two 13 mm screws located on the back of the printer using a screwdriver with the T10 torx bit (star-shaped).

  2. HP Deskjet 1000 J110a Plug Ports Replacement: étape 2, image 1 de 3 HP Deskjet 1000 J110a Plug Ports Replacement: étape 2, image 2 de 3 HP Deskjet 1000 J110a Plug Ports Replacement: étape 2, image 3 de 3
    • In the front of the printer, open the tray where the paper comes out and remove the two 13 mm screws located under the top of the printer.

  3. HP Deskjet 1000 J110a Plug Ports Replacement: étape 3, image 1 de 1
    • With the front of the printer facing you, lift and raise the left side of the panel (like opening a book in reverse) until it disconnects from the clip on the right side of the panel.

  4. HP Deskjet 1000 J110a Plug Ports Replacement, Plug Ports: étape 4, image 1 de 3 HP Deskjet 1000 J110a Plug Ports Replacement, Plug Ports: étape 4, image 2 de 3 HP Deskjet 1000 J110a Plug Ports Replacement, Plug Ports: étape 4, image 3 de 3
    Outil utilisé dans cette étape :
    Tweezers
    $4.99
    J'achète
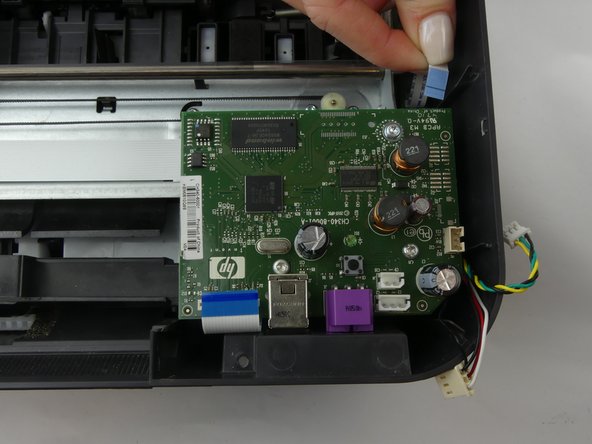
    • Locate and remove the two flat ribbon connectors which connect the circuit board to the other printer components.

    • Remove each connector using tweezers if it is too difficult to remove them by hand.

  5. HP Deskjet 1000 J110a Plug Ports Replacement: étape 5, image 1 de 2 HP Deskjet 1000 J110a Plug Ports Replacement: étape 5, image 2 de 2
    • Locate and remove the three multicolored wire connectors which connect the circuit board to the other printer components.

    • Remove each connector by hand, as shown. You can use tweezers if it is too difficult to remove them by hand.

  6. HP Deskjet 1000 J110a Plug Ports Replacement: étape 6, image 1 de 3 HP Deskjet 1000 J110a Plug Ports Replacement: étape 6, image 2 de 3 HP Deskjet 1000 J110a Plug Ports Replacement: étape 6, image 3 de 3
    • Remove the top two 13mm screws using a screwdriver with the T10 torx bit.

    • Remove the bottom 9mm screw using a screwdriver with the T10 torx bit, and remove the plug port circuit board.

Conclusion

To reassemble your device, follow these instructions in reverse order.

Une autre personne a terminé cette réparation.

Chris Perez

Membre depuis le 01/29/18

247 Réputation

2 tutoriels rédigés

Équipe

USF Tampa, Team S5-G3, Passmore Spring 2018 Membre de l'équipe USF Tampa, Team S5-G3, Passmore Spring 2018

USFT-PASSMORE-S18S5G3

4 membres

12 tutoriels rédigés

0 commentaires

Ajouter un commentaire

Nombre de vues :

Dernières 24 heures : 0

7 derniers jours : 1

30 derniers jours : 14

Total : 642