Aller au contenu principal

HP Elite x2 G1 1012 Rear Facing Camera Replacement

Ce dont vous avez besoin

  1. HP Elite x2 G1 1012 Rear Facing Camera Replacement, Display: étape 1, image 1 de 1
    • Be sure to power off and unplug your device before you begin your repair.

    • With the screen face down, lift up the stand as far as it goes.

    • Make sure not to force it past the resting point.

  2. HP Elite x2 G1 1012 Rear Facing Camera Replacement: étape 2, image 1 de 2 HP Elite x2 G1 1012 Rear Facing Camera Replacement: étape 2, image 2 de 2
    • Use a T5 driver to remove the six screws on the back of the tablet.

  3. HP Elite x2 G1 1012 Rear Facing Camera Replacement: étape 3, image 1 de 1
    • After removing the screws, delicately close the stand.

    • Flip the tablet on its back so that the screen is facing up.

  4. HP Elite x2 G1 1012 Rear Facing Camera Replacement: étape 4, image 1 de 2 HP Elite x2 G1 1012 Rear Facing Camera Replacement: étape 4, image 2 de 2
    • Use the suction cup to carefully separate the screen from the device. Pull upwards with a fluid and smooth motion.

    • Do not lift too fast! There will still be wires connecting the screen to the device. Make sure they are not tampered with.

  5. HP Elite x2 G1 1012 Rear Facing Camera Replacement: étape 5, image 1 de 3 HP Elite x2 G1 1012 Rear Facing Camera Replacement: étape 5, image 2 de 3 HP Elite x2 G1 1012 Rear Facing Camera Replacement: étape 5, image 3 de 3
    • Remove the tape on the lower left side of the screen.

    • Underneath the tape, disconnect the LCM cable, the larger wire that was underneath the tape, from the back of the tablet screen.

  6. HP Elite x2 G1 1012 Rear Facing Camera Replacement: étape 6, image 1 de 2 HP Elite x2 G1 1012 Rear Facing Camera Replacement: étape 6, image 2 de 2
    • Disconnect the flex cable from the device using the spudger.

    • Remove the Display Assembly from the device.

  7. HP Elite x2 G1 1012 Rear Facing Camera Replacement, Rear Facing Camera: étape 7, image 1 de 1
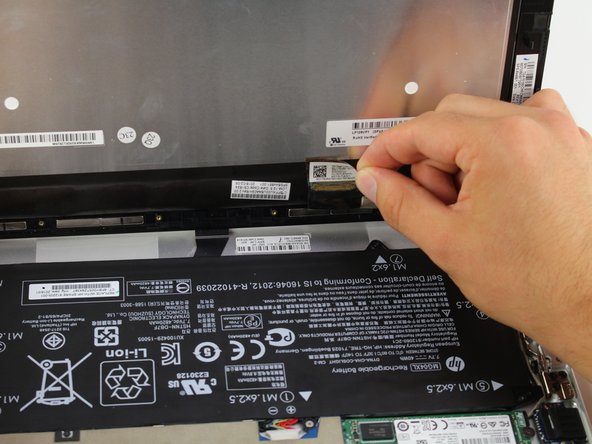
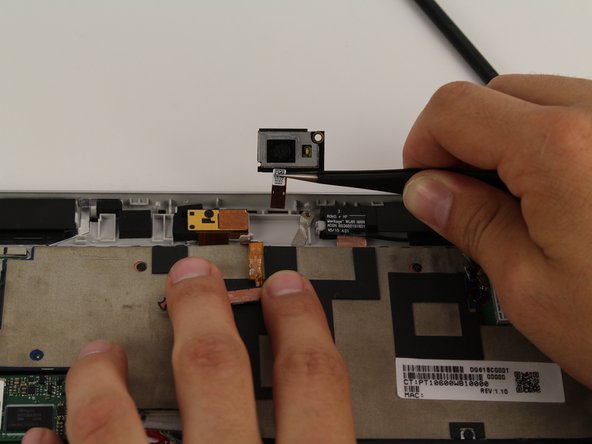
    • Use a pair of tweezers to remove the flex cable on the top of the camera.

  8. HP Elite x2 G1 1012 Rear Facing Camera Replacement: étape 8, image 1 de 1
    • Use a Phillips #00 screwdriver to remove the screw in the corner of the camera.

  9. HP Elite x2 G1 1012 Rear Facing Camera Replacement: étape 9, image 1 de 1
    • Use a spudger to delicately lift up the camera.

  10. HP Elite x2 G1 1012 Rear Facing Camera Replacement: étape 10, image 1 de 2 HP Elite x2 G1 1012 Rear Facing Camera Replacement: étape 10, image 2 de 2
    • Use a pair of tweezers to disconnect the flex cable from the motherboard and remove the rear facing camera from the device.

Conclusion

To reassemble your device, follow these instructions in reverse order.

Colin Mika

Membre depuis le 04/19/18

943 Réputation

6 tutoriels rédigés

Équipe

Cal Poly, Team S24-G7, Maness Spring 2018 Membre de l'équipe Cal Poly, Team S24-G7, Maness Spring 2018

CPSU-MANESS-S18S24G7

4 membres

6 tutoriels rédigés

0 commentaires

Ajouter un commentaire

Nombre de vues :

Dernières 24 heures : 0

7 derniers jours : 0

30 derniers jours : 2

Total : 538