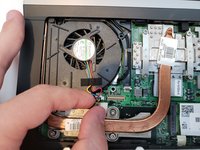
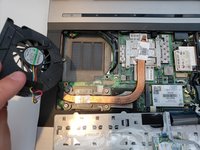
Aller au contenu principal

HP EliteBook 8530w Fan Replacement

Ce dont vous avez besoin

  1. HP EliteBook 8530w Fan Replacement, Battery: étape 1, image 1 de 2 HP EliteBook 8530w Fan Replacement, Battery: étape 1, image 2 de 2
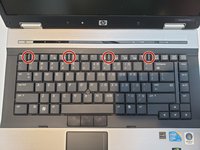
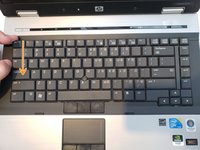
    • Turn the laptop off then place it down so that the back is facing up.

    • Slide the battery release switch to the left and hold it there.

  2. HP EliteBook 8530w Fan Replacement: étape 2, image 1 de 2 HP EliteBook 8530w Fan Replacement: étape 2, image 2 de 2
    • Pull the battery away upward and away from the laptop while continuing to hold the release switch.

    • Once the battery is removed from the laptop, you may release the switch.

    • To properly dispose of your battery, look for the closest location that accepts electronic waste in your area and drop it off there.

  3. HP EliteBook 8530w Fan Replacement, Fan: étape 3, image 1 de 1
    • Unscrew the two screws from the center panel with a Phillips #00 screwdriver.

    • These screws should have a keyboard icon stamped next to them.

  4. HP EliteBook 8530w Fan Replacement: étape 4, image 1 de 3 HP EliteBook 8530w Fan Replacement: étape 4, image 2 de 3 HP EliteBook 8530w Fan Replacement: étape 4, image 3 de 3
    • Flip the laptop over then open the lid.

    • Slide the four tabs at the top of the keyboard towards you with your finger.

    • Wedge a finger or spudger in the top corner of the keyboard and hinge it forward to reveal the backside.

    • Do not try to pull the keyboard out of the laptop. There are still cables connected to it that can easily be damaged.

  5. HP EliteBook 8530w Fan Replacement: étape 5, image 1 de 3 HP EliteBook 8530w Fan Replacement: étape 5, image 2 de 3 HP EliteBook 8530w Fan Replacement: étape 5, image 3 de 3
    • Use a Torx TR7 screwdriver to remove the three screws holding down the fan.

    • Gently remove the fan connector that plugs into the motherboard.

    • Note: It can help to use something like tweezers to remove the connector if you are having trouble.

    • Remove the fan.

Conclusion

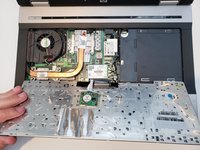
To reassemble your device, follow these instructions in reverse order.

Une autre personne a terminé cette réparation.

0 commentaires

Ajouter un commentaire

Nombre de vues :

Dernières 24 heures : 1

7 derniers jours : 3

30 derniers jours : 14

Total : 673