Aller au contenu principal

HP Envy 17-3070NR Motherboard Replacement

Ce dont vous avez besoin

  1. HP Envy 17-3070NR Motherboard Replacement, Back Cover: étape 1, image 1 de 2 HP Envy 17-3070NR Motherboard Replacement, Back Cover: étape 1, image 2 de 2
    • Before you begin taking apart the computer, make sure that it is completely powered off.

    • Slide the release latch away from the nearest edge.

    • Slide the back cover off of the computer.

  2. HP Envy 17-3070NR Motherboard Replacement: étape 2, image 1 de 3 HP Envy 17-3070NR Motherboard Replacement: étape 2, image 2 de 3 HP Envy 17-3070NR Motherboard Replacement: étape 2, image 3 de 3
    • Remove the six 3.7mm Phillips screws.

    • Slide the back cover until it clicks, then lift it straight off.

  3. HP Envy 17-3070NR Motherboard Replacement, Hard Drive: étape 3, image 1 de 3 HP Envy 17-3070NR Motherboard Replacement, Hard Drive: étape 3, image 2 de 3 HP Envy 17-3070NR Motherboard Replacement, Hard Drive: étape 3, image 3 de 3
    • Remove the four 3.7mm Phillips screws that hold the hard drive onto the computer.

    • Remove the hard drive by lifting it out of its cavity.

    • Unplug the hard drive cable that connects it to the main assembly.

  4. HP Envy 17-3070NR Motherboard Replacement, Battery: étape 4, image 1 de 2 HP Envy 17-3070NR Motherboard Replacement, Battery: étape 4, image 2 de 2
    • Disconnect the multi-colored battery cable from the main assembly by gently pulling upward on it.

  5. HP Envy 17-3070NR Motherboard Replacement: étape 5, image 1 de 3 HP Envy 17-3070NR Motherboard Replacement: étape 5, image 2 de 3 HP Envy 17-3070NR Motherboard Replacement: étape 5, image 3 de 3
    • Remove the two 3.8 mm Torx screws using M8 Torx screwdriver.

    • Remove the battery by pulling it straight out away from the computer.

    • It is much easier to use the battery cable to carefully lift the battery off than to try to pry it off with tools.

  6. HP Envy 17-3070NR Motherboard Replacement, Optical Drive: étape 6, image 1 de 3 HP Envy 17-3070NR Motherboard Replacement, Optical Drive: étape 6, image 2 de 3 HP Envy 17-3070NR Motherboard Replacement, Optical Drive: étape 6, image 3 de 3
    • Remove the four 3.7mm Phillips screws that secure the optical drive to the computer.

    • Slowly lift the optical drive away from the computer ensuring that you don't put stress on the connecting cable.

    • Do not fully lift off the optical drive as there is still a cable that connects it to the motherboard.

    • Remove Sub Speaker assembly first in order to remove Optical drive. Carefully disconnect speaker connector.

  7. HP Envy 17-3070NR Motherboard Replacement: étape 8, image 1 de 3 HP Envy 17-3070NR Motherboard Replacement: étape 8, image 2 de 3 HP Envy 17-3070NR Motherboard Replacement: étape 8, image 3 de 3
    • Carefully disconnect the connecting cable by lifting the white clamp with a Flathead screwdriver and pulling on the blue tab away from connector.

  8. HP Envy 17-3070NR Motherboard Replacement, Subwoofer: étape 9, image 1 de 3 HP Envy 17-3070NR Motherboard Replacement, Subwoofer: étape 9, image 2 de 3 HP Envy 17-3070NR Motherboard Replacement, Subwoofer: étape 9, image 3 de 3
    • Unscrew the three 6.5mm Phillips shoulder screws that connect the subwoofer to the computer.

    • Disconnect the red and black subwoofer cable from the system board by pulling it upwards.

    • Remove the subwoofer by pulling straight up from the main assembly.

  9. HP Envy 17-3070NR Motherboard Replacement, RAM: étape 10, image 1 de 3 HP Envy 17-3070NR Motherboard Replacement, RAM: étape 10, image 2 de 3 HP Envy 17-3070NR Motherboard Replacement, RAM: étape 10, image 3 de 3
    • Press down on both tabs on either side of the top RAM stick.

    • The RAM will slightly pop out and you will be able to slide it out of it's cavity.

    • Repeat the same process for the second stick of RAM if needed.

  10. HP Envy 17-3070NR Motherboard Replacement, Wireless Card: étape 11, image 1 de 3 HP Envy 17-3070NR Motherboard Replacement, Wireless Card: étape 11, image 2 de 3 HP Envy 17-3070NR Motherboard Replacement, Wireless Card: étape 11, image 3 de 3
    • Unscrew 4.5mm Phillips screw.

    • Unplug both antenna connectors by carefully pulling them upwards.

    • During re-assembly make sure to match numbers(1 or 2) on the antenna cable and the wireless card.

  11. HP Envy 17-3070NR Motherboard Replacement: étape 12, image 1 de 3 HP Envy 17-3070NR Motherboard Replacement: étape 12, image 2 de 3 HP Envy 17-3070NR Motherboard Replacement: étape 12, image 3 de 3
    • Pull wireless card up and away from you.

  12. HP Envy 17-3070NR Motherboard Replacement, CMOS Battery: étape 13, image 1 de 3 HP Envy 17-3070NR Motherboard Replacement, CMOS Battery: étape 13, image 2 de 3 HP Envy 17-3070NR Motherboard Replacement, CMOS Battery: étape 13, image 3 de 3
    • Unplug CMOS battery by gently pulling upwards on it's cable.

  13. HP Envy 17-3070NR Motherboard Replacement, Top Cover: étape 14, image 1 de 3 HP Envy 17-3070NR Motherboard Replacement, Top Cover: étape 14, image 2 de 3 HP Envy 17-3070NR Motherboard Replacement, Top Cover: étape 14, image 3 de 3
    • Remove the first connector by lifting the white clamp with a Flathead screwdriver and pulling the connector to your right.

  14. HP Envy 17-3070NR Motherboard Replacement: étape 15, image 1 de 3 HP Envy 17-3070NR Motherboard Replacement: étape 15, image 2 de 3 HP Envy 17-3070NR Motherboard Replacement: étape 15, image 3 de 3
    • Remove the second connector by gently pulling upward.

  15. HP Envy 17-3070NR Motherboard Replacement: étape 16, image 1 de 1
    • Remove the seventeen 6.6mm Phillips screws.

    • Remove the three 3.6 mm Phillips screws.

    • Remove the eleven 3.2mm Phillips screws

    • Three of the 3.2mm Phillips screws are located underneath the black hard drive flap.

    • Make sure that you keep the screws organized so that you keep track of all of the different sizes and locations.

  16. HP Envy 17-3070NR Motherboard Replacement: étape 17, image 1 de 3 HP Envy 17-3070NR Motherboard Replacement: étape 17, image 2 de 3 HP Envy 17-3070NR Motherboard Replacement: étape 17, image 3 de 3
    • Flip the laptop over.

    • Use a Plastic Opening tool to carefully pry all around the top cover up off of the remaining assembly.

    • Starting location for prying does not matter as long as you pry all around the frame before lifting it off.

    • Do not fully lift the top cover because there are cables that will need to be disconnected before removal.

  17. HP Envy 17-3070NR Motherboard Replacement: étape 18, image 1 de 2 HP Envy 17-3070NR Motherboard Replacement: étape 18, image 2 de 2
    • Gently pull the white connector shown in the picture towards you to disconnect it from the system board.

  18. HP Envy 17-3070NR Motherboard Replacement: étape 19, image 1 de 1
    • Gently pull the black connector towards you to disconnect the top cover from the main assembly.

    • Once both connectors are disconnected, lift the top cover off of the main assembly.

  19. HP Envy 17-3070NR Motherboard Replacement, Disassembling HP Envy 17-3070NR Motherboard Assembly: étape 20, image 1 de 1
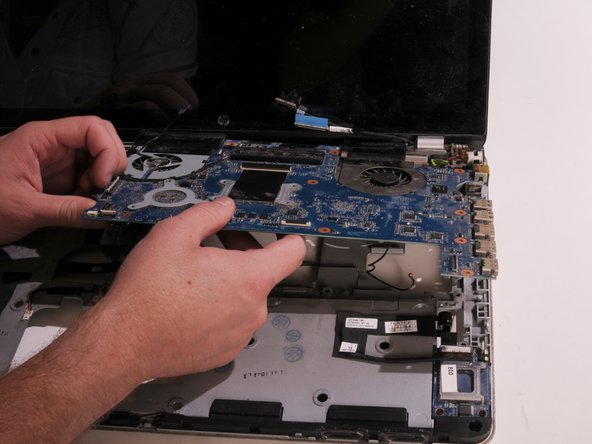
    • Remove the two 4.5mm Phillips screws from the system board

  20. HP Envy 17-3070NR Motherboard Replacement: étape 21, image 1 de 3 HP Envy 17-3070NR Motherboard Replacement: étape 21, image 2 de 3 HP Envy 17-3070NR Motherboard Replacement: étape 21, image 3 de 3
    • Disconnect three cables by lifting a white clamp with a Flathead screwdriver and pulling on the blue tab.

  21. HP Envy 17-3070NR Motherboard Replacement: étape 22, image 1 de 3 HP Envy 17-3070NR Motherboard Replacement: étape 22, image 2 de 3 HP Envy 17-3070NR Motherboard Replacement: étape 22, image 3 de 3
    • Disconnect three cables by pulling upward on black or blue tabs connected to them.

  22. HP Envy 17-3070NR Motherboard Replacement: étape 23, image 1 de 3 HP Envy 17-3070NR Motherboard Replacement: étape 23, image 2 de 3 HP Envy 17-3070NR Motherboard Replacement: étape 23, image 3 de 3
    • Disconnect cable by using a Flathead screwdriver to gently pry it off the black connector towards you.

  23. HP Envy 17-3070NR Motherboard Replacement: étape 24, image 1 de 3 HP Envy 17-3070NR Motherboard Replacement: étape 24, image 2 de 3 HP Envy 17-3070NR Motherboard Replacement: étape 24, image 3 de 3
    • Lift up the power connector from the clip.

  24. HP Envy 17-3070NR Motherboard Replacement: étape 25, image 1 de 3 HP Envy 17-3070NR Motherboard Replacement: étape 25, image 2 de 3 HP Envy 17-3070NR Motherboard Replacement: étape 25, image 3 de 3
    • Carefully lift up motherboard from the main assembly.

  25. HP Envy 17-3070NR Motherboard Replacement, Fan Assembly: étape 26, image 1 de 3 HP Envy 17-3070NR Motherboard Replacement, Fan Assembly: étape 26, image 2 de 3 HP Envy 17-3070NR Motherboard Replacement, Fan Assembly: étape 26, image 3 de 3
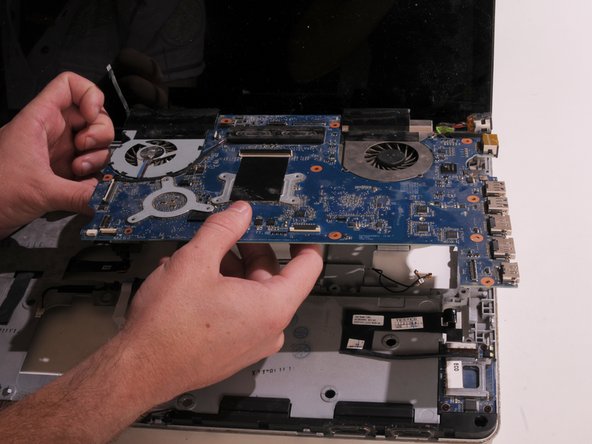
    • Flip the system board over.

    • Unplug the first fan assembly cable by carefully pulling it upwards.

  26. HP Envy 17-3070NR Motherboard Replacement: étape 27, image 1 de 3 HP Envy 17-3070NR Motherboard Replacement: étape 27, image 2 de 3 HP Envy 17-3070NR Motherboard Replacement: étape 27, image 3 de 3
    • Unplug the second fan assembly cable by carefully pulling it upwards.

  27. HP Envy 17-3070NR Motherboard Replacement: étape 28, image 1 de 3 HP Envy 17-3070NR Motherboard Replacement: étape 28, image 2 de 3 HP Envy 17-3070NR Motherboard Replacement: étape 28, image 3 de 3
    • Remove the three 4.5mm Phillips screws on the fan assembly.

    • Loosen the seven captive Phillips screws in the ascending numerical order (1-7). Numbers are printed next to each screw on the housing.

    • Screws will not fully come off the assembly. You need to only loosen them.

    • Remove the fan assembly from the system board by lifting it straight up.

    • For reassembly, you will need to clean the old thermal paste off of areas highlighted in yellow as well as matching parts on the fan assembly. Following that, you would need to reapply thermal paste before putting back the fan assembly. Small amount of the size of the rice grain should be enough for each plate.

  28. HP Envy 17-3070NR Motherboard Replacement, Motherboard: étape 29, image 1 de 2 HP Envy 17-3070NR Motherboard Replacement, Motherboard: étape 29, image 2 de 2
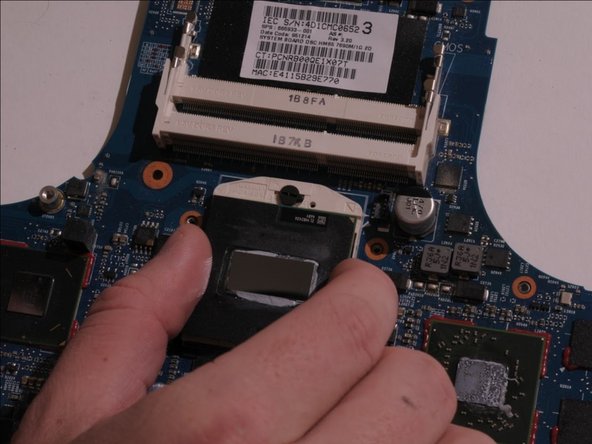
    • Unlock CPU by turning the locking screw 180 degrees counterclockwise using Flathead screwdriver. You will hear a slight click when CPU is fully unlocked.

    • Carefully lift CPU upwards by holding it from both sides.

    • It is important to lift CPU straight upward in order to not bend any pins on it.

    • For reassembly, make sure to put CPU back by matching a small yellow triangle in the corner of CPU to the small triangle imprinted on the CPU socket.

  29. HP Envy 17-3070NR Motherboard Replacement: étape 30, image 1 de 3 HP Envy 17-3070NR Motherboard Replacement: étape 30, image 2 de 3 HP Envy 17-3070NR Motherboard Replacement: étape 30, image 3 de 3
    • Detach the power connector by pulling it away from the motherboard.

Conclusion

To reassemble your device, follow these instructions in reverse order.

5 autres ont terminé cette réparation.

Jasper Lewin

Membre depuis le 04/21/15

750 Réputation

6 tutoriels rédigés

Équipe

Cal Poly, Team 14-8, Amido Spring 2015 Membre de l'équipe Cal Poly, Team 14-8, Amido Spring 2015

CPSU-AMIDO-S15S14G8

4 membres

12 tutoriels rédigés

0 commentaires

Ajouter un commentaire

Nombre de vues :

Dernières 24 heures : 0

7 derniers jours : 0

30 derniers jours : 3

Total : 4,499