Aller au contenu principal

HP Envy 700-030qe Solid State Drive Replacement

Ce dont vous avez besoin

  1. HP Envy 700-030qe Solid State Drive Replacement, Solid State Drive: étape 1, image 1 de 1
    • Before beginning, it is good to wear an anti-static wrist band to prevent electrical components from getting harmed.

    • Attach the anti-static wristband to your wrist, and clip the other end to an exposed piece of metal anywhere on the case.

  2. HP Envy 700-030qe Solid State Drive Replacement: étape 2, image 1 de 1
    • Start by opening the device case by unscrewing the 10.5mm hand screw on the back of the computer.

    • If the hand screw is too tight, you may use the Torx T15 screwdriver to remove it.

  3. HP Envy 700-030qe Solid State Drive Replacement: étape 3, image 1 de 1
    • Turn the computer onto its side to continue removing the case cover.

    • Slide the cover off by sliding it to the right.

  4. HP Envy 700-030qe Solid State Drive Replacement: étape 4, image 1 de 2 HP Envy 700-030qe Solid State Drive Replacement: étape 4, image 2 de 2
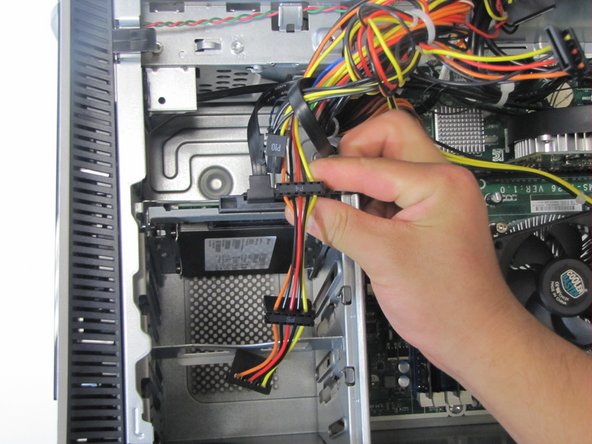
    • Locate the SSD inside the open case.

    • Unplug the SATA power cable from the hard drive by pulling straight up.

  5. HP Envy 700-030qe Solid State Drive Replacement: étape 5, image 1 de 1
    • Finish disconnecting the hard drive by unplugging the black SATA interface cable by pulling up.

  6. HP Envy 700-030qe Solid State Drive Replacement: étape 6, image 1 de 1
    • To remove the SSD and its casing, pull out on the side silver tab.

    • At the same time, pull up on the hard drive. It should slide out smoothly without much effort.

  7. HP Envy 700-030qe Solid State Drive Replacement: étape 7, image 1 de 1
    • To completly remove the SSD from its casing, unscrew the four 5mm screws on opposite ends of the casing. Use a Torx T15 screw driver to accomplish this.

    • Notice that the screws to remove are the four screws inside the holes rather than the screws that are next to the holes.

  8. HP Envy 700-030qe Solid State Drive Replacement: étape 8, image 1 de 1
    • Finally, slide the SSD out of the casing.

Conclusion

To reassemble your device, follow these instructions in reverse order.

4 autres ont terminé cette réparation.

Chandler Warne

Membre depuis le 10/01/15

273 Réputation

1 tutoriel rédigé

Équipe

Cal Poly, Team 5-9, Maness Fall 2015 Membre de l'équipe Cal Poly, Team 5-9, Maness Fall 2015

CPSU-MANESS-F15S5G9

4 membres

10 tutoriels rédigés

0 commentaires

Ajouter un commentaire

Nombre de vues :

Dernières 24 heures : 0

7 derniers jours : 1

30 derniers jours : 11

Total : 2,499