Aller au contenu principal

HP Envy x360 15m-cn0012dx Fan Replacement

Ce dont vous avez besoin

  1. HP Envy x360 15m-cn0012dx  Fan Replacement, Fan: étape 1, image 1 de 2 HP Envy x360 15m-cn0012dx  Fan Replacement, Fan: étape 1, image 2 de 2
    • Make sure the computer is turned off, and remove all cables.

    • Set the laptop face down.

    • Peel back the grey screw guards, along the top and bottom edge of the back case. It may be helpful to use a spudger to get started.

    • Peel slowly to avoid tearing the rubber covers.

  2. HP Envy x360 15m-cn0012dx  Fan Replacement: étape 2, image 1 de 3 HP Envy x360 15m-cn0012dx  Fan Replacement: étape 2, image 2 de 3 HP Envy x360 15m-cn0012dx  Fan Replacement: étape 2, image 3 de 3
    • Using the Phillips #0 screwdriver, remove the seven 5mm screws from the back case.

  3. HP Envy x360 15m-cn0012dx  Fan Replacement: étape 3, image 1 de 3 HP Envy x360 15m-cn0012dx  Fan Replacement: étape 3, image 2 de 3 HP Envy x360 15m-cn0012dx  Fan Replacement: étape 3, image 3 de 3
    • Pry open the back cover using the iFixit Opening Tool.

    • While using the tool, place a pick at each corner of the computer (be careful and do it slowly).

    • Once all the corners are slightly lifted, carefully pop off the back cover.

  4. HP Envy x360 15m-cn0012dx  Fan Replacement: étape 4, image 1 de 3 HP Envy x360 15m-cn0012dx  Fan Replacement: étape 4, image 2 de 3 HP Envy x360 15m-cn0012dx  Fan Replacement: étape 4, image 3 de 3
    • Remove the two 4mm screws from the fan using a Phillips #0 screwdriver.

    • Peel the tape off of the multicolor cable bundle connecting the fan to the motherboard.

    • Use the iFixit opening tool to disconnect the connector.

  5. HP Envy x360 15m-cn0012dx  Fan Replacement: étape 5, image 1 de 2 HP Envy x360 15m-cn0012dx  Fan Replacement: étape 5, image 2 de 2
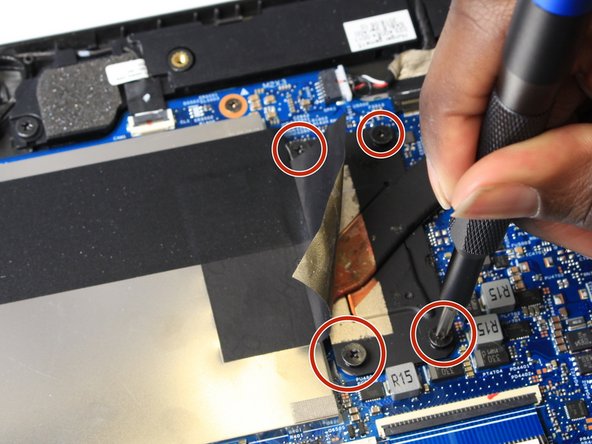
    • Peel back the tape from the heatsink.

    • Use the Phillips #0 screwdriver to remove the four captive screws from the heatsink.

    • These screws will stay inside the heatsink while it is removed, simply loosen them until they disengage from the case and the heatsink becomes loose.

  6. HP Envy x360 15m-cn0012dx  Fan Replacement: étape 6, image 1 de 2 HP Envy x360 15m-cn0012dx  Fan Replacement: étape 6, image 2 de 2
    • Unlatch the black cable from the plastic guides on the fan.

    • Lift the fan from the laptop case.

Conclusion

To reassemble your device, follow these instructions in reverse order.

2 autres ont terminé cette réparation.

Ross Jeseritz

Membre depuis le 02/04/20

157 Réputation

1 tutoriel rédigé

Équipe

UW Stout, Team S1-G3, Schneider-Bateman Spring 2020 Membre de l'équipe UW Stout, Team S1-G3, Schneider-Bateman Spring 2020

UWSTOUT-SCHNEIDER-BATEMAN-S20S1G3

3 membres

5 tutoriels rédigés

0 commentaires

Ajouter un commentaire

Nombre de vues :

Dernières 24 heures : 1

7 derniers jours : 8

30 derniers jours : 68

Total : 2,705