Aller au contenu principal

HP Mini 210 Fan Replacement

Ce dont vous avez besoin

  1. HP Mini 210 Fan Replacement, Battery: étape 1, image 1 de 2 HP Mini 210 Fan Replacement, Battery: étape 1, image 2 de 2
    • Turn off and unplug the netbook before replacing the battery.

    • Hold the netbook top-side down with the lid closed.

    • Slide the plastic battery release latches towards the lock symbols.

    • The left tab unlocks completely, but you will need to hold the right tab towards the lock symbol as you remove the battery.

  2. HP Mini 210 Fan Replacement: étape 2, image 1 de 1
    • Slide the battery out from the netbook.

  3. HP Mini 210 Fan Replacement, Disassembling HP Mini 210 Back Case: étape 3, image 1 de 1
    • Turn the netbook to view its edge.

    • Press both orange eject buttons simultaneously, and use a spudger to pry off the back case.

  4. HP Mini 210 Fan Replacement: étape 4, image 1 de 1
    • If the back case does not separate from the netbook easily, use the spudger to pry off the back case by the edge near the battery compartment, and work your way to the sides. The case will then pivot along the front edge.

  5. HP Mini 210 Fan Replacement: étape 5, image 1 de 1
    • Pull the back case off from the front edge.

  6. HP Mini 210 Fan Replacement, Keyboard: étape 6, image 1 de 3 HP Mini 210 Fan Replacement, Keyboard: étape 6, image 2 de 3 HP Mini 210 Fan Replacement, Keyboard: étape 6, image 3 de 3
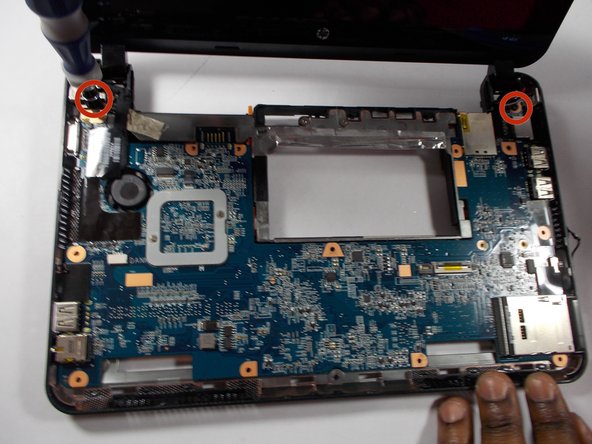
    • Using a screwdriver, remove the three 6.6 mm screws highlighted with the red circles in the first picture above.

  7. HP Mini 210 Fan Replacement: étape 7, image 1 de 2 HP Mini 210 Fan Replacement: étape 7, image 2 de 2
    • Once you have removed the screws, flip the netbook over so that the keyboard is now facing upwards. Open the screen as far back as the netbook allows.

    • Using a prying tool, lift upwards and remove the plastic casing that covers the spaces around the keys of the keyboard.

    • Be careful when removing the plastic casing.

  8. HP Mini 210 Fan Replacement: étape 8, image 1 de 3 HP Mini 210 Fan Replacement: étape 8, image 2 de 3 HP Mini 210 Fan Replacement: étape 8, image 3 de 3
    • After removing the plastic casing surrounding the keys, carefully lift the full keyboard from the netbook using a plastic opening tool.

    • Do not yank the keyboard out. The keyboard is attached to the netbook through a ribbon cable, which needs to remain undamaged in order for the new keyboard to properly connect with the netbook.

  9. HP Mini 210 Fan Replacement: étape 9, image 1 de 3 HP Mini 210 Fan Replacement: étape 9, image 2 de 3 HP Mini 210 Fan Replacement: étape 9, image 3 de 3
    • Be very gentle with the ZIF connector! It is designed to be locked into the motherboard, so make sure you lift the retaining latch before attempting to disconnect it.

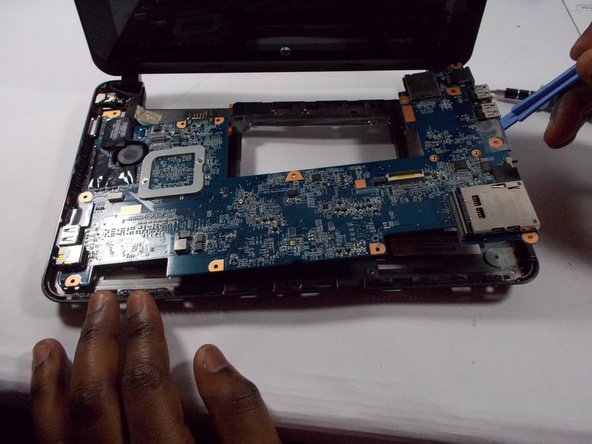
    • Lift the latch on the ZIF (zero insertion-force) connector using a plastic opening tool. The ZIF connector is located on the motherboard and is connected to the keyboard through the ribbon cable.

    • Disconnect the ribbon cable from the ZIF connector on the motherboard by lifting it up and out; this completely removes the keyboard.

  10. HP Mini 210 Fan Replacement, Fan: étape 10, image 1 de 1
    • Use the spudger to peel the front black plastic plate from the rest of the case, starting at a corner and working your way around the entire case.

  11. HP Mini 210 Fan Replacement: étape 11, image 1 de 1
    • Locate the cable that connects the trackpad to the motherboard and carefully remove it.

  12. HP Mini 210 Fan Replacement: étape 12, image 1 de 2 HP Mini 210 Fan Replacement: étape 12, image 2 de 2
    • Use a screwdriver to remove the 9.3 mm screws on top of the motherboard.

  13. HP Mini 210 Fan Replacement: étape 13, image 1 de 1
    • Remove the gold tape that holds the motherboard.

  14. HP Mini 210 Fan Replacement: étape 14, image 1 de 1
    • Use a spudger to carefully remove the motherboard.

  15. HP Mini 210 Fan Replacement: étape 15, image 1 de 2 HP Mini 210 Fan Replacement: étape 15, image 2 de 2
    • Flip over the motherboard to get to the fan.

    • Carefully remove the cable that is attaches the fan to the motherboard.

    • Remove the screws that hold in the fan.

    • The fan is now able to be completely removed.

Conclusion

To reassemble your device, follow these instructions in reverse order.

3 autres ont terminé cette réparation.

Irakoze Vincent

Membre depuis le 03/11/14

223 Réputation

1 tutoriel rédigé

Équipe

UMass Dartmouth, Team 3-6, Calaway Spring 2014 Membre de l'équipe UMass Dartmouth, Team 3-6, Calaway Spring 2014

UMASSD-CALAWAY-S14S3G6

3 membres

2 tutoriels rédigés

0 commentaires

Ajouter un commentaire

Nombre de vues :

Dernières 24 heures : 0

7 derniers jours : 0

30 derniers jours : 3

Total : 4,950