Aller au contenu principal

HP Officejet Pro 8625 CMOS Battery Replacement

Ce dont vous avez besoin

  1. HP Officejet Pro 8625 CMOS Battery Replacement, Left Side Panel: étape 1, image 1 de 3 HP Officejet Pro 8625 CMOS Battery Replacement, Left Side Panel: étape 1, image 2 de 3 HP Officejet Pro 8625 CMOS Battery Replacement, Left Side Panel: étape 1, image 3 de 3
    • Remove the two 11.6 mm T9 screws from the right side of the back of the printer.

  2. HP Officejet Pro 8625 CMOS Battery Replacement: étape 2, image 1 de 3 HP Officejet Pro 8625 CMOS Battery Replacement: étape 2, image 2 de 3 HP Officejet Pro 8625 CMOS Battery Replacement: étape 2, image 3 de 3
    • Pull down the front panel to expose the screws on the front.

    • Remove the one 11.6 mm T9 screw on the left side of the front face.

  3. HP Officejet Pro 8625 CMOS Battery Replacement: étape 3, image 1 de 2 HP Officejet Pro 8625 CMOS Battery Replacement: étape 3, image 2 de 2
    • Remove the side panel by pushing down and towards the back.

    • This step may be easier if the printer is laid on its side with the left side panel facing up.

  4. HP Officejet Pro 8625 CMOS Battery Replacement, Motherboard: étape 4, image 1 de 3 HP Officejet Pro 8625 CMOS Battery Replacement, Motherboard: étape 4, image 2 de 3 HP Officejet Pro 8625 CMOS Battery Replacement, Motherboard: étape 4, image 3 de 3
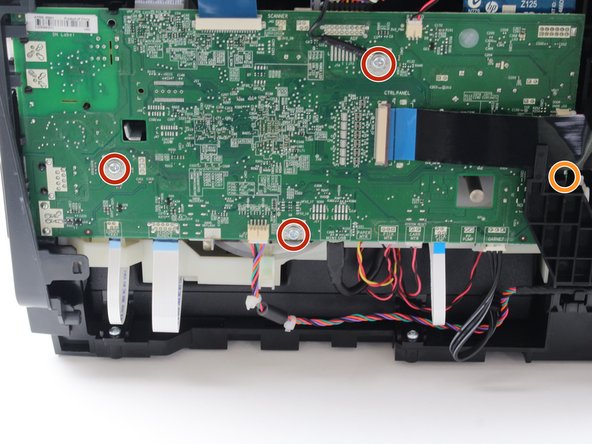
    • Remove the three 5.3 mm T9 screws from the motherboard.

    • Remove the one 6.7 mm T9 screw from the motherboard.

  5. HP Officejet Pro 8625 CMOS Battery Replacement: étape 5, image 1 de 2 HP Officejet Pro 8625 CMOS Battery Replacement: étape 5, image 2 de 2
    • Remove the connectors from the front and sides of the motherboard by pulling straight away from the connection.

  6. HP Officejet Pro 8625 CMOS Battery Replacement: étape 6, image 1 de 3 HP Officejet Pro 8625 CMOS Battery Replacement: étape 6, image 2 de 3 HP Officejet Pro 8625 CMOS Battery Replacement: étape 6, image 3 de 3
    • Lift the bottom of the motherboard and remove the connectors from the back.

    • Remove the motherboard.

    • There are two white connectors underneath the motherboard, remove them separately.

  7. HP Officejet Pro 8625 CMOS Battery Replacement, CMOS Battery: étape 7, image 1 de 3 HP Officejet Pro 8625 CMOS Battery Replacement, CMOS Battery: étape 7, image 2 de 3 HP Officejet Pro 8625 CMOS Battery Replacement, CMOS Battery: étape 7, image 3 de 3
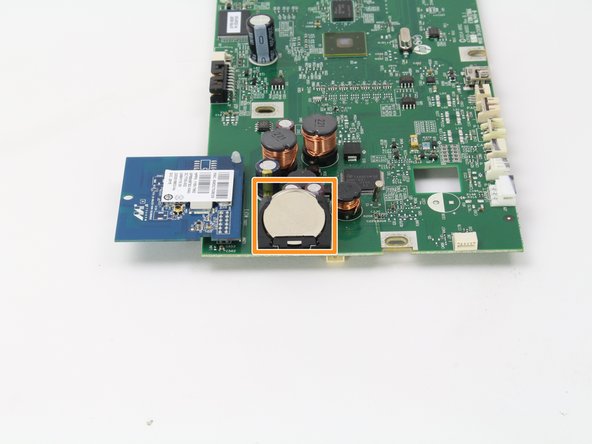
    • Locate the CMOS battery on the motherboard.

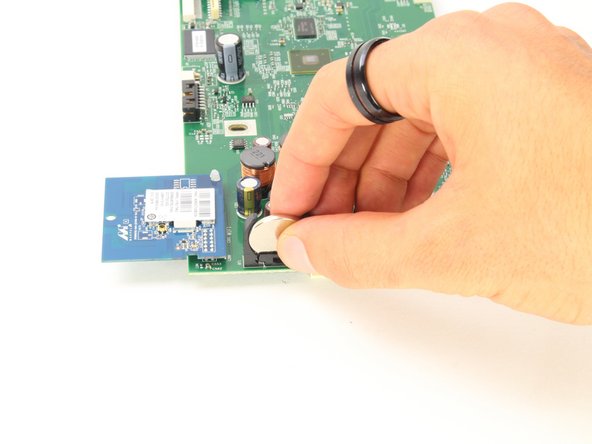
    • Remove the CMOS battery by pinching the top and pulling away from the motherboard.

Conclusion

To reassemble your device, follow these instructions in reverse order.

Cam Engle

Membre depuis le 10/08/18

531 Réputation

3 tutoriels rédigés

Équipe

Cal Poly, Team S13-G3, White Fall 2018 Membre de l'équipe Cal Poly, Team S13-G3, White Fall 2018

CPSU-WHITE-F18S13G3

3 membres

14 tutoriels rédigés

0 commentaires

Ajouter un commentaire

Nombre de vues :

Dernières 24 heures : 0

7 derniers jours : 0

30 derniers jours : 3

Total : 554