Cette version peut contenir des modifications incorrectes. Passez au dernier aperçu vérifié.
Ce dont vous avez besoin
-
Cette étape n’est pas traduite. Aidez à la traduire
-
Carefully wedge the flathead 3/32" screwdriver on the outer groove of the control panel faceplate.
-
Follow the perimeter of the groove with the flathead 3/32" screwdriver making sure to gently pry and lift upward until the control panel faceplate comes off.
-
-
Cette étape n’est pas traduite. Aidez à la traduire
-
Once the control panel faceplate is off, look for the Lock/Unlock tab located underneath the off button.
-
To unlock and release the control panel, insert the flathead 3/32" screwdriver into the tab and carefully push down. The control panel will then separate from the printer's base by sliding it downward a little.
-
-
Cette étape n’est pas traduite. Aidez à la traduire
-
Underneath the control panel will be a flat grey ribbon cable. This cable is attached at the base of the green control board with the other end of the cable located on the back side of the printer's base.
-
Carefully disconnect both ends of the flat grey ribbon cable to release the control panel in its entirety.
-
-
Cette étape n’est pas traduite. Aidez à la traduire
-
Lift open the scanner lid and locate a black tab located at the center of the scanner bed.
-
Using your finger push (pull on some printers) the tab towards the scanner lid. This will release the scanner lid
-
-
Cette étape n’est pas traduite. Aidez à la traduire
-
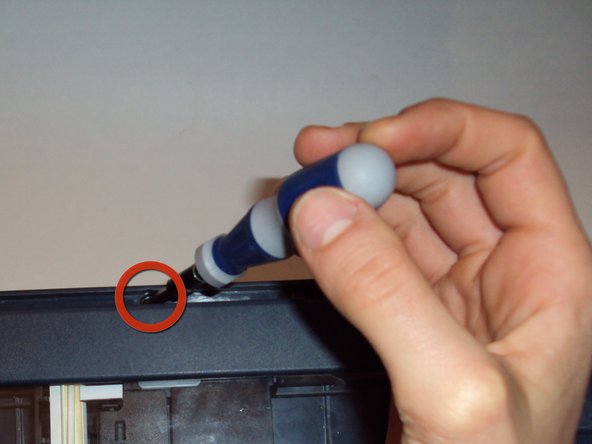
Once the scanner lid is removed, use the Philips #1(Torx on some printers) Screwdriver to remove the screw.
-
-
Cette étape n’est pas traduite. Aidez à la traduire
-
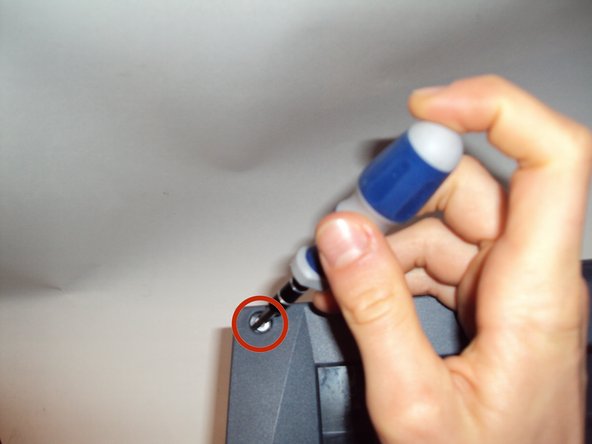
Remove all four silver screws from the corners of the scanner glass cover with a T10 Torx Screwdriver.
-
-
Cette étape n’est pas traduite. Aidez à la traduire
-
Once you have removed the four torx screws, gently lift the scanner glass cover from the printer's base.
-


Annulation : je n'ai pas terminé ce tutoriel.
7 autres ont terminé cette réparation.
Équipe

Cal Poly, Team 12-31, Maness Spring 2011 Membre de l'équipe Cal Poly, Team 12-31, Maness Spring 2011
CPSU-MANESS-S11S12G31
5 membres
9 tutoriels rédigés
2 commentaires
2410 yazıcının kurulum sidisi exe dosyası gönderirseniz sevinirim benimki kayboldu lütfen teşekkürler. Mail. Veysiakaynak@hotmail.com
Where can you get a replacement cord for a HP PSC 2410 Photos mart All-in-one printer