Aller au contenu principal

HP Pavilion 15-ay041wm LCD Screen Replacement

Ce dont vous avez besoin

  1. HP Pavilion 15-ay041wm LCD Screen Replacement, Battery: étape 1, image 1 de 2 HP Pavilion 15-ay041wm LCD Screen Replacement, Battery: étape 1, image 2 de 2
    • Place the laptop upside down.

  2. HP Pavilion 15-ay041wm LCD Screen Replacement: étape 2, image 1 de 2 HP Pavilion 15-ay041wm LCD Screen Replacement: étape 2, image 2 de 2
    • Find the battery lock latch on the top left corner.

    • Slide the latch to the right position.

  3. HP Pavilion 15-ay041wm LCD Screen Replacement: étape 3, image 1 de 3 HP Pavilion 15-ay041wm LCD Screen Replacement: étape 3, image 2 de 3 HP Pavilion 15-ay041wm LCD Screen Replacement: étape 3, image 3 de 3
    • Find the battery release latch on the top right corner.

    • Slide and hold the latch towards the left to cover the battery icon.

    • Carefully slide the battery outwards.

  4. HP Pavilion 15-ay041wm LCD Screen Replacement, LCD Screen: étape 4, image 1 de 1
    • Place the laptop on a flat surface with the lid open.

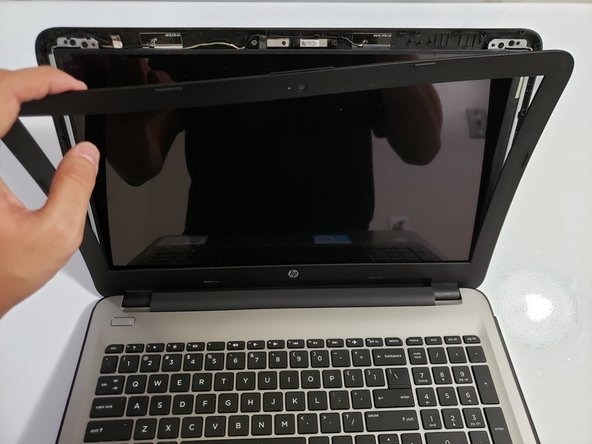
  5. HP Pavilion 15-ay041wm LCD Screen Replacement: étape 5, image 1 de 2 HP Pavilion 15-ay041wm LCD Screen Replacement: étape 5, image 2 de 2
    • Gently pull away the bezel by the inner edge starting from the side until bezel is detached from screen.

    • To avoid scratching the screen, do not use any sharp objects.

  6. HP Pavilion 15-ay041wm LCD Screen Replacement: étape 6, image 1 de 2 HP Pavilion 15-ay041wm LCD Screen Replacement: étape 6, image 2 de 2
    • Unsnap the two hinges attached to the clam shell by pulling towards yourself and then up.

  7. HP Pavilion 15-ay041wm LCD Screen Replacement: étape 7, image 1 de 1
    • Remove the four 3mm screws that are holding the LCD panel in place.

  8. HP Pavilion 15-ay041wm LCD Screen Replacement: étape 8, image 1 de 1
    • Gently pull the screen from the hooks and place it on the keyboard.

    • The video cable is attached to the bottom of the LCD screen.

  9. HP Pavilion 15-ay041wm LCD Screen Replacement: étape 9, image 1 de 1
    • Peel the tape securing the video cable.

  10. HP Pavilion 15-ay041wm LCD Screen Replacement: étape 10, image 1 de 2 HP Pavilion 15-ay041wm LCD Screen Replacement: étape 10, image 2 de 2
    • Gently disconnect the video cable to detach the LCD screen from the back panel.

Conclusion

To reassemble your device, follow these instructions in reverse order.

2 autres ont terminé cette réparation.

Équipe

York University, Team S1-G2, Woodhouse Winter 2020 Membre de l'équipe York University, Team S1-G2, Woodhouse Winter 2020

YORK-WOODHOUSE-W20S1G2

3 membres

4 tutoriels rédigés

Un commentaire

Hi. This is my first time trying to fix a computer by myself, but I'm desperate -old lady, low fixed income & this is my only computer. Please, please help! Trying to replace LCD cable, not the screen itself from HP15-ay041wm. [Screen fading from various shades of color to white & cursor freezes. Have to keep moving/tilting screen till find the “sweet spot". Then have to keep holding onto screen w/one hand while trying to type w/other. That lasts a few moments, but it eventually starts going goofy again & I have to find its new sweet spot. Hear this seems to be pretty common w/this model.] Followed your terrific directions & removed screen & disco’d the cable from screen, but now I'm stuck & panicking. How do I get the old cable past the hinge setup, get bad cable out of the main guts of the comp & get the new cable in? I've got this thing taken apart, scared to death I'm gonna ruin the whole computer and I can't afford a new one. So grateful for your help. Thx, God bless, be safe & well!

Bernadette - Réponse

Ajouter un commentaire

Nombre de vues :

Dernières 24 heures : 2

7 derniers jours : 6

30 derniers jours : 23

Total : 1,439