Aller au contenu principal

HP Pavilion g7-1365dx Hard Drive Replacement

Ce dont vous avez besoin

  1. HP Pavilion g7-1365dx Hard Drive Replacement, Battery: étape 1, image 1 de 1
    • To prevent injury, make sure the laptop is powered off before removing the battery.

    • Flip the laptop so that it is upside down and opens away from you. This exposes the battery, it will be centered at the bottom of the laptop .

    • Push the switch above the battery towards the center of the laptop .

  2. HP Pavilion g7-1365dx Hard Drive Replacement: étape 2, image 1 de 1
    • While pushing the switch, lift the battery by the side closest to the switch up and away from the laptop.

  3. HP Pavilion g7-1365dx Hard Drive Replacement, Service Door: étape 3, image 1 de 2 HP Pavilion g7-1365dx Hard Drive Replacement, Service Door: étape 3, image 2 de 2
    • Using a Phillips size 0 screwdriver, unscrew the 2 Phillips screws.

    • Use the opening tool around the edges of the service door to loosen it and remove it.

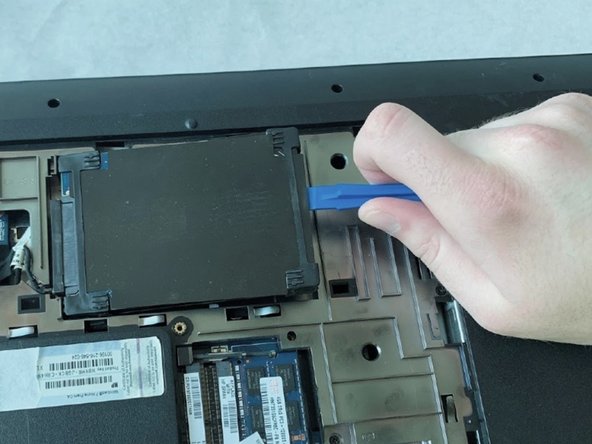
  4. HP Pavilion g7-1365dx Hard Drive Replacement, Hard Drive: étape 4, image 1 de 3 HP Pavilion g7-1365dx Hard Drive Replacement, Hard Drive: étape 4, image 2 de 3 HP Pavilion g7-1365dx Hard Drive Replacement, Hard Drive: étape 4, image 3 de 3
    • Disconnect the drive connector cable from the system board by pulling the plastic tab on top of the connector.

    • Use the opening tool to lift the hard drive out.

    • Remove the hard drive.

Conclusion

To reassemble your device, follow these instructions in reverse order.

Derrick Manu

Membre depuis le 03/18/19

245 Réputation

2 tutoriels rédigés

Équipe

UMass Dartmouth, Team S1-G1, Simcock Spring 2019 Membre de l'équipe UMass Dartmouth, Team S1-G1, Simcock Spring 2019

UMASSD-SIMCOCK-S19S1G1

4 membres

8 tutoriels rédigés

0 commentaires

Ajouter un commentaire

Nombre de vues :

Dernières 24 heures : 4

7 derniers jours : 4

30 derniers jours : 6

Total : 354