Introduction
Ce guide vous aidera à démonter la tête d'impression et à nettoyer l'imprimante : l'emplacement de parcage de la tête d'impression est souvent plein d'encre et de poussières mélangés.
Ce dont vous avez besoin
-
-
Allumer l'imprimante
-
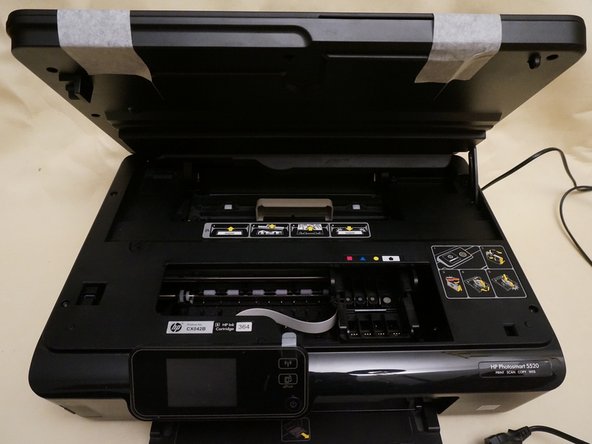
Soulever la vitre du scanner et le couvercle du scanner pour faire venir la tête d'impression au centre de l'imprimante
-
Retirer les cartouches d'encre
-
Débrancher l'imprimante mais ne pas l'éteindre avec le bouton. Sinon, la tête d'impression retournera sur son emplacement de parcage
-
Utiliser du ruban adhésif pour maintenir la couvercle et la vitre du scanner ensemble
-
-
-
Tirer délicatement sur le crochet. Retenir la vitre et le couvercle une fois le crochet enlevé
How to clean under the glass
Need to know to clean under glass it has Cobb
-
-
-
-
Dévisser les 7 vis torx. Ne pas oublier celle qui se trouve sous l'étiquette de l'imprimante (Vous devez enlever l'étiquette dans le coin inférieur droit)
-
Pousser les clips à l'arrière du panneau LCD et tirer le panneau LCD vers l'extérieur en même temps. Les clips peuvent être sentis, mais non visibles sous le plastique sur lequel l'étiquette HP est visible sur l'image du milieu. Une quatrième photo aiderait ici.
-
Ensuite, retirer les nappes de données connectées au panneau LCD pour déconnecter le panneau LCD de l'imprimante.
-
Retirer les 2 vis torx restantes masquées par le panneau LCD
-
Les clips sont ici (Flèches bleues)
First push the three clips (blue arrows), then take off the panel, then remove the two remaining torx.
Cette démonstration est particulièrement mauvaise. Sur ma 5520, il n’y a pas moyen d’accéder aux “clips” sans casser les 2 supports de l’afficheur LCD. Plutôt que de risquer de casser quoi que ce soit et d’aggraver la situation, j’arrête là avant d’obtenir une info complémentaire sur le démontage PROPRE du LCD.
C'est le moment délicat. On a trés peu de visibilité de l'arrière du panneau, pourtant les 3 clips sont là, un de chaque côté et un en haut. À tâtons avec un doigt on arrive en poussant chaque clip vers l'intérieur, puis le panneau vers l'extérieur.
Merci à l'auteur de ce tutoriel qui m'a permis de démonter mon imprimante qui malheureusement n'est pas facilement irréparable….
Bien à
Download the HP printer/ scanner doctor, just solved my problem with black ink not printing properly. Lines through photos etc.
Smythers
Beim Lösen des LCDs brauche ich 3 Hände!!!!
C’est en effet le moment le plus délicat : j’y suis arrivé finalement en trouvant seulement le clip central et en pesant dessus avec le doigt et cela a suffit à tirer le panneau qui est sorti de lui-même. Merci à Marc P. qui m’a poussé à persévérer.Pierre Aubert 12.06.2021
Merci beaucoup à l’auteur de ce tuto . Grâce à lui, j’ai démonté la tête sans difficultés voici plus de 2 ans et j’ai réussi à la nettoyer. J’ai donc une tête neuve d’avance ! Par contre, aujourd’hui, une petite fuite d’encre noire s’est manifestée. J’ai re-démonté pour nettoyer mais je ne vois rien de concret. Je remonte et place l’imprimante dans un plateau avec tissus d’épongeage !
Pierre
Bonjour : très bon tutoriel, mais ..., manquent des précisions ; Etape 2 : comment est fixée et se démonte cette charnière-glissière : vissée ou entrée à la force ? Etape 3 : MISSION IMPOSSIBLE pour le démontage de l'écran LCD ! combien de clips (je n'en "devine" qu'un, en haut et au centre ... ) ? à quoi ressemblent-ils ? comment faut-il agir sur ces clips, "à tâtons et en aveugle" ? etc ... ; je n'ai pas réussi à franchir cette étape (en dépit du temps passé et de la force exercée ... ) qui demande des explications supplémentaires ...
Bref, un dessin représentatif desdits "clips" et un schéma du sens des forces à exercer seraient bienvenus, ... et éviteraient la casse !
Merci : MJL
-
-
-
Retirer les ressorts qui maintiennent la tête d'impression
-
Retirer la tête d'impression en tirant sur les nappes de données. Ceux-ci sont délicats et facilement endommagés si vous essayez de les nettoyer avec de l'alcool.
-
En remettant la tête d'impression après son nettoyage ou son remplacement, faire attention à placer le ruban horizontal dans le guide de plastique comme indiqué sur la dernière photo. Un mauvais placement peut bloquer la tête d'impression lors de la remise sous tension à la fin de la procédure.
-
-
-
L'imprimante est équipée d'un système de nettoyage automatique de la tête d'impression. Généralement, il y a pas mal d'encre (Probablement mélangé à de la poussière) à l'endroit où la tête d'impression est nettoyée
-
Retirer 4 des 5 vis torx comme indiqué sur la photo. Comme indiqué dans un commentaire d'un utilisateur, celui en haut à droite sert à joindre les deux pièces de cette partie.
-
En supposant que la tête d'impression est maintenant retirée, basculer doucement la plaque de plastique et la retirer
-
Si vous n'avez pas encore mis vos gants, c'est le moment de le faire !
-
Maintenant, poussez le chariot qui contient le système de nettoyage de la tête d'impression (Flèches rouges)
-
Le chariot qui contient le système de nettoyage de ta tête d'impression est maintenant propre (Dernière photo)
thank you for that information, there is a video on you tube too but not in English but he shows it pretty well. my cartridges are stuck in the docking area, so only need to get to there, hopefully the system will work afterwards.
I did what so advice to do. But it is not working at all even cleaned it with ultra-soon bath. Nothing is helping what to do?? Ronald
You need to MOVE UP the advice about putting on gloves. Otherwise, well done & thank you.
Followed instructions …very clear! Now I am getting cartridge jam message and cannot get rid of it. Whirring noise before message comes up.
Instructions work well. Fortunately, the ink muck is water soluble. After cleaning, (cleaning carriage as well as the printhead) I continue having No Black Ink delivered during printhead cleaning routine or when I try to print using “Black Ink Only”! Next option is print head replacement or a trip to Best Buy to buy a Win10 printer.
Thank you,
“Skuz”
Merci beaucoup, très bien expliqué. Tout est propre, malheureusement la cartouche noire ne fonctionne pas.
Je suis allée dans les paramètres de l’imprimante “type de papier” , qualité d’impression” ,”plus foncé/plus clair” etc.. je dois au minimum choisir “qualité optimun et “le plus foncé” pour avoir un résultat gris pâle.
Par contre si je choisis qualité “photo” j’obtiens une impression noire et correcte…
When the instructions state “remove the five torq screws”, the one on the top right of the photo should not be removed (so, remove only four). It serves only to keep two pieces of plastic together and does not hold the plate in the machine.
Nach dem zusammensetzen habe ich ein Problem mit dem Schlitten. Beim Start direkt aus der Parkposition heraus knallt es und ich bekomme immer die Fehlermeldung “Patronenwagen blockiert”. Beim manuellen Schieben merkt man auch, dass irgendwo ein kleiner Widerstand ist. Was kann ich beim Zusammensetzen falsch gemacht haben?
hallo marco, habe haargenau das gleiche problem.
wurde Ihr problem gelöst ? & wenn ja wie ??
Hallo Marco, hallo Volker,
ich merke zwar keine Widerstand, sondern ledigleich, das sich der Schlitten beim verlassen der Parkposition etwas anhebt (scheint aber an der Führung zu liegen), ansonsten kann Euren beschrieben Fehler aber bestätigen. Hat einer von Euch Beiden bereits eine Lösung gefunden?
Gruß Martin
Hallo Marco, hallo Volker,
auf der Rückseite vom Schlitten ist im oberen Bereich ein schwarzer Sensor, durch den das transparente Band durchgeführt werden muss. Mein Band lag unterhalb des Sensors, deshalb funktionierte es bei nicht. Nun läuft der Schlitten wieder gewohnt “langsam” und knallt nirgends gegen.
Leider druckt bei mir der Drucker auch nach Reinigung des Druckkopfes immer noch nicht.
After I cleaned the printhead many times without more succes then before, I replaced it now with a new one. But STILL it is not printing black!
I tried 4 new black cartridges already. The other colors work fine, but just not black. I have the newest firmware running. Has anyone another idea?
donchu, maybe a tube in the purge unit of your printer is blocked. I recently watched this helpful video because I had the same problem with the black ink not printing.
It is a bit messy, but maybe worth a try.
The printer is very stubborn ! after changed the head it says “ the head is damaged call hp assistance “ :-( is there a way to reset such a printer ?
Très bien expliqué et pas de problème particulier. Par contre, pas de changement au niveau de ma défaillance de fonctionnement, pas d’impression de la cartouche d’encre noire. Comme ce n’est pas trop compliqué à changer, j’ai commander une tête d’impression neuve, je verrai bien si j’ai raison d’insister…
Bonjour, J’ai une imprimante hp5520. Depuis plusieurs semaines , elle ne fonctionne plus. j’ai nettoyé les têtes des couleurs. Elle ne fonctionne toujours pas et notamment pour la couleur noir. Hier, je me suis rendue compte après un xxx nettoyage, qu’il y avait de l’encre de partout à droite de la cartouche. Je n’ai pas l’impression que ma cartouche à fuit. D où provient cet encre ? Et comment faire repartir mon imprimante qui jusqu’alors m’avait donné entière satisfaction. Merci pour votre aide
-


Pour réassembler l'imprimante, veuillez suivre les instructions dans l'ordre inverse
Pour réassembler l'imprimante, veuillez suivre les instructions dans l'ordre inverse
Annulation : je n'ai pas terminé ce tutoriel.
62 autres ont terminé cette réparation.
Merci à ces traducteurs :
100%


Ces traducteurs nous aident réparer le monde ! Vous voulez contribuer ?
Commencez à traduire ›
41 commentaires
A l'étape 3, je n'arrive pas à retirer l'écran LCD. quand on me dit de pousser les deux clips à l'arrière, je ne vois les pas. tout semble solide et j'ai peur de casser quelque chose en forçant. comment franchir cette étape?
J'ai aussi eu un peu de difficulté à enlever l'écran LCD. Il ne faut pas hésiter à tirer dessus. Quand un clip est enlevé, les autres viennent plus facilement
LENNON -
Bonjour : très bon tutoriel, mais ..., manquent des précisions ; Etape 2 : comment est fixée et se démonte cette charnière-glissière ? Etape 3 : MISSION IMPOSSIBLE pour le démontage de l'écran LCD ! combien de clips ? à quoi ressemblent-ils ? comment faut-il agir sur ces clips, "à tâtons et en aveugle" ? etc ... ; je n'ai pas réussi à franchir cette étape qui demande des explications supplémentaires ... Merci : MJL
MJL -
J'ai étais ravie d'avoir ce tutoriel entre les mains car j'avais de gros problèmes et la tout est très bien détaillé en image c'est parfait même les références pour les pièces à changer d'indiquer c'est très bien
The print head cleaning system carriage can be completely removed. Need to push the carriage to back of printer. Remove screw in back right corner, next to the black cylindrical pump with rubber hoses, and another in the gear assembly that runs this pump. Then wiggle and remove this pump/gear assembly. Now the carriage can be moved forward on the track till a slot allows getting past a small metal shaft and a gear. Now you can clean it in the sink with hot water. Be careful to put the two springs back on this carriage before putting it back into the printer.
And be sure all the tubing will freely flow water, or the pumping action will not work!
Hi John, Thanks for your detailed instructions. I went as far as removing the pump/gear assembly. But whatever I tried, I could not manage to take out the "print head cleaning carriage". A photo would help if you have. Thanks & Merci! Chris
The instructions were very good. The most difficult part, strangely, was getting the LCD panel clips out. Good work. Thanks!
Black is completely blocked. It was printing before I put in a new cartridge. I got as far as removing the top panel torque screw, but no matter what I do, I cannot get the LCD panel clips to budge to get at the last screw. It is impossible to release them all at the same time. Any advice appreciated. Thank you.
Paul Williams 26 August 2017
Hey Paul, the first time I did this I couldn’t get the LED panel off either. At that time I found there was enough flexibility in the cover to lever it up from the rear sufficiently to reach inside and remove the printhead. Not ideal, but do-able. The next time (today in fact) I realised that it was possible to reach a finger inside the carapace at the front and toggle the lower right hand clip holding the LED which, once released, made it easy to unclip the remaining clips. Much easier! However, having now done this twice, I have decided to buy a new printhead (on eBay, from China, US$15 with free shipping).
John -
Good instructions, but after reassmbly, I get a message that there is a cartridge jam, and I can't get it to work properly again. My initial issue was that the black ink wasn't working (but had plenty of ink left), so I was trying to clean out the printer head. But now I have no way of knowing if that addressed the initial issue.
Carriage Jam results from failing to reposition the guide robbon between the sensor assembly on the print head cradle.
There are 2 black blocks at the top of the circuit board at the rear of the print head/cartridge cradle. The plastic guide ribbon needs to be between the two blocks.
having done all cleaning the printer is going through all the the motions and just returning a blank sheet even though it is printing the diagnostic sheet perfectly regards EJL
Thank you for your help. I am upset: HP clearly made it difficult for the users to fix their stuff. I mean: screw hidden behind a label, cables very difficult to put back etc etc This company do not respect the customers nor the environment.
Instructions were good until this point: “Remove the 2 remaining torx screws hidden by the LCD panel…See where are clips (Blue arrows).” No explanation on how to remove the LCD panel and no blue arrows in the diagram pointing out clips. Did the author take a doobie break? Thanks to the comments, I figured it out. However, pulling the ribbons off the print head broke one of the plastic plugs off the printhead, forcing me to order a new one. With Mr. HP in pieces and doubts about a new printhead fixing this boat anchor, I’m strongly tempted to slam dunk it into my trash receptacle and be done. Thanks HP for another stunning piece of crap.
Merci pour ce tutoriel ! Mon imprimante avait vraiment besoin d’un petit nettoyage, il y avait de l’encre partout !
J’ai fait attention lorsque j’ai remis tout en place, et pourtant au redemarrage, l’imprimante me signale un blocage charriot (alors que le charriot se déplace librement sans problème à la main et grace aux moteurs). Auriez-vous une idée ? Serait-ce le ruban horizontal de la tête d’impression qui aurait été endommagé ?
Merci beaucoup !
Does this mean we leave the plastic panel out ?
It just says remove the plastic panel, and the printhead carriage is now clean !!
To people struggling with the LED panel; I lift the panel as i’m trying to push the catch in the back. This seems to make it easier to get the catch back.
I removed the print head cleaning carriage assembly that slides fore and aft on the right side of my hp 5520 printer. After cleaning the plugged black ink tube that is attached to it, I’m ready to install it. PROBLEM: There are 2 springs on this unit…one on the side which I reconnected. The other is a smaller (weaker) spring that goes on the bottom of the unit. I see where the one end of the spring attaches but cannot figure out where to connect the other end. Any help would be greatly appreciated.
Just reassembled my 5520 after installing a new printhead; unfortunately I am now receiving the message that “the cartridge access door is open” and it is not. The mechanical part of the system is in working order so it seems that the sensor itself has failed. Is there a fix for this? Yes, I have done a hard reboot multiple times but still receive the error. Help please.
Hi can you tell me where this parts go? https://drive.google.com/file/d/1-7y_OG-...
Did you find where to put it? The same part appeared in my sink as I cleaned the larger panel - it goes somewhere touching that panel, I’m sure, but it is not obvious where! It would be helpful if the generally very clear instructions warned about this and showed where this rogue part fits in.
link doesn't work anymore but if this is the same part I had - it's missing in the image but I'm 99% sure it goes where the screw hole that doesn't have a screw is circled in the top right (pictured in the last step). not sure if this part is vital though
just for future reference, seeing as this is an old comment
Wessel -
What if you let your idiot friend change cartridge and they shut printer off instead of unplugging it?
Bonjour savez-vous où se trouve le capteur de fin de course, car j'ai une erreur récurrente et j'aimerais pourvoir changer ce capteur .
Bonjou
je viens de faire l’ensemble du tuto après la remise en service j’ai un pb le chario saute du coup j’ai un message qui me demande de verifier le chariot de le pousser de droit à gauche à fond (aide sur l’ecran) rien ni fait
Help
merci d’avance
bonjour j ai le même problème que faire?
tuto génial très bien explique et facile a effectuer
A l’heure ou l’on veut sauver la planète il ne faudrait que des tutos comme celui ci pour tous les produits de la vie
milles merci
gilbert
j’e n’ais pas encore fait ma maintenance mais l’utilitaire est vraiment détaillé dans ce tutoriel merci encore de nous aider.
Recht herzlichen Dank. Ich war schon am verzweifeln, die Tinte ist beim Drucker schon hinten rechts hervor gekommen und ich bring den oberen Teil vorne beim Display nicht ab, auch das unter dem Bezeichnungs- Schild vom Drucker eine Schraube ist, ohne ihrer super Reparatur Anleitung hätte ich das nie geschafft. So super beschrieben und abgebildet, ein Traum, danke danke danke, mit ganz freundlichen Grüßen aus Österreich aus Graz Eduard Konrad
J’ai nettoyé et remonté l’imprimante, mais l’écran ne s’allume plus. Comment réparer ?
Ich habe den mit Tinte versifften Drucker nach der Demontage hochkant in die Duschwanne gestellt (Elektronik nach oben) und die ganze Tinte mit der Duschbrause herausgespült. Hat eine Zeit gedauert bis nur noch klares Wasser aus dem Drucker kam. Dann noch den seitlichen Schwamm herausgezogen und ausgespült. Dann alles gut getrocknet und zusammengebaut, nun ist der Drucker blitzblank sauber und druckt auch wieder einwandfrei, ohne dass unten Tinte ausläuft!
Schwarze Finger waren allerdings nicht zu vermeiden ;-)
Bravo pour ce tuto très efficace. Mon imprimante et moi vous disons merci
dO YOU KNOW WHERE i CAN OBTAIN A SERVICE MANUAL (SCHEMATIC OF MAINBOARD)
this is very nice. I could able to it. Now I want to learn/know about full dis assembly of electrical circuit board from th e printer . Please give th e instructions . Thanks
Bonjour : très bon tutoriel, mais ..., manquent des précisions ; Etape 2 : comment est fixée et se démonte cette charnière-glissière ? Etape 3 : MISSION IMPOSSIBLE pour le démontage de l'écran LCD ! combien de clips ? à quoi ressemblent-ils ? comment faut-il agir sur ces clips, "à tâtons et en aveugle" ? etc ... ; je n'ai pas réussi à franchir cette étape qui demande des explications supplémentaires ... Merci : MJL
Druckkoüpf fährt nicht in Mittelstellung? Wie kann man das beheben?
claudiakornetzky - Réponse