Aller au contenu principal

HP Photosmart 935 LCD Screen Replacement

Ce dont vous avez besoin

  1. HP Photosmart 935 LCD Screen Replacement, Batteries: étape 1, image 1 de 2 HP Photosmart 935 LCD Screen Replacement, Batteries: étape 1, image 2 de 2
    • Flip the camera over so the bottom of the camera is facing you.

    • Turn the mode dial to the OFF position.

  2. HP Photosmart 935 LCD Screen Replacement: étape 3, image 1 de 2 HP Photosmart 935 LCD Screen Replacement: étape 3, image 2 de 2
    • Slide the bottom cover in the direction of the arrow to open it.

  3. HP Photosmart 935 LCD Screen Replacement: étape 4, image 1 de 1
    • Pull out the batteries.

  4. HP Photosmart 935 LCD Screen Replacement, Plastic Casing: étape 5, image 1 de 1
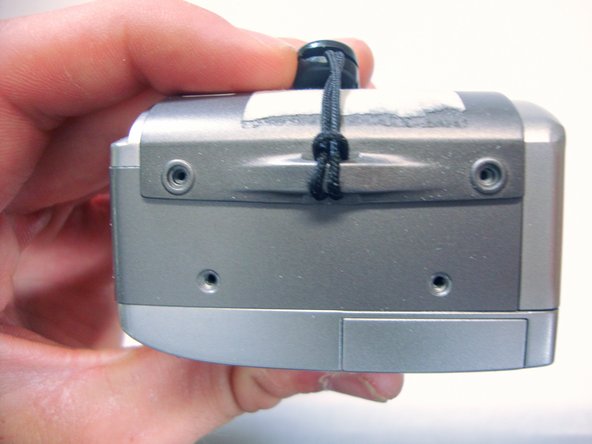
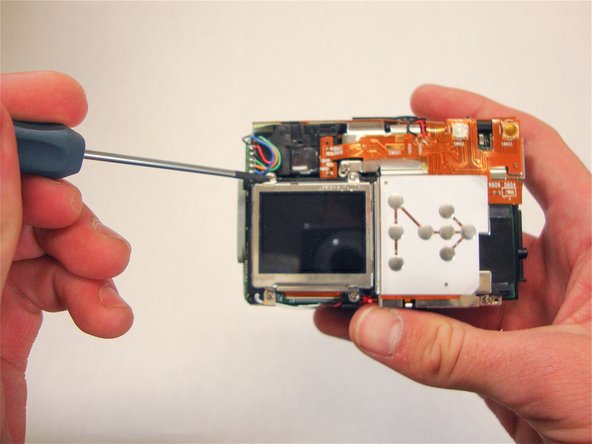
    • Use a Phillips #00 screwdriver to remove the two 4.7 mm screws in the bottom of the plastic casing.

  5. HP Photosmart 935 LCD Screen Replacement: étape 6, image 1 de 2 HP Photosmart 935 LCD Screen Replacement: étape 6, image 2 de 2
    • Remove the four 4.7 mm screws on the left side of the camera.

  6. HP Photosmart 935 LCD Screen Replacement: étape 7, image 1 de 2 HP Photosmart 935 LCD Screen Replacement: étape 7, image 2 de 2
    • Remove the four 4.7 mm screws on the opposite side of the camera.

  7. HP Photosmart 935 LCD Screen Replacement: étape 8, image 1 de 3 HP Photosmart 935 LCD Screen Replacement: étape 8, image 2 de 3 HP Photosmart 935 LCD Screen Replacement: étape 8, image 3 de 3
    • Use your thumbs to pry the case apart.

    • It is easiest to pry the case apart if you start at the bottom.

    • The case should come apart with minimal effort. If it doesn't, you can use a spudger or plastic opening tool to pry it open.

  8. HP Photosmart 935 LCD Screen Replacement: étape 9, image 1 de 1
    • This step requires a significant amount of force.

    • Pull the bottom half of the inner camera out of the case by half an inch. This may be difficult.

  9. HP Photosmart 935 LCD Screen Replacement: étape 10, image 1 de 2 HP Photosmart 935 LCD Screen Replacement: étape 10, image 2 de 2
    • While pulling the camera out of the case, note the small soft plastic cover on the side. This cover will detach from the rest of the device.

    • Once the bottom of the inner camera is pulled out, pull the device out completely.

    • Use a firm grasp when removing the device from the case for stability and control.

  10. HP Photosmart 935 LCD Screen Replacement, LCD Screen: étape 11, image 1 de 1
    • Orient the camera so that the LCD screen is facing you.

    • If case is still on, remove it by following the Plastic Casing Installation Guide found in the previous steps.

    • Removing the casing completely is crucial to completing this guide.

  11. HP Photosmart 935 LCD Screen Replacement: étape 12, image 1 de 2 HP Photosmart 935 LCD Screen Replacement: étape 12, image 2 de 2
    • Using a Phillips #00 remove the four 4.40 mm screws that secure the LCD screen to the frame.

  12. HP Photosmart 935 LCD Screen Replacement: étape 13, image 1 de 1
    • Allow the LCD screen to flip down. This will expose the electric strip that connects the screen to the camera.

  13. HP Photosmart 935 LCD Screen Replacement: étape 14, image 1 de 1
    • Look for where the yellow electric strip is attached to the camera. You will find a plastic grey bar and a white base holding this strip in place.

    • Push the grey bar away from the white base. This will release the yellow electric strip and free the LCD screen from the camera.

  14. HP Photosmart 935 LCD Screen Replacement: étape 15, image 1 de 1
    • Unplug the connected red and white wires. They will come out with the small white casing.

  15. HP Photosmart 935 LCD Screen Replacement: étape 16, image 1 de 1
    • Flip camera so that the lens is facing away from you. You should be looking at the LCD screen.

  16. HP Photosmart 935 LCD Screen Replacement: étape 17, image 1 de 2 HP Photosmart 935 LCD Screen Replacement: étape 17, image 2 de 2
    • Remove the bottom left LCD mounting frame screw. The screen should come loose after the screw is removed.

    • Remove the LCD screen from the camera. Make sure that the electric strip comes out with screen.

Conclusion

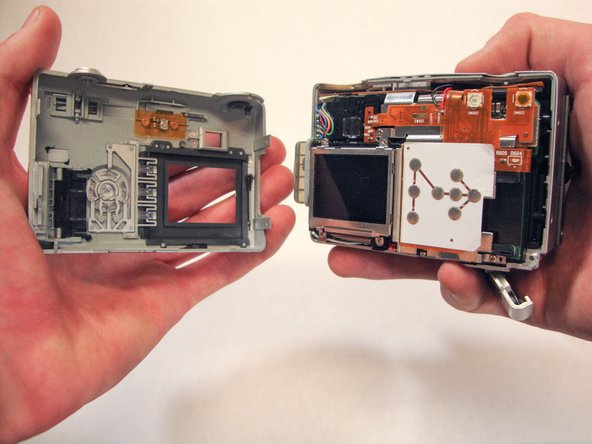
To reassemble your device, follow these instructions in reverse order.

3 autres ont terminé cette réparation.

Nick Oleskowicz

Membre depuis le 04/03/12

287 Réputation

3 tutoriels rédigés

Équipe

Cal Poly, Team 15-13, Forte Spring 2012 Membre de l'équipe Cal Poly, Team 15-13, Forte Spring 2012

CPSU-FORTE-S12S15G13

5 membres

10 tutoriels rédigés

Un commentaire

Thank for this very good job, I own this this camera so it is will be quite easy to fix it following your guide.

Saverio Mercurio - Réponse

Ajouter un commentaire

Nombre de vues :

Dernières 24 heures : 0

7 derniers jours : 5

30 derniers jours : 6

Total : 2,396