Aller au contenu principal

HP Photosmart c3180 Encoder Strip Replacement

Ce dont vous avez besoin

  1. HP Photosmart c3180 Encoder Strip Replacement, Top Panel of HP Photosmart c3180 printer: étape 1, image 1 de 2 HP Photosmart c3180 Encoder Strip Replacement, Top Panel of HP Photosmart c3180 printer: étape 1, image 2 de 2
    • Before disassembling your printer, be sure that the printer has been unplugged to avoid any risk of injury.

    • Rotate the printer 90 degrees counter clockwise so that the side panel next to control panel is facing you.

    • Remove the two T10 12mm Torx screws from the left side panel.

  2. HP Photosmart c3180 Encoder Strip Replacement: étape 2, image 1 de 2 HP Photosmart c3180 Encoder Strip Replacement: étape 2, image 2 de 2
    • Firmly pull the the back of the side panel until it separates from the body of the printer.

    • Rotate the side panel upwards while pulling it towards yourself to remove the panel.

  3. HP Photosmart c3180 Encoder Strip Replacement: étape 3, image 1 de 2 HP Photosmart c3180 Encoder Strip Replacement: étape 3, image 2 de 2
    • Rotate the printer 90 degrees clockwise.

    • Grasp the paper tray and rotate it down.

    • Insert your fingers into the slot in the printer door and pull to rotate the gate down.

  4. HP Photosmart c3180 Encoder Strip Replacement: étape 4, image 1 de 2 HP Photosmart c3180 Encoder Strip Replacement: étape 4, image 2 de 2
    • Rotate the printer 90 degrees clockwise.

    • Remove the two T10 12 mm Torx screws.

    • Grasp both sides of the side panel and pull it forward to remove the panel.

  5. HP Photosmart c3180 Encoder Strip Replacement: étape 5, image 1 de 2 HP Photosmart c3180 Encoder Strip Replacement: étape 5, image 2 de 2
    • Rotate the printer 90 degrees counter clockwise.

    • Lift the scanner lid to expose the scanner glass.

  6. HP Photosmart c3180 Encoder Strip Replacement: étape 6, image 1 de 1
    • Remove the two T10 12 mm Torx screws.

    • Do not attempt to lift the top panel off the printer yet because it is still connected to the printer body by a cable.

  7. HP Photosmart c3180 Encoder Strip Replacement: étape 7, image 1 de 2 HP Photosmart c3180 Encoder Strip Replacement: étape 7, image 2 de 2
    • Rotate the printer 90 degrees counter clockwise.

    • Inside the printer is a small white tab. Press it inward with a spudger until a pop is heard.

    • Remove the front panel by grasping its front and pulling away from the printer.

  8. HP Photosmart c3180 Encoder Strip Replacement: étape 8, image 1 de 2 HP Photosmart c3180 Encoder Strip Replacement: étape 8, image 2 de 2
    • Rotate the printer 90 degrees clockwise.

    • Remove the cable connecting the top panel of the printer to the power button assembly.

  9. HP Photosmart c3180 Encoder Strip Replacement: étape 9, image 1 de 1
    • Carefully lift the top panel of the printer away from the printer body.

  10. HP Photosmart c3180 Encoder Strip Replacement, Ink Cartridge Track: étape 10, image 1 de 2 HP Photosmart c3180 Encoder Strip Replacement, Ink Cartridge Track: étape 10, image 2 de 2
    • Set aside the top panel of the printer.

    • Remove the two T10 12 mm Torx screws from the top front of the printer

  11. HP Photosmart c3180 Encoder Strip Replacement: étape 11, image 1 de 2 HP Photosmart c3180 Encoder Strip Replacement: étape 11, image 2 de 2
    • Rotate the Printer 90 degrees counter clockwise.

    • Remove the scanner cable from the main circuit board.

    • Grasp the bottom of the cable and pull straight up. Do not wiggle it from side to side or twist it as this can damage the connection.

  12. HP Photosmart c3180 Encoder Strip Replacement: étape 12, image 1 de 1
    • Rotate the printer 90 degrees clockwise.

    • Using both hands, lift the scanner tray from the body of the printer.

  13. HP Photosmart c3180 Encoder Strip Replacement: étape 13, image 1 de 2 HP Photosmart c3180 Encoder Strip Replacement: étape 13, image 2 de 2
    • Remove the power button circuit board from the support frame by pinching the left side, and pulling forward and to the left simultaneously.

    • Push up on the tab holding the secondary control circuit board with the spudger and pull it forward to remove it.

    • Be careful not to pull too hard on the cable connecting the power button control circuit board and the secondary control circuit board to the main circuit board

  14. HP Photosmart c3180 Encoder Strip Replacement: étape 14, image 1 de 2 HP Photosmart c3180 Encoder Strip Replacement: étape 14, image 2 de 2
    • Remove the two T10 12 mm Torx screws.

    • Lift the support frame off of the printer body with both hands.

  15. HP Photosmart c3180 Encoder Strip Replacement: étape 15, image 1 de 1
    • Remove the printer door and paper tray by putting them in the closed position and not laying flat then rotating them upwards lift the left side up.

  16. HP Photosmart c3180 Encoder Strip Replacement: étape 16, image 1 de 2 HP Photosmart c3180 Encoder Strip Replacement: étape 16, image 2 de 2
    • Remove both of the ink cartridges by grabbing the front of the ink cartridge and pulling down.

    • Make sure that the printer carriage is pushed all the way to the right.

  17. HP Photosmart c3180 Encoder Strip Replacement: étape 17, image 1 de 2 HP Photosmart c3180 Encoder Strip Replacement: étape 17, image 2 de 2
    • Remove the T10 6 mm Torx screw on the left side of the track assembly.

    • Remove the T10 12 mm Torx screw on the left side of the track assembly.

  18. HP Photosmart c3180 Encoder Strip Replacement: étape 18, image 1 de 2 HP Photosmart c3180 Encoder Strip Replacement: étape 18, image 2 de 2
    • Gently push the ink cartridge carriage to the left side of the printer.

  19. HP Photosmart c3180 Encoder Strip Replacement: étape 19, image 1 de 1
    • Remove the two T10 12 mm Torx screws.

    • Remove the two T10 6 mm Torx screws.

  20. HP Photosmart c3180 Encoder Strip Replacement: étape 20, image 1 de 2 HP Photosmart c3180 Encoder Strip Replacement: étape 20, image 2 de 2
    • Rotate the printer 90 degrees counter clockwise.

    • Remove the cable connecting the ink cartridge carriage to the main circuit board.

    • Pull straight up to free the cable from the main circuit board. Do not twist or wiggle the cable as doing so can damage it.

    • You may need to lift the carriage up with one hand in order to reach the cable with the free hand as shown.

  21. HP Photosmart c3180 Encoder Strip Replacement: étape 21, image 1 de 1
    • Carefully remove the connector holding the drive motor wires to the main circuit board.

  22. HP Photosmart c3180 Encoder Strip Replacement: étape 22, image 1 de 2 HP Photosmart c3180 Encoder Strip Replacement: étape 22, image 2 de 2
    • Slide the ink cartridge carriage all the way to the right side of the printer.

    • Using both hands, carefully lift the ink cartridge track off of the main body of the printer.

  23. HP Photosmart c3180 Encoder Strip Replacement, Encoder Strip: étape 23, image 1 de 3 HP Photosmart c3180 Encoder Strip Replacement, Encoder Strip: étape 23, image 2 de 3 HP Photosmart c3180 Encoder Strip Replacement, Encoder Strip: étape 23, image 3 de 3
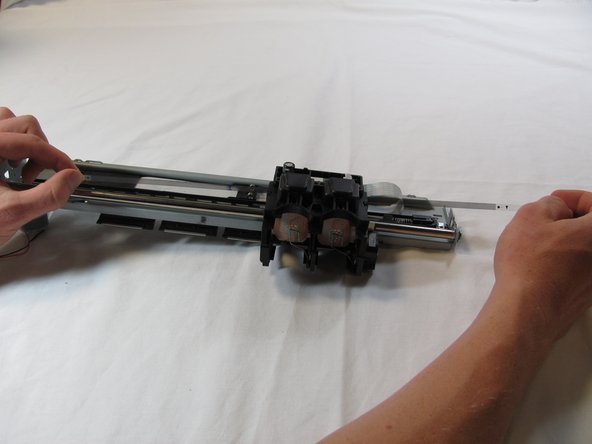
    • Set aside the printer body

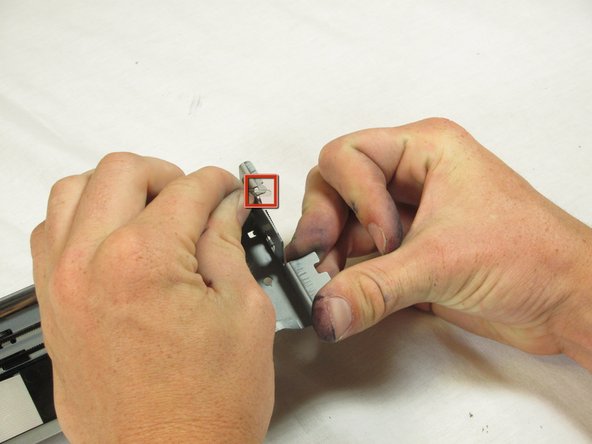
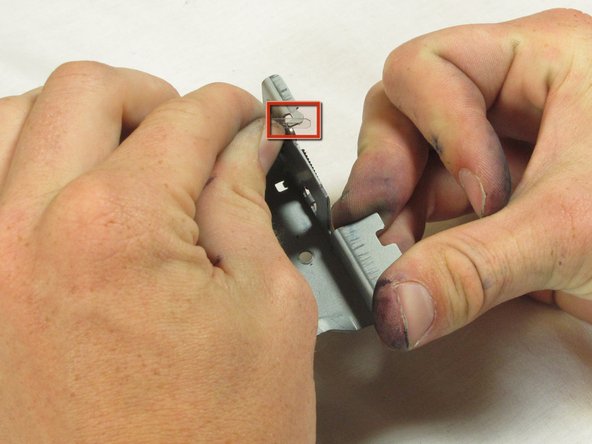
    • Unhook the encoding strip by pinching it on the right side and pulling away from the center of the ink cartridge track.

  24. HP Photosmart c3180 Encoder Strip Replacement: étape 24, image 1 de 2 HP Photosmart c3180 Encoder Strip Replacement: étape 24, image 2 de 2
    • Rotate the Track 180 degrees and slide the printer carriage slightly to the left.

    • Grasp the metal tab holding the encoding strip and pull it away from the track while pulling it up.

    • Without releasing the metal tab, pull the encoding strip through the ink cartridge carriage. The encoding strip should slide out smoothly.

Conclusion

To reassemble your device, follow these instructions in reverse order.

4 autres ont terminé cette réparation.

Jim

Membre depuis le 10/06/11

1 590 Réputation

10 tutoriels rédigés

Équipe

Cal Poly, Team 20-30, Maness Fall 2011 Membre de l'équipe Cal Poly, Team 20-30, Maness Fall 2011

CPSU-MANESS-F11S20G30

4 membres

25 tutoriels rédigés

Un commentaire

I would like to mention that these steps also work for the HP Photosmart C4150 model as well. Thanks for the repair guide.

Chris - Réponse

Ajouter un commentaire

Nombre de vues :

Dernières 24 heures : 0

7 derniers jours : 1

30 derniers jours : 13

Total : 6,987