Aller au contenu principal

HP Spectre x360 13t-4000 Hard Drive Replacement

Ce dont vous avez besoin

  1. HP Spectre x360 13t-4000 Hard Drive Replacement, Bottom Cover: étape 1, image 1 de 2 HP Spectre x360 13t-4000 Hard Drive Replacement, Bottom Cover: étape 1, image 2 de 2
    • Turn off and unplug the laptop.

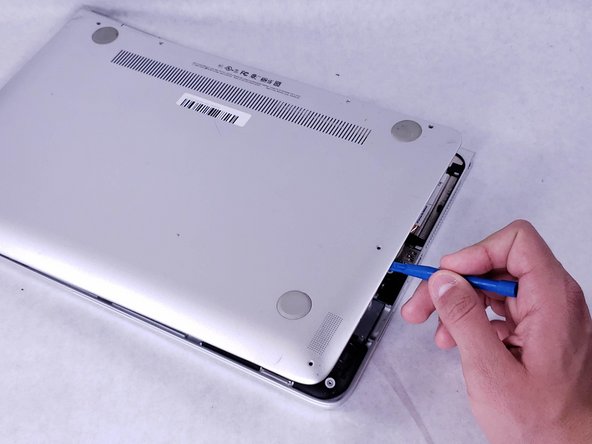
    • Flip over the laptop so that the bottom backplate is exposed.

  2. HP Spectre x360 13t-4000 Hard Drive Replacement: étape 2, image 1 de 2 HP Spectre x360 13t-4000 Hard Drive Replacement: étape 2, image 2 de 2
    • Use a T5 screwdriver to remove the six 3 mm screws that secure the backplate.

    • Use the same screwdriver to remove the two 7 mm screws.

  3. HP Spectre x360 13t-4000 Hard Drive Replacement: étape 3, image 1 de 3 HP Spectre x360 13t-4000 Hard Drive Replacement: étape 3, image 2 de 3 HP Spectre x360 13t-4000 Hard Drive Replacement: étape 3, image 3 de 3
    • Insert an opening tool under the bottom cover at the screen hinges, and gently pry the cover free.

    • Carefully work your way around the cover's edges to pop it off completely.

  4. HP Spectre x360 13t-4000 Hard Drive Replacement, Battery: étape 4, image 1 de 3 HP Spectre x360 13t-4000 Hard Drive Replacement, Battery: étape 4, image 2 de 3 HP Spectre x360 13t-4000 Hard Drive Replacement, Battery: étape 4, image 3 de 3
    • With the backplate removed, remove the four 3 mm screws securing the battery with a Phillips #1 screwdriver.

    • With the screws removed, disconnect the 3 wires connected to the battery.

    • Tweezers may be needed to remove the wires.

  5. HP Spectre x360 13t-4000 Hard Drive Replacement, Hard Drive: étape 5, image 1 de 3 HP Spectre x360 13t-4000 Hard Drive Replacement, Hard Drive: étape 5, image 2 de 3 HP Spectre x360 13t-4000 Hard Drive Replacement, Hard Drive: étape 5, image 3 de 3
    • Using a Phillips #000 screwdriver, unscrew the one 2mm screw located to the left of the hard drive.

    • With the screw undone, use a plastic spudger, lifting the hard drive from the left side. Once the hard drive is at an angle, pull the hard drive out.

Conclusion

To reassemble your device, follow these instructions in reverse order.

Brandon Carvalho

Membre depuis le 03/21/19

566 Réputation

5 tutoriels rédigés

Équipe

UMass Dartmouth, Team S2-G4, Simcock Spring 2019 Membre de l'équipe UMass Dartmouth, Team S2-G4, Simcock Spring 2019

UMASSD-SIMCOCK-S19S2G4

3 membres

6 tutoriels rédigés

Un commentaire

Will the 500 GB replacement kit work? It is recommended on this post but looks as though it is only compatible with Macs?

Crucial MX500 500 GB SSD

Mackenzi Christenson - Réponse

Ajouter un commentaire

Nombre de vues :

Dernières 24 heures : 3

7 derniers jours : 16

30 derniers jours : 52

Total : 8,642