Cette version peut contenir des modifications incorrectes. Passez au dernier aperçu vérifié.
Ce dont vous avez besoin
-
Cette étape n’est pas traduite. Aidez à la traduire
-
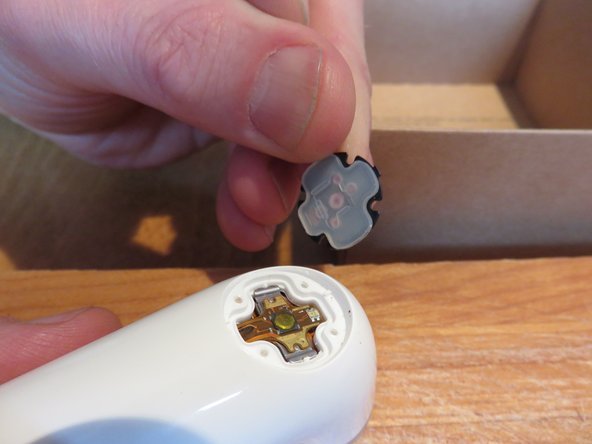
The button has a little prong in the middle that has a recess, and two hooked prongs, that release when turned counter clockwise.
-
To release it, be careful to avoid the extra ring you see around the button. That is part of the sealing assembly.
-
Lift the button carefully with very thin flat screwdriver, or dentist tools, and pry it off while rotating counterclockwise. This shoudl be the result.
-
-
Cette étape n’est pas traduite. Aidez à la traduire
-
Release 2 black screws to release the button retainer.
-
-
Cette étape n’est pas traduite. Aidez à la traduire
-
Remove the 4 screws that hold the sealing asembly.
-
You now see the on-off button assembly.
-
-
Cette étape n’est pas traduite. Aidez à la traduire
-
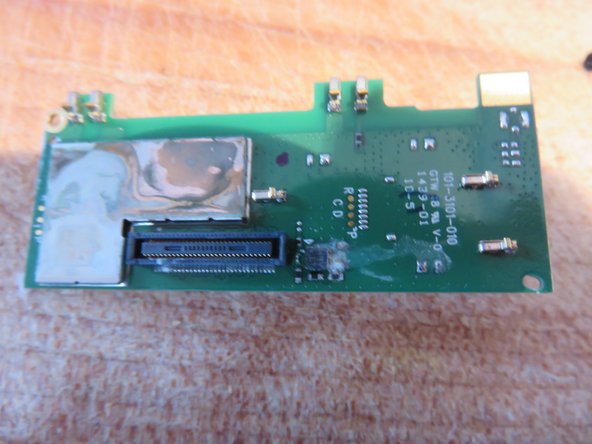
Here is a close-up of the switch support plate and main camera head to camera body connector.
-
It's glued on to a metal cross, and needs to be carefully removed to allow the body with cable to slide out.
-
-
Cette étape n’est pas traduite. Aidez à la traduire
-
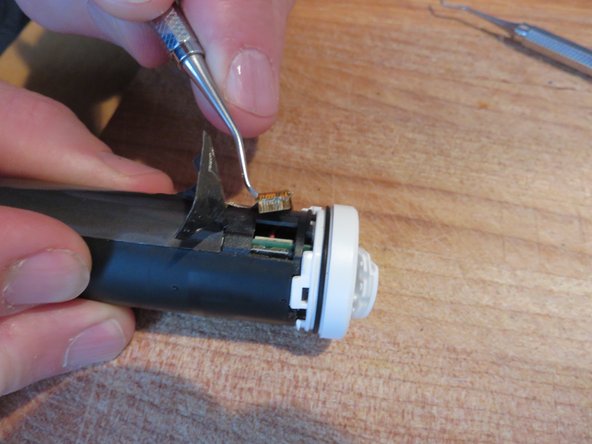
If you lift the switch, you can see the metal holding plate, and connector for the camera head below.
-
Carefully pry off the metal plate without damaging the cable and switch button.
-
The long body holds the battery and electronics and locks the camera head in place. So when pulling out the main assembly,, this flat cable and switch needs to be kept free to avoid damage.
-
-
Cette étape n’est pas traduite. Aidez à la traduire
-
Lift off the connector carefully, try to use non metal tool to avoid damage.
-
You can see the metal plate is still on here, but easier to remove it first.
-
First time for me, so the sequence of details may be off a little.
-
-
-
Cette étape n’est pas traduite. Aidez à la traduire
-
Put a standard camera connection onto the bottom of the camera, so you have something to pull on.
-
-
Cette étape n’est pas traduite. Aidez à la traduire
-
This is a picture from another one we sawed open. You can see the small latches that keeps the main assembly in.
-
-
Cette étape n’est pas traduite. Aidez à la traduire
-
4 right hands are better than 4 left, unless there are lefthanded people involved. Thanks for the two hands Bro
-
We also tried to push the whole assembly down, there seems to be some movement there, but then you jam it in and you cannot pull it out at the same time...
-
Got fed up and just broke the two latches using my very handy dentist tools. It's kind of round the corner so hard to reach. Again be careful for the connection, but the alignment is approximately the bottom of the camera head connector.
-
I don't think you can do it with a screwdriver.
-
Or better, the lower third of the horizontal part of the cross. Hmm is that clear?
-
The latch is just touching the body at the side of the cross shape.
-
-
Cette étape n’est pas traduite. Aidez à la traduire
-
Once the two latches were broken, constant wiggling and pulling started to show the bottom was moving.
-
Careful help of wide spudger, going round and round may help.
-
-
Cette étape n’est pas traduite. Aidez à la traduire
-
and it is out!
-
Note the broken latches.
-
And the poor seal around the speaker (or is it the mic?? Did the water get in there?
-
-
Cette étape n’est pas traduite. Aidez à la traduire
-
Gently pry the tape away and pull out the connector for power.
-
Watch out for the earthing strip you can see in the picture.
-
Mine was full of green copper corrosion. Cleaned as best I could and re-inserted. Still very very dead, no charge light, with or without SD card, nothing.
-
Second connector appears to be for the sensors that switch it on when you hold it. Did not touch.
-
-
Cette étape n’est pas traduite. Aidez à la traduire
-
Time to get rough
-
Remove the connector again in preparation to free and remove the bottom cover.
-
If you do it as below, you will break stuff...
-
Using force and unlatching the 3 obvious. Hmm that seems hard...
-
The junk one already has the bottom cap missing, so hard to see where the issue is.
-
-
Cette étape n’est pas traduite. Aidez à la traduire
-
The right way:
-
Find some really long Phillips 00 screwdrivers. One side has an obvious channel to loosen one of the two screws.
-
Maybe you can get to them when you have squeezed the housing open a little, but not obvious.
-
-
Cette étape n’est pas traduite. Aidez à la traduire
-
Gently pry some more of the tape away, see also the earthing mesh connecting to the power cable.
-
Open the clips on the plastic holder and the main body folds open.
-
Another view on the bottom cap and the channel to get to these two key screws.
-
Cleaned up some more water damage, but corrosion in too many places.
-
-
Cette étape n’est pas traduite. Aidez à la traduire
-
top board is held in with single phillips screw.
-
All damaged. Water dried and corrosion present.
-
-
Cette étape n’est pas traduite. Aidez à la traduire
-
The camera head can only come out once you have the main assembly out. The lens ring has a bajonet connection, seal and glue. Bajonet is anti clockwise to release. All it needs is about 1 mm.
-
Its quite hard to get any kind of grip on it. Leave it in place if you can.
-


Annulation : je n'ai pas terminé ce tutoriel.
31 autres ont terminé cette réparation.
23 commentaires
Hi Daggosett,
Bad dog!
In step 15 and 17 you can see where the battery sits and shape (17, right side), sitting all along the main body of the camera.
If I recall correctly, it sits at the side of the little pinhole - mic, but not 100% sure.
Not much you can do if the dog got a mouthful of the Lithium battery anyway. I would not imagine he would like to ingest any of it.
Hope you both recover.
Mike
Great post. Water ingress caused my lens to permanently fog up. Have you had any success taking the lens assembly apart? I think I'll give it a go.
Hi John,
No, did not try taking lens apart. See my comments in the huide on the lens.
Perhaps you can try to evaporate it and or absorb.
Like using the rice and warm place trick. (Hairdryer?)
If it is real water droplets - and has salts inside, that will leave residue.
If it is condensed water from another spot...it may work
You could try those 4 screws also I explain to leave alone...
Depends where the water sits.....
Good luck
Mike
Mike B -
my htc re camera is working.
but problem is , its not charging, even after reset .
please help me to rectify this problem