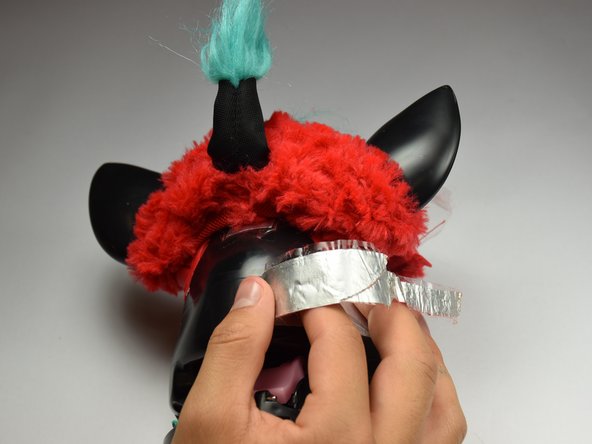
Aller au contenu principal

Hasbro Furby 2012 Switch Replacement

Ce dont vous avez besoin

  1. Hasbro Furby 2012 Switch Replacement, Outer Shell: étape 1, image 1 de 3 Hasbro Furby 2012 Switch Replacement, Outer Shell: étape 1, image 2 de 3 Hasbro Furby 2012 Switch Replacement, Outer Shell: étape 1, image 3 de 3
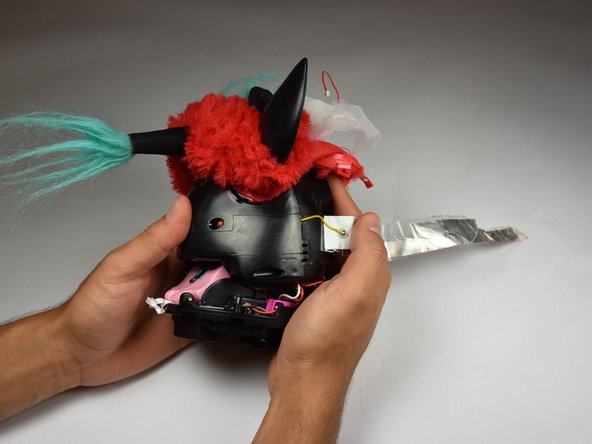
    • Use a flathead screwdriver to remove the two 10mm screws on the base of the Furby.

  2. Hasbro Furby 2012 Switch Replacement: étape 2, image 1 de 3 Hasbro Furby 2012 Switch Replacement: étape 2, image 2 de 3 Hasbro Furby 2012 Switch Replacement: étape 2, image 3 de 3
    • Use a Phillips #0 driver to unscrew the eight 10mm screws.

    • Remove the base ring after unscrewing all the screws.

    • Be careful when lifting the base ring from the Furby. There are sharp edges that hold the base ring in place.

  3. Hasbro Furby 2012 Switch Replacement: étape 3, image 1 de 2 Hasbro Furby 2012 Switch Replacement: étape 3, image 2 de 2
    • Unhook the white ribbon from the tab on the base.

  4. Hasbro Furby 2012 Switch Replacement: étape 4, image 1 de 3 Hasbro Furby 2012 Switch Replacement: étape 4, image 2 de 3 Hasbro Furby 2012 Switch Replacement: étape 4, image 3 de 3
    • Roll the Furby's fur downward.

    • Disconnect the now exposed red wire.

  5. Hasbro Furby 2012 Switch Replacement: étape 5, image 1 de 3 Hasbro Furby 2012 Switch Replacement: étape 5, image 2 de 3 Hasbro Furby 2012 Switch Replacement: étape 5, image 3 de 3
    • Locate the two middle clips first.

    • Locate the two remaining clips on Furby's sides, they are opposite each other.

    • Orient the Furby upside down with the tail facing away from you.

  6. Hasbro Furby 2012 Switch Replacement: étape 6, image 1 de 3 Hasbro Furby 2012 Switch Replacement: étape 6, image 2 de 3 Hasbro Furby 2012 Switch Replacement: étape 6, image 3 de 3
    • Insert a metal prying tool directly into the clip opening.

    • Press upward into the clip. At the same time, use your other hand to pull away the plastic seam from the Furby's body.

    • Repeat the previous step to remove the remaining three clips.

  7. Hasbro Furby 2012 Switch Replacement: étape 7, image 1 de 3 Hasbro Furby 2012 Switch Replacement: étape 7, image 2 de 3 Hasbro Furby 2012 Switch Replacement: étape 7, image 3 de 3
    • Locate the two 10mm screws and remove them with the Phillips #0 head screwdriver.

    • Lift up on the fur covering until the face of the Furby is exposed.

  8. Hasbro Furby 2012 Switch Replacement: étape 8, image 1 de 3 Hasbro Furby 2012 Switch Replacement: étape 8, image 2 de 3 Hasbro Furby 2012 Switch Replacement: étape 8, image 3 de 3
    • Orient the Furby on its side to where the beak is facing left and locate the edge of the aluminum tape.

    • Lift tape gently and peel back until the tape is nearly removed.

    • Do not pull on the yellow wire located on the opposite end of the tape.

  9. Hasbro Furby 2012 Switch Replacement: étape 9, image 1 de 2 Hasbro Furby 2012 Switch Replacement: étape 9, image 2 de 2
    • Locate the four 10mm screws. Two on either side of body, and two on top of back plate, around the tape.

    • Remove the 10mm screws with the Phillips#0 screwdriver.

  10. Hasbro Furby 2012 Switch Replacement: étape 10, image 1 de 1
    • Peel the tape gently, grabbing it from the bottom edge and folding the tape upward.

    • Peel the tape up until it is nearly detached from the black case.

  11. Hasbro Furby 2012 Switch Replacement: étape 11, image 1 de 2 Hasbro Furby 2012 Switch Replacement: étape 11, image 2 de 2
    • Orient the Furby face down, with the base facing away from you.

    • Locate the clips below the ears.

    • Repeat the technique used in Step 6. Create leverage using a metal prying tool to press upward into the clip, while also pulling back on the clip itself.

  12. Hasbro Furby 2012 Switch Replacement: étape 12, image 1 de 2 Hasbro Furby 2012 Switch Replacement: étape 12, image 2 de 2
    • Remove the loose, plastic back panel by pulling the panel away from Furby's body.

  13. Hasbro Furby 2012 Switch Replacement, Switch: étape 13, image 1 de 2 Hasbro Furby 2012 Switch Replacement, Switch: étape 13, image 2 de 2
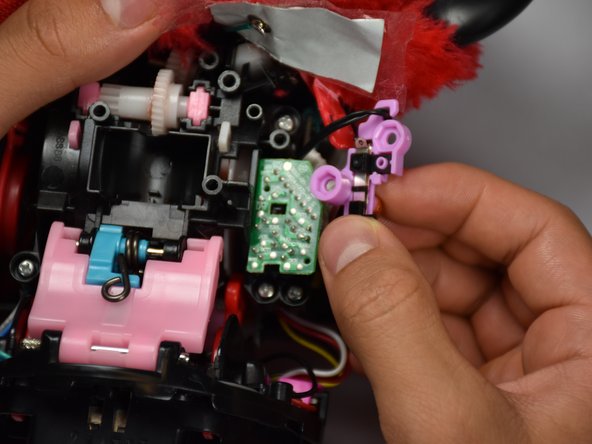
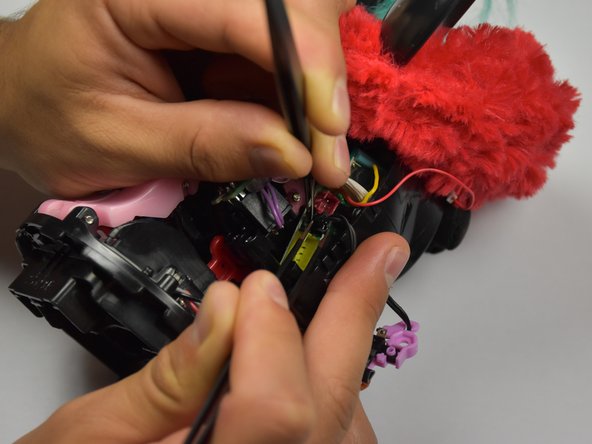
    • Locate and remove the two screws holding in the switch using J0 Phillips Head Screw Driver.

  14. Hasbro Furby 2012 Switch Replacement: étape 14, image 1 de 2 Hasbro Furby 2012 Switch Replacement: étape 14, image 2 de 2
    • Orient the Furby with the beak facing right.

    • Using the blunt and pointed tweezers, remove the black connector.

    • Insert the new switch in place of where the previous connector was located.

Conclusion

To reassemble your device, follow these instructions in reverse order.

Une autre personne a terminé cette réparation.

Jordan Castillo

Membre depuis le 10/06/16

912 Réputation

5 tutoriels rédigés

Équipe

Cal Poly, Team 15-5, Livingston Fall 2016 Membre de l'équipe Cal Poly, Team 15-5, Livingston Fall 2016

CPSU-LIVINGSTON-F16S15G5

4 membres

9 tutoriels rédigés

Un commentaire

Did someone find a replacement furby switch? Or found a way to repair the one inside the furby already?

Frubyx - Réponse

Ajouter un commentaire

Nombre de vues :

Dernières 24 heures : 1

7 derniers jours : 2

30 derniers jours : 15

Total : 1,304